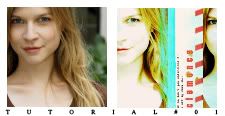
Tutorial 01
My first tutorial

NOTE: I USED PS CS2 FOR THIS TUTORIAL
Step 01: Get your base. I used this:

Step 02: Duplicate your background and set to screen 100%. Now go to Layer - New Adjustment Layer - Hue/Saturation and
change ONLY the mode to Soft Light. Click OK two times. Duplicate it once:

Step 03: Now you can work a little bit with the background (only the backgorund) using the curves (i worked only with the RGB channel). This is a
optional step. The background should looks like this:

The image should looks like this:

Step 04: Make a new layer, fill it with # f9e2d7 and set to darken 100%. Make other layer, fill it with #7de7f0 and set to overlay 50%.
Flaten the image:

Step 05: Create a new canvas and fill it with # fbf2ea and paste the image two times. Move one layer to the left, other to the right. You can delet
some parts of the image.

Step 06: Past this texture from gender and set to darken 100%.

Use this brush from illgoest , color: # ea5549

The icon should looks like this:

Step 07:Use this brush from illgoest too, color: #d39e52.

Put some text... and:

Hope this could be useful, and SORRY for my bad english ^_^
Thanks

NOTE: I USED PS CS2 FOR THIS TUTORIAL
Step 01: Get your base. I used this:

Step 02: Duplicate your background and set to screen 100%. Now go to Layer - New Adjustment Layer - Hue/Saturation and
change ONLY the mode to Soft Light. Click OK two times. Duplicate it once:

Step 03: Now you can work a little bit with the background (only the backgorund) using the curves (i worked only with the RGB channel). This is a
optional step. The background should looks like this:

The image should looks like this:

Step 04: Make a new layer, fill it with # f9e2d7 and set to darken 100%. Make other layer, fill it with #7de7f0 and set to overlay 50%.
Flaten the image:

Step 05: Create a new canvas and fill it with # fbf2ea and paste the image two times. Move one layer to the left, other to the right. You can delet
some parts of the image.

Step 06: Past this texture from gender and set to darken 100%.

Use this brush from illgoest , color: # ea5549

The icon should looks like this:

Step 07:Use this brush from illgoest too, color: #d39e52.

Put some text... and:
Hope this could be useful, and SORRY for my bad english ^_^
Thanks