(no subject)
Tutorial #5 - as requested
Aerith Icon - Photo Filter
Learn how to go from:
to
In 4 east steps. *Photo Filter *Color Layers * Layer Modes
Today we're going to make this lovely icon of Aerith. It's not your usual icon, since the original base was blue-ish. This tutorial is for screencaps with unusual colorings of the screencaps. Caps of GoF might work. And I'm told that this only works for later versions of Photoshop, but not entirely sure. Sorry. ^-^
1. We start off by aquiring a base. Get your screencap or whatever you're using and crop it to a square. Then re-size it to 100x100. This is my base:
My base:
2. Okay, duplicate your base twice. Set the bottom duplicate to Soft Light 100%. Set the top duplicate to Screen. Adjust the opacity of the Screen layer to suit your image so that it's not too bright nor too dark. I set mine to 47%. Sharpen the Screened layer and Fade Sharpen as needed.
I achieved this after completing this step:
3. This next step is a crucial part to making the icon. It's certainly easy and it all depends on the original image.
The Photo Filter Adjustment Layer is misused and well missed Adjustment Layer. It's located here:
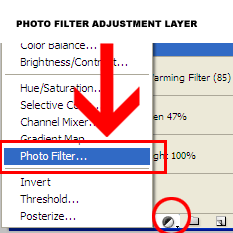
To continue on the icon making, click on Photo Filter on the Adjustment Layer menu. The image below shows the Photo Filter window.
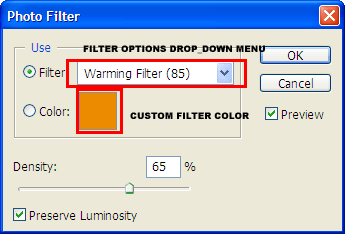
For this particular icon, I'm going to use Warming Filter (85) at 65% Density. It takes out the blue and replaces it with creamy peach color. I chose the Warming Filter because I wanted to counter balance the blue. For example, you have an orange-ish screencap, use one of the Cooling Filters available in the Filter options drop down menu.
I had options to use either the Warming Filter mentioned above, Orange Filter or the Sepia Filter. I chose the Warming Filter because it stronger than both the Orange and Sepia Filter.
Also try out different degrees of Density, it's somewhat like Opacity; the higher the degree the more intense the filter. I chose 65%, not too strong but you can still notice the peach color.
Finally, click Okay after choosing which Filter and Density you would like to use. Set the Adjustment Layer to Normal.
After using the Photo Filter:
4. One final layer. Create a new layer and fill it with #c1c1c1, a light-medium grey. Set it to Color Burn 100%. This intensifies the colors. And voila! The lovely Aerith icon!

Variations of this technique: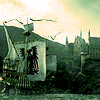
using a bluish base of GoF.
Please comment, and show me what you made! Feel free to Mem this, friend me and check out my other tutorials too.
Aerith Icon - Photo Filter
Learn how to go from:

to

In 4 east steps. *Photo Filter *Color Layers * Layer Modes
Today we're going to make this lovely icon of Aerith. It's not your usual icon, since the original base was blue-ish. This tutorial is for screencaps with unusual colorings of the screencaps. Caps of GoF might work. And I'm told that this only works for later versions of Photoshop, but not entirely sure. Sorry. ^-^
1. We start off by aquiring a base. Get your screencap or whatever you're using and crop it to a square. Then re-size it to 100x100. This is my base:
My base:

2. Okay, duplicate your base twice. Set the bottom duplicate to Soft Light 100%. Set the top duplicate to Screen. Adjust the opacity of the Screen layer to suit your image so that it's not too bright nor too dark. I set mine to 47%. Sharpen the Screened layer and Fade Sharpen as needed.
I achieved this after completing this step:

3. This next step is a crucial part to making the icon. It's certainly easy and it all depends on the original image.
The Photo Filter Adjustment Layer is misused and well missed Adjustment Layer. It's located here:

To continue on the icon making, click on Photo Filter on the Adjustment Layer menu. The image below shows the Photo Filter window.

For this particular icon, I'm going to use Warming Filter (85) at 65% Density. It takes out the blue and replaces it with creamy peach color. I chose the Warming Filter because I wanted to counter balance the blue. For example, you have an orange-ish screencap, use one of the Cooling Filters available in the Filter options drop down menu.
I had options to use either the Warming Filter mentioned above, Orange Filter or the Sepia Filter. I chose the Warming Filter because it stronger than both the Orange and Sepia Filter.
Also try out different degrees of Density, it's somewhat like Opacity; the higher the degree the more intense the filter. I chose 65%, not too strong but you can still notice the peach color.
Finally, click Okay after choosing which Filter and Density you would like to use. Set the Adjustment Layer to Normal.
After using the Photo Filter:

4. One final layer. Create a new layer and fill it with #c1c1c1, a light-medium grey. Set it to Color Burn 100%. This intensifies the colors. And voila! The lovely Aerith icon!

Variations of this technique:

using a bluish base of GoF.
Please comment, and show me what you made! Feel free to Mem this, friend me and check out my other tutorials too.