Tutorial 2
Here's tutorial 2. *gasp* This early? Haha. I'm bored. :)
We'll go from this:
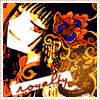
to this:
1) Prepare your base (Do the usual. Just flatten if you have layers.). Set it aside. :)
2) Open a new 94x94 px canvas.
3) Fill with #411a4d.
4) Fill with #526bb2 and set to Exclusion 30%.
5) Fill with #391744 and set to Soft Light.
6) Grab your base again and copy and paste it to the blank (color-filled) canvas. Set it to Linear Light.

7) Use this gradient and set it to Soft Light. (Credit to the maker. If you know who she/he is, please do tell.)

>
8) Duplicate your base and set to Soft Light.

9) Create a new Hue/Saturation Layer. Adjust to your preferences. (I increased the Saturation to 44 and the Lightness to 20)

10) New Selective Color layer:
Reds: -1, -19, 19, 0
Blues: 100, 67, -82, 30
Whites: 100, 100, 100, -2
Neutrals: 59, 33, 17, -7
Blacks: 100, 100, 100, 100

11) Add a glowy dot by faintscribbles. :) Put it where you prefer and set it to Screen.

>
12) Using the Rectangular Marquee Tool, create a rectangular (duh-ness) box and fill it with the color of your choice. Adjust the position to your liking.

13) Add text. (Mine is "royalty". Violation, 14 pt, Tracking: 100, b-ed and i-ed)

14) Flatten. Open a new 100x100 px canvas. Paste there.
15) Put your favorite border brush and it's finished. (I adjusted the opacity of my border so it'd suit my icon.)

Finished! Again, experiment and adjust! I'd like to see the greatness of your work so include an image of your outcome? I'd be happy. :D
[x]Comments are very much appreciated
Next tutorials wouldn't be posted for a while. School's being a bully. :|
We'll go from this:

to this:

1) Prepare your base (Do the usual. Just flatten if you have layers.). Set it aside. :)
2) Open a new 94x94 px canvas.
3) Fill with #411a4d.
4) Fill with #526bb2 and set to Exclusion 30%.
5) Fill with #391744 and set to Soft Light.
6) Grab your base again and copy and paste it to the blank (color-filled) canvas. Set it to Linear Light.

7) Use this gradient and set it to Soft Light. (Credit to the maker. If you know who she/he is, please do tell.)

>

8) Duplicate your base and set to Soft Light.

9) Create a new Hue/Saturation Layer. Adjust to your preferences. (I increased the Saturation to 44 and the Lightness to 20)

10) New Selective Color layer:
Reds: -1, -19, 19, 0
Blues: 100, 67, -82, 30
Whites: 100, 100, 100, -2
Neutrals: 59, 33, 17, -7
Blacks: 100, 100, 100, 100

11) Add a glowy dot by faintscribbles. :) Put it where you prefer and set it to Screen.

>

12) Using the Rectangular Marquee Tool, create a rectangular (duh-ness) box and fill it with the color of your choice. Adjust the position to your liking.

13) Add text. (Mine is "royalty". Violation, 14 pt, Tracking: 100, b-ed and i-ed)

14) Flatten. Open a new 100x100 px canvas. Paste there.
15) Put your favorite border brush and it's finished. (I adjusted the opacity of my border so it'd suit my icon.)

Finished! Again, experiment and adjust! I'd like to see the greatness of your work so include an image of your outcome? I'd be happy. :D
[x]Comments are very much appreciated
Next tutorials wouldn't be posted for a while. School's being a bully. :|