Roxas tutorial
Someone asked me how I got the texture in the backgrounds of some of my icons, so I've made a tutorial!
Sorry if this is a little hard to follow, this is my first time writing one of these. If you have any questions about it, just ask.
This is image heavy. Sorry dial-up users!
We'll be making this icon today using PS7.

First take your base

and crop it to 100x100. Do auto-levels and auto-color.
If you're using the same picture I am, it should look something like this.

Then copy the base and desaturate it. Copy the base again and bring it to the top. Sharpen
and set it on soft light.

Next, I used this texture by soulspring.
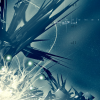
Set it to screen and erase the part covering Roxas.

Next I wanted to bring out the red in his shirt. So, I selected a red from his collar in the base picture, made a new layer, colored in the collar on his shirt and set the layer to color.

Duplicate the base again, bring it to the top, sharpen and set to overlay.

Next I used another texture by soulspring.

Set it to screen and erase the part covering Roxas.

Then I used a border by meleada

Set it to multiply and you're done!
This is what I use for some of my icons, depending on how I want it to look, I may erase the background of a base and place the texture under it instead.
Just play around with it. I hope this helped!
If you used this tutorial, I'd love to see what you made with it. ^_^
Feel free to visit my journal and check out some of the other icons I've made!
Sorry if this is a little hard to follow, this is my first time writing one of these. If you have any questions about it, just ask.
This is image heavy. Sorry dial-up users!
We'll be making this icon today using PS7.
First take your base
and crop it to 100x100. Do auto-levels and auto-color.
If you're using the same picture I am, it should look something like this.
Then copy the base and desaturate it. Copy the base again and bring it to the top. Sharpen
and set it on soft light.
Next, I used this texture by soulspring.
Set it to screen and erase the part covering Roxas.
Next I wanted to bring out the red in his shirt. So, I selected a red from his collar in the base picture, made a new layer, colored in the collar on his shirt and set the layer to color.
Duplicate the base again, bring it to the top, sharpen and set to overlay.
Next I used another texture by soulspring.
Set it to screen and erase the part covering Roxas.
Then I used a border by meleada
Set it to multiply and you're done!
This is what I use for some of my icons, depending on how I want it to look, I may erase the background of a base and place the texture under it instead.
Just play around with it. I hope this helped!
If you used this tutorial, I'd love to see what you made with it. ^_^
Feel free to visit my journal and check out some of the other icons I've made!