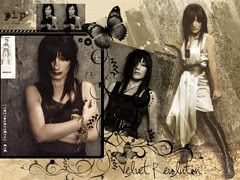
Tori Amos Wallpaper using Photoshop CS
The other day I was trying to figure out how to answer someone's question about making wallpapers with multiple images without just blending them together. After a lot of thought and several tries I came up with a wallpaper that seemed somewhat suitable and I decided to try to recreate it as a tutorial. I used Photoshop CS, but the only major difference for PSP would be the brushes. Although I created this to be a 1024x768 wallpaper I resized the pictures showing the steps so they wouldn't quite so large. Also, thank you to all the people whose resources I have used in creating this wallpaper.
preview:

I opened a new 1024x768 image. I wanted start out with a really creamy color so I chose #F1E7CC. Then I wanted to add a scratchy texture so I went to Zombie Stock and found this texture. I resized it, desaturated it, pasted it on top of the creamy layer and set it to Color Burn.

I went to Here in My Head and found four pictures of Tori's "Pip". I found a rather large picture, resized it to a height of 768, and pasted it on top of the texture layer. I set the layer to Hard Light.

I then created a mask by going to the botom of the layer pallet and clicking the "Add Vector Mask" (which looks like a rectangle with a circle in the middle). By creating the mask, I could erase bits of the image without worrying about making mistakes. Black hides the image behind it and white reveals it. While in the mask I used a brush from the set Watercolor1 by Env1ro.

I created a new layer beneath the above image and using the same brush set, I placed two brush strokes with the color #887E5E. I set the layer to Multiply.

I took the second picture, resized it, and pasted it as a new layer. In order to get rounded corners I followed this tutorial.

Now I created a new layout under the image and used the rounded rectangle set at #000000 to create a black rectangle under the image. I will refer to this as the border layer.

In order to perk up the color in the image I duplicated the image layer, set it to Soft Light, and went to Layer/Merge Down.

I took a third image, resized it, and went to Image/Adjustments/Desaturate. To make the image a little more lively I went to Image/Adjustments/Auto Contrast.

I set the layer to Multiply and moved it below the black border layer. Then I created another mask over this image. Using the brush titled "recifebrush5" by Misprinted Type to make the borders jagged.

I went to Image/Free Transform and rotated the image a little bit. I than placed a new layer under the image and used a splatter brush from the Env1ro set with the color set on #F1E7CC to put the creamy color under her face. I then took the Smudge Tool from the Tool Pallet by hitting the "r" key on my keyboard, used a Basic Brush, and smudged the brush so her face did not look splotchy.

I created two layers--one on top of all of the images and one below the black border layer. I then used a brush from Coolwing called Butteryfly-Flowers-Brushes set on #000000 to create the large butterfly (which I had to press three times) and the swirls. I put another swirl on the layer underneath the black border.

I went the border layer and erased the bits that covered the butterfly.

I took a forth image and resized it to a really small size, desatured it, and Auto Contrasted it. I then pasted it as a new layer twice, lined the two pictures up, and merged them.

I use a brush from Feel Resources called Feel_Brush_Masks01 to create a black border. I carefully placed the brush three times until it reached the butterfly and cut off the extra bits.

I found a image with the name "Pip" on it, pasted it just below the black border, and set it to Multiply.

I created a new layer just above the texture layer and added another brush from the Env1ro set with the color set on #C0AB84. I set the layer to Multiply.

I wanted to add some text on the bottom of the image. The text settings were Susie's Hand, 100 pt, -25 tracking, Smooth. (The tracking can be found on the Character pallet with AV over a line with arrows on each end).

I created a new layout on top of everything and added a butterfly from the earlier brush set.

I didn't like the way the images looked around the large butterfly brush, so I went to the two images and erased the bits under the butterfly.

Finally I merged all the layers (Layer/Merge All). In order to sharpen the image a bit I then went to Filter/Sharpen/Unsharpen Mask and put the settings at Amount 25% and Radius 2.1 pixels.
preview:


I opened a new 1024x768 image. I wanted start out with a really creamy color so I chose #F1E7CC. Then I wanted to add a scratchy texture so I went to Zombie Stock and found this texture. I resized it, desaturated it, pasted it on top of the creamy layer and set it to Color Burn.

I went to Here in My Head and found four pictures of Tori's "Pip". I found a rather large picture, resized it to a height of 768, and pasted it on top of the texture layer. I set the layer to Hard Light.

I then created a mask by going to the botom of the layer pallet and clicking the "Add Vector Mask" (which looks like a rectangle with a circle in the middle). By creating the mask, I could erase bits of the image without worrying about making mistakes. Black hides the image behind it and white reveals it. While in the mask I used a brush from the set Watercolor1 by Env1ro.

I created a new layer beneath the above image and using the same brush set, I placed two brush strokes with the color #887E5E. I set the layer to Multiply.

I took the second picture, resized it, and pasted it as a new layer. In order to get rounded corners I followed this tutorial.

Now I created a new layout under the image and used the rounded rectangle set at #000000 to create a black rectangle under the image. I will refer to this as the border layer.

In order to perk up the color in the image I duplicated the image layer, set it to Soft Light, and went to Layer/Merge Down.

I took a third image, resized it, and went to Image/Adjustments/Desaturate. To make the image a little more lively I went to Image/Adjustments/Auto Contrast.

I set the layer to Multiply and moved it below the black border layer. Then I created another mask over this image. Using the brush titled "recifebrush5" by Misprinted Type to make the borders jagged.

I went to Image/Free Transform and rotated the image a little bit. I than placed a new layer under the image and used a splatter brush from the Env1ro set with the color set on #F1E7CC to put the creamy color under her face. I then took the Smudge Tool from the Tool Pallet by hitting the "r" key on my keyboard, used a Basic Brush, and smudged the brush so her face did not look splotchy.

I created two layers--one on top of all of the images and one below the black border layer. I then used a brush from Coolwing called Butteryfly-Flowers-Brushes set on #000000 to create the large butterfly (which I had to press three times) and the swirls. I put another swirl on the layer underneath the black border.

I went the border layer and erased the bits that covered the butterfly.

I took a forth image and resized it to a really small size, desatured it, and Auto Contrasted it. I then pasted it as a new layer twice, lined the two pictures up, and merged them.

I use a brush from Feel Resources called Feel_Brush_Masks01 to create a black border. I carefully placed the brush three times until it reached the butterfly and cut off the extra bits.

I found a image with the name "Pip" on it, pasted it just below the black border, and set it to Multiply.

I created a new layer just above the texture layer and added another brush from the Env1ro set with the color set on #C0AB84. I set the layer to Multiply.

I wanted to add some text on the bottom of the image. The text settings were Susie's Hand, 100 pt, -25 tracking, Smooth. (The tracking can be found on the Character pallet with AV over a line with arrows on each end).

I created a new layout on top of everything and added a butterfly from the earlier brush set.

I didn't like the way the images looked around the large butterfly brush, so I went to the two images and erased the bits under the butterfly.

Finally I merged all the layers (Layer/Merge All). In order to sharpen the image a bit I then went to Filter/Sharpen/Unsharpen Mask and put the settings at Amount 25% and Radius 2.1 pixels.