.018
2 TUTORIALS
requested by goreplz and spg_spn_girls

>>>
using Adobe Photoshop CS
ONE
To prep the cap, duplicate the layer 3 times then set it to Multiply > Screen > Screen all at 100%. if you notice the cap is now too bright it's just so the next step works better. Create a new layer and stamp the image on it and set it to Soft Light. Then delete one screen layer. I do it this way so I get better light/contrast. the cap now looks like this:

TWO
Stamp the image into an new layer and resize the canvas to 100x100. Move/rransform the cap until you find a crop you like. The icon base now looks like this

THREE
now for coloring. create a new fill layer #FCEBD9 and set it to multiply, 100% this will give her richer skin color

>>>
FOUR
for lighting, paint white blobs in a new layers in the area where the light source is coming from. In this case, it's coming from the sky. more info on my lighting process here

FIVE
create a new layer, stamp the image and set it to multiply at 33%, this is so the light blobs blend better into the image and you keep some of the original colors you had in step 3.

SIX
I duplicated the Multiply layer, put a gaussian blur filter (around 1.0px) and set it to Soft Light at 33% for better contrast

>>>
SEVEN
To sharpen, I create a new layer, stamp the image and filter > sharpen. I desaturate it so the colors are not affected and set it to Hard Light, 12%

>>>
EIGHT
Usually at this point, I'm done but I want to get richer colors still so under the Multiply layer (in step 5), I create a new gradient fill layer #FFCC74 to white and set it to linear burn. I rasterize it and move/transform it around until I'm satisfied

>>>
NINE
since my style right now is muted coloring I wanted the whites to not be so...white. You can do this with levels or selective color but a shorter way is to create a light gray color fill layer #E2E4E6 and set it to multiply, I adjust the opacity until I'm happy so this is at 50%

>>>
TEN
create a brightness/contrast layer and set it to +5/-10 and we're done!

~

>>>
using Adobe Photoshop CS
ONE
Prepare the cap. again, duplicate original cap 3 times and set them to multiply > screen > screen then create a new layer, stamp the image and set it to soft light. the result is a little too bright so I lower the opacity of one layer to 33%. this is the result:

TWO
Resize the canvas to 100x100 and find a crop you like. I settled on this:

If I remember correctly, I also did a bit of smudging away the white light above his left shoulder and whatever that thing is on his right shoulder just so the background is more solid.
THREE
this was for the color palette sidequest at theiconquest so all of the colors i used is from the rogue palette there. anyway, as usual I like to start out with a beige-y color fill layer for the skin tone so I pick the first first color in the palette #F5EFD0 and set it to multiply, 100%

>>>
FOUR
lighting time! the source of light comes from the left so I place a light blob there.

FIVE
At this time I decide that I can work with the 4th color in the rogue palette so I create a new color layer #435E42 and set it on Soft Light, 100% to put more green tones

>>>
FIVE
to get deeper colors, I stamp the image on a new layer and set it to Multiply, 33%

SIX
I want more greens in the shadows so I duplicated the green color layer and set it to Lighten, 33%. (this stays under the Multiply layer so that the effect is more subtle)
>>>
SEVEN
create a new layer (above the multiply layer in step five) and stamp the image there. apply filter > gaussian blur 1.0px and set it to Soft Light, 50%

>>>
EIGHT
to sharpen, stamp the image on a new layer, Filter > Sharpen, desaturate it so the colors aren't affected and set it to Hard Light--after a few adjustments, I settle at 20%

>>>
NINE
add a brightness/contrast layer set at +5/-15

TEN
I decide I want a bit of texture so I stamp the image in a new layer go to Filter > Film Grain. it wasn't enough so I filter it again using Rough Pastels. I set it to Overlay to add a little more contrast, at 20%

>>>
ELEVEN
to make the colors more muted, create a white saturation layer and set it at 20% and the icon's done!

More questions/clarifications? Ask away...

Ask The Maker || My Thread
profile | resources | tags | old icons | watch | request
requested by goreplz and spg_spn_girls
>>>
using Adobe Photoshop CS
ONE
To prep the cap, duplicate the layer 3 times then set it to Multiply > Screen > Screen all at 100%. if you notice the cap is now too bright it's just so the next step works better. Create a new layer and stamp the image on it and set it to Soft Light. Then delete one screen layer. I do it this way so I get better light/contrast. the cap now looks like this:
TWO
Stamp the image into an new layer and resize the canvas to 100x100. Move/rransform the cap until you find a crop you like. The icon base now looks like this
THREE
now for coloring. create a new fill layer #FCEBD9 and set it to multiply, 100% this will give her richer skin color
>>>
FOUR
for lighting, paint white blobs in a new layers in the area where the light source is coming from. In this case, it's coming from the sky. more info on my lighting process here
FIVE
create a new layer, stamp the image and set it to multiply at 33%, this is so the light blobs blend better into the image and you keep some of the original colors you had in step 3.
SIX
I duplicated the Multiply layer, put a gaussian blur filter (around 1.0px) and set it to Soft Light at 33% for better contrast
>>>
SEVEN
To sharpen, I create a new layer, stamp the image and filter > sharpen. I desaturate it so the colors are not affected and set it to Hard Light, 12%
>>>
EIGHT
Usually at this point, I'm done but I want to get richer colors still so under the Multiply layer (in step 5), I create a new gradient fill layer #FFCC74 to white and set it to linear burn. I rasterize it and move/transform it around until I'm satisfied
>>>
NINE
since my style right now is muted coloring I wanted the whites to not be so...white. You can do this with levels or selective color but a shorter way is to create a light gray color fill layer #E2E4E6 and set it to multiply, I adjust the opacity until I'm happy so this is at 50%
>>>
TEN
create a brightness/contrast layer and set it to +5/-10 and we're done!
~
>>>
using Adobe Photoshop CS
ONE
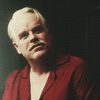
Prepare the cap. again, duplicate original cap 3 times and set them to multiply > screen > screen then create a new layer, stamp the image and set it to soft light. the result is a little too bright so I lower the opacity of one layer to 33%. this is the result:
TWO
Resize the canvas to 100x100 and find a crop you like. I settled on this:
If I remember correctly, I also did a bit of smudging away the white light above his left shoulder and whatever that thing is on his right shoulder just so the background is more solid.
THREE
this was for the color palette sidequest at theiconquest so all of the colors i used is from the rogue palette there. anyway, as usual I like to start out with a beige-y color fill layer for the skin tone so I pick the first first color in the palette #F5EFD0 and set it to multiply, 100%
>>>
FOUR
lighting time! the source of light comes from the left so I place a light blob there.
FIVE
At this time I decide that I can work with the 4th color in the rogue palette so I create a new color layer #435E42 and set it on Soft Light, 100% to put more green tones
>>>
FIVE
to get deeper colors, I stamp the image on a new layer and set it to Multiply, 33%
SIX
I want more greens in the shadows so I duplicated the green color layer and set it to Lighten, 33%. (this stays under the Multiply layer so that the effect is more subtle)
>>>
SEVEN
create a new layer (above the multiply layer in step five) and stamp the image there. apply filter > gaussian blur 1.0px and set it to Soft Light, 50%
>>>
EIGHT
to sharpen, stamp the image on a new layer, Filter > Sharpen, desaturate it so the colors aren't affected and set it to Hard Light--after a few adjustments, I settle at 20%
>>>
NINE
add a brightness/contrast layer set at +5/-15
TEN
I decide I want a bit of texture so I stamp the image in a new layer go to Filter > Film Grain. it wasn't enough so I filter it again using Rough Pastels. I set it to Overlay to add a little more contrast, at 20%
>>>
ELEVEN
to make the colors more muted, create a white saturation layer and set it at 20% and the icon's done!
More questions/clarifications? Ask away...
Ask The Maker || My Thread
profile | resources | tags | old icons | watch | request