.032
2 TUTORIALS
requested by reebeecaa and angelamaria

>>>
using Adobe Photoshop CS
ONE
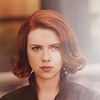
I once again prepare the cap using duplicated layers. For this cap I have the Base > Muliply > Screen > Screen then stamp the visible image into a new layer and set it on Soft LIght. All layers are at 100%

I resize my canvas to 100x100 and settle on a crop. Center, as usual, because I'm boring that way.
TWO
I find the whites too bright so I create a new color fill layer #FFFBEF and set it to multiply 100%

>>>
THREE
I add a couple of light blobs

>>>
I want to highlight some parts of her face so I create a few more blobs and set it to Soft Light 100%

>>>
FOUR
to deepen the colors I stamp the image on a new layer and set it to Multiply 20%

FIVE
now for coloring. again, this is all done below the Muliply layer in the previous step. create a color fill layer #594B2D and set it to Hard Light 20% to lighten some of the blacks

>>>
Too deepen skin tones, create a new Gradient Fill layer #EDCAAE to transparent (pictured below on white so you can see it easier) and set it to Linear Burn 100%. Then rasterize/transform and move it around your canvas until you're satisfied it hits the right areas of her face.

>>>
It's too orange so create a White color fill layer on Saturation 20%

SIX
For sharpening/contrast create a new layer and stamp the visible image. Desaturate it so the colors are not too affected and set it to Hard LIght 20%

>>>
SEVEN
You can probably skip this step since i don't even know if the effect is obvious but to add texture, I set this texture by happy_harper13 to screen 20%

>>>
wasn't too happy with that so I tried again, this time with filters. I stamp the image on a new layer and add Film Grain (1, 20, 1) and Paint Daubs (1, 1) to sharpen. I lower the opacity to 20.

>>>
EIGHT
It's too brown so to add a little more color, I add this texture by val_valerie, rotate/transform it until I'm satisfied and set it to Soft Light 50%

>>>
>>>
>>>
NINE
I add a new color fill layer #EBEBEB and set it to Multiply 50% to make the whites less...white

>>>
TEN
I wanted to deepen the colors a bit so I stamp the image in a new layer and set it to Multiply 12%

ELEVEN
And finally add a Brightness/Contrast layer at 5/-5 and we're done!

~

>>>
using Adobe Photoshop CS
ONE
Prep the cap using duplicated layers. Similar to the icon above, the layers in this are Base > Multiply > Screen > Screen > Stamped Image on Soft Light. Then resize the canvas to 100x100 and find your crop *ahem*center*ahem*

TWO
The color is actually lovely already but I want a more moody brown so I create a new color fill layer #422A2A and set it on Hard Light 20%

>>>
THREE
To highlight certain parts of his face and neck, I create a new layer, paint a couple of light blobs and set it on Soft Light

>>>
FOUR
For deeper colors, stamp the image on a new layer and set it to Multiply 33%

FIVE
create a new layer and stamp the image again, desaturate it and sharpen (use fade if it's too strong) then set it to Hard Light 20%

>>>
SIX
I want to add a reddish hue so I create a new color fill layer #A72121 and set it to Lighten 20%

>>>
SEVEN
I add a texture by happy_harper13 and set it to screen 10% for a bit of...texture

>>>
EIGHT
I want it even more moodier so I add more color layers. To deepen the shadows on the left side, I create a new Gradient Fill layer #383A4B to transparent (here on white) and set it to Linear Burn 20%

>>>
To darken the whites, I add a new color fill layer #EDE7E7 and set it to Multiply 75%

>>>
I still want it darker so I create a new Gradient Fill layer #3E1515 to transparent (here on white) and set it to Soft Light 50%

>>>
NINE
add a Brightness/Contrast layer +10/-10

TEN
and lastly, for the text I use these settings for the first and second lines respectively:


I find it a little weak so I duplicate it and add a little blur (shown here on black) drag it below the other text layer to give it support and the icon is done!

>>>
>>>
as usual, if there's anything you want clarified just ask! :)
ask the maker thread | profile | resources | tags | old icons | watch | request
requested by reebeecaa and angelamaria
>>>
using Adobe Photoshop CS
ONE
I once again prepare the cap using duplicated layers. For this cap I have the Base > Muliply > Screen > Screen then stamp the visible image into a new layer and set it on Soft LIght. All layers are at 100%
I resize my canvas to 100x100 and settle on a crop. Center, as usual, because I'm boring that way.
TWO
I find the whites too bright so I create a new color fill layer #FFFBEF and set it to multiply 100%
>>>
THREE
I add a couple of light blobs
>>>
I want to highlight some parts of her face so I create a few more blobs and set it to Soft Light 100%
>>>
FOUR
to deepen the colors I stamp the image on a new layer and set it to Multiply 20%
FIVE
now for coloring. again, this is all done below the Muliply layer in the previous step. create a color fill layer #594B2D and set it to Hard Light 20% to lighten some of the blacks
>>>
Too deepen skin tones, create a new Gradient Fill layer #EDCAAE to transparent (pictured below on white so you can see it easier) and set it to Linear Burn 100%. Then rasterize/transform and move it around your canvas until you're satisfied it hits the right areas of her face.
>>>
It's too orange so create a White color fill layer on Saturation 20%
SIX
For sharpening/contrast create a new layer and stamp the visible image. Desaturate it so the colors are not too affected and set it to Hard LIght 20%
>>>
SEVEN
You can probably skip this step since i don't even know if the effect is obvious but to add texture, I set this texture by happy_harper13 to screen 20%
>>>
wasn't too happy with that so I tried again, this time with filters. I stamp the image on a new layer and add Film Grain (1, 20, 1) and Paint Daubs (1, 1) to sharpen. I lower the opacity to 20.
>>>
EIGHT
It's too brown so to add a little more color, I add this texture by val_valerie, rotate/transform it until I'm satisfied and set it to Soft Light 50%
>>>
>>>
>>>
NINE
I add a new color fill layer #EBEBEB and set it to Multiply 50% to make the whites less...white
>>>
TEN
I wanted to deepen the colors a bit so I stamp the image in a new layer and set it to Multiply 12%
ELEVEN
And finally add a Brightness/Contrast layer at 5/-5 and we're done!
~
>>>
using Adobe Photoshop CS
ONE
Prep the cap using duplicated layers. Similar to the icon above, the layers in this are Base > Multiply > Screen > Screen > Stamped Image on Soft Light. Then resize the canvas to 100x100 and find your crop *ahem*center*ahem*
TWO
The color is actually lovely already but I want a more moody brown so I create a new color fill layer #422A2A and set it on Hard Light 20%
>>>
THREE
To highlight certain parts of his face and neck, I create a new layer, paint a couple of light blobs and set it on Soft Light
>>>
FOUR
For deeper colors, stamp the image on a new layer and set it to Multiply 33%
FIVE
create a new layer and stamp the image again, desaturate it and sharpen (use fade if it's too strong) then set it to Hard Light 20%
>>>
SIX
I want to add a reddish hue so I create a new color fill layer #A72121 and set it to Lighten 20%
>>>
SEVEN
I add a texture by happy_harper13 and set it to screen 10% for a bit of...texture
>>>
EIGHT
I want it even more moodier so I add more color layers. To deepen the shadows on the left side, I create a new Gradient Fill layer #383A4B to transparent (here on white) and set it to Linear Burn 20%
>>>
To darken the whites, I add a new color fill layer #EDE7E7 and set it to Multiply 75%
>>>
I still want it darker so I create a new Gradient Fill layer #3E1515 to transparent (here on white) and set it to Soft Light 50%
>>>
NINE
add a Brightness/Contrast layer +10/-10
TEN
and lastly, for the text I use these settings for the first and second lines respectively:
I find it a little weak so I duplicate it and add a little blur (shown here on black) drag it below the other text layer to give it support and the icon is done!
>>>
>>>
as usual, if there's anything you want clarified just ask! :)
ask the maker thread | profile | resources | tags | old icons | watch | request