42 // #5 tutorial
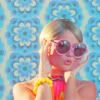
we're going from 
to
1. First crop your image and resize it.
2. Add a new Curves Layer with these settings:
RGB:
1st Point:
Input: 105
Output: 128

3. Add another Curves Layer with these settings:
RGB:
1st Point:
Input: 108
Output: 140

4. Fill a new Solid Color Layer with #E7E31B, and set it to soft light, 58%.

5. Add a new Selective Coloring Layer, with these:
Reds: -100/100/-15/0
Cyans: -100/100/100/0
Neutrals: 55/-10/-55/-20

6. Add a Saturation Layer, and set the Master Saturation at: +45.
and that's all!
another icons made with this technique:
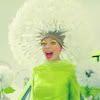

a little tip! you can delete one of the curves layer if it makes your icon too bright! for example, in the kelly icon, i deleted the second one.
to
1. First crop your image and resize it.
2. Add a new Curves Layer with these settings:
RGB:
1st Point:
Input: 105
Output: 128
3. Add another Curves Layer with these settings:
RGB:
1st Point:
Input: 108
Output: 140
4. Fill a new Solid Color Layer with #E7E31B, and set it to soft light, 58%.
5. Add a new Selective Coloring Layer, with these:
Reds: -100/100/-15/0
Cyans: -100/100/100/0
Neutrals: 55/-10/-55/-20
6. Add a Saturation Layer, and set the Master Saturation at: +45.
and that's all!
another icons made with this technique:
a little tip! you can delete one of the curves layer if it makes your icon too bright! for example, in the kelly icon, i deleted the second one.