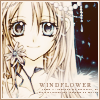
Tutorial #9
Hello, tutorial number nine. This is basically a colouring tutorial and has no use whatsoever. XD;; I'm not entirely proud of this icon but I thought, "Hey, why not try making an icon tutorial using your own resources? Huh?" and this is the outcome.
From this to this:
oo1. Let's start with our base. Mine is Otoumiya Haine from Shinshi Doumei Cross. If you want to adjust it, just go for Auto Contrast/Auto Levels or duplicate the base, set the duplicate to soft light and merge the layers.
oo2. Either create a new layer, fill it with black, set it to Color and fiddle with the opacities OR create a new adjustment layer and selecting Gradient Map (which are easier) and fiddle with its opacity. XD;;
oo3. New layer: Fill it with a slightly grayish-brown color (like #E4D8D0) and set it to Darken.
oo4. New layer: Fill with a navy blue/dark blue color and set to Exclusion (adjust the opacity to your liking).
oo5. Duplicate your base, bring it to the top, desaturate then set to soft light.
oo6. New layer: Fill it with a pale, slightly bright green color, set to Saturation (adjust the opacity to your liking).
oo7. For the next layers, I used my own gradients in adding adjusting the color of the icon. I recommend that you experiment with using your own gradients or playing with color layers. Here's the settings I used for my own though:
- 1 Color Burn layer (adjust the opacity to your liking).
- 4 Soft Light layers (adjust the opacity to your liking).
- 1 Screen layer (set at a very low opacity)
But like I said, EXPERIMENT with the settings and the opacity.
oo8. Another Exclusion layer but darker than the first one. ^_^
oo9. Make a new adjustment layer, select Color Balance and play with the settings to fit your icon.
o1o. New layer: Fill with any light color and set to Color Burn.
o11. Duplicate the base twice and put both layers on top. Desaturate the first duplicate and set it to soft light. For the second duplicate, set it to Soft Light as well.
Basically, you're done, but you can add borders and text if you want. That's all.
From this to this:

oo1. Let's start with our base. Mine is Otoumiya Haine from Shinshi Doumei Cross. If you want to adjust it, just go for Auto Contrast/Auto Levels or duplicate the base, set the duplicate to soft light and merge the layers.
oo2. Either create a new layer, fill it with black, set it to Color and fiddle with the opacities OR create a new adjustment layer and selecting Gradient Map (which are easier) and fiddle with its opacity. XD;;
oo3. New layer: Fill it with a slightly grayish-brown color (like #E4D8D0) and set it to Darken.
oo4. New layer: Fill with a navy blue/dark blue color and set to Exclusion (adjust the opacity to your liking).
oo5. Duplicate your base, bring it to the top, desaturate then set to soft light.
oo6. New layer: Fill it with a pale, slightly bright green color, set to Saturation (adjust the opacity to your liking).
oo7. For the next layers, I used my own gradients in adding adjusting the color of the icon. I recommend that you experiment with using your own gradients or playing with color layers. Here's the settings I used for my own though:
- 1 Color Burn layer (adjust the opacity to your liking).
- 4 Soft Light layers (adjust the opacity to your liking).
- 1 Screen layer (set at a very low opacity)
But like I said, EXPERIMENT with the settings and the opacity.
oo8. Another Exclusion layer but darker than the first one. ^_^
oo9. Make a new adjustment layer, select Color Balance and play with the settings to fit your icon.
o1o. New layer: Fill with any light color and set to Color Burn.
o11. Duplicate the base twice and put both layers on top. Desaturate the first duplicate and set it to soft light. For the second duplicate, set it to Soft Light as well.
Basically, you're done, but you can add borders and text if you want. That's all.