Tutorial #10
Oh, look, my *quickly counts* 10th tutorial? Whatever. Anyway, here's a nice tut, requested by nice people who commented at this post. It's like any manga-coloring tut out there, only I use Kobato and there's a Saturation layer in here, somewhere. So, *cough*. Works for people who have Photoshop, not beginner friendly I think, since I used Channel Mixer and Selective Coloring. *bricked*
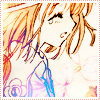
How to make this:
from this.
Step o1. Find a nice, decent-looking manga image. Don't crop it to 100x100 yet! Just...crop the part you like. In my case, I used a image from Kobato, Exam 2. Er, this is where we see Fujimoto leave this store, and Ioryogi yelling at Kobato for having zero common sense.
Step o2. Erase all the black parts surrounding your subject. But don't erase your subject. ^^
Step o3. Color. Basically, you have the freedom to decide what colors your character's clothes would have. Create a new layer (or several layers), grab the brush tool set to the size of 5pt (or 3pt), colorize, and set the layer to multiply. Make sure the colors are on different layers (it's easier that way). (skip this part if your image is simply a colored image with a white background) (this was from my 6th tutorial). Then, you crop it to 100x100.
Step o4. Take this flowerly texture by colorfilter,
and set it to Multiply, 100%. Merge the layers.
Step o5. Take another texture, this time by gender,
. Adjust its opacity to like 20-29%.
Step o6. New layer: Fill it with a dark blue color (ANY DARK BLUE) and set to Exclusion. (ME = EXCLUSION FIEND)
Step o7. Have you heard of those scratch textures? They're quite nice. So I used one (from the_seventhsign) and set it to Screeen. Doesn't really make a difference, but I just like it there.
Step o8. New layer: Pick a slightly grayish green color and fill the layer with it. Set it to Saturation, 30-50% opacity. :D
Step o9. Go to Layer->New Adjustment Layer and select the Channel Mixer. Er, just play with the settings until you got one you like. :) THEN, set to Soft Light.
Step 1o. Back to Base 1! By now, it's merged with the flowerly texture. Duplicate it and set it on top. Set it to Soft Light. :)
Step 11. New Adjustment layer: Gradient Map. Select a drabby-looking gradient, um, like gray blended with brown but still light to the eyes, and set it to Soft Light.
Step 12. Pick any two textures from 77words's Mixed Bag set. You can set them both to Soft Light, or one would be set it to Soft Light and the other would be on Color Burn. Depends. Be creative. :)
Step 13. Another texture!
by awmpdotnet. Set it to Hard Light.
Step 14. Duplicate your base again. Set it on top of everything and set it to Soft Light.
Step 15. Duplicate your base. Set it on top. DESATURATE. Set to Soft Light.
Step 16. Add some light blobs and set them to Lighten.
Step 17. New Adjustment Layer: Selective Coloring. Go and play with the settings. Set to Soft Light.
Step 18. Add your borders and stuff. And you're done!
That was long. Questions? Ask away! ^^ I don't bite.
How to make this:

from this.
Step o1. Find a nice, decent-looking manga image. Don't crop it to 100x100 yet! Just...crop the part you like. In my case, I used a image from Kobato, Exam 2. Er, this is where we see Fujimoto leave this store, and Ioryogi yelling at Kobato for having zero common sense.
Step o2. Erase all the black parts surrounding your subject. But don't erase your subject. ^^
Step o3. Color. Basically, you have the freedom to decide what colors your character's clothes would have. Create a new layer (or several layers), grab the brush tool set to the size of 5pt (or 3pt), colorize, and set the layer to multiply. Make sure the colors are on different layers (it's easier that way). (skip this part if your image is simply a colored image with a white background) (this was from my 6th tutorial). Then, you crop it to 100x100.
Step o4. Take this flowerly texture by colorfilter,

and set it to Multiply, 100%. Merge the layers.
Step o5. Take another texture, this time by gender,

. Adjust its opacity to like 20-29%.
Step o6. New layer: Fill it with a dark blue color (ANY DARK BLUE) and set to Exclusion. (ME = EXCLUSION FIEND)
Step o7. Have you heard of those scratch textures? They're quite nice. So I used one (from the_seventhsign) and set it to Screeen. Doesn't really make a difference, but I just like it there.
Step o8. New layer: Pick a slightly grayish green color and fill the layer with it. Set it to Saturation, 30-50% opacity. :D
Step o9. Go to Layer->New Adjustment Layer and select the Channel Mixer. Er, just play with the settings until you got one you like. :) THEN, set to Soft Light.
Step 1o. Back to Base 1! By now, it's merged with the flowerly texture. Duplicate it and set it on top. Set it to Soft Light. :)
Step 11. New Adjustment layer: Gradient Map. Select a drabby-looking gradient, um, like gray blended with brown but still light to the eyes, and set it to Soft Light.
Step 12. Pick any two textures from 77words's Mixed Bag set. You can set them both to Soft Light, or one would be set it to Soft Light and the other would be on Color Burn. Depends. Be creative. :)
Step 13. Another texture!

by awmpdotnet. Set it to Hard Light.
Step 14. Duplicate your base again. Set it on top of everything and set it to Soft Light.
Step 15. Duplicate your base. Set it on top. DESATURATE. Set to Soft Light.
Step 16. Add some light blobs and set them to Lighten.
Step 17. New Adjustment Layer: Selective Coloring. Go and play with the settings. Set to Soft Light.
Step 18. Add your borders and stuff. And you're done!
That was long. Questions? Ask away! ^^ I don't bite.