anty_: icon tut #002 - Karen Kasumi
I feel lazy and bad because the last 3 updates in this journal were made by watermirror120 XDD But because I'm too ashamed to post icons right now, you guys get a tutorial! 8D
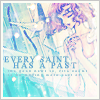
The icon we're making won Second Place at clamp_icontest -- so it can't be as crap as I thought it was xD
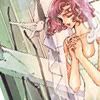
------>
Be warn: basic knowledege of PS7.0, tolerance to pointless rambles and a lot of patience is needed for this tut.
1. First we need our base~ I used this picture of Karen Kasumi from X/1999; just because it was the only picture in my pitiful CLAMP folder that I haven't used yet. But you guys can use whatever you like 8D
So I cropped it, pasted it onto a 100x100 canvas and rotate it around abit, and we get our base :D

2. Yes, the base looks a bit icky, but we're going to touch it up now. Go to Image --> Adjustment --> Colour Balance. Have the preview box ticked and play around with those little bars a bit until you're satisfied.
When you're finished with the colouring, go to Image --> Adjustment --> Brightness/Contrast and fiddle around with that until you're happy with the brightness of the picture
Here is my edited base:
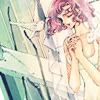
3. Now, let's open a new canvas at 100x100! In this new canvas, I used a gradient by crumblingwalls and slapped some pretty star-cluster brushes from Hybrid Genesis on top. Merge those layers and duplicated once on Overlay, merge again.
We get this thing here:
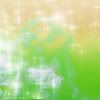
4. Copy the 'thing' and Paste on top of your base. Set it on Soft Light - 100%
You may get rid of the canvas that you used to make the 'thing' now, you don't need it anymore 8D
5. Duplicate the thing. Set it on Lighten 100%. Fiddle around with the Hue and Saturation bar ((found by pressing Ctrl + B)) to find the colours that would match the icon most. You can also lower the opacity of the layer to suit your liking.
My duplicated 'thing' turned out like this in the end:
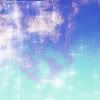
6. Anyhow, that's all the work we're going to do with the 'thing' today. Next, we go mad with gradients~ All the following gradients are by crumblingwalls
- Overlay 100%

- Soft Light - 67%

- Soft Light - 100% I erased a bit of where the gradient was covering her hair
Kk, what colour gradients to use all depends on what picture you're dealing with. And don't just stick to one colour scheme. Always refer to that Hue and Saturation bar when your icon is looking a bit wrong. A bit of hue-modification on one gradient can make a lot of diffrence!
Kay -- with that said, we're half-way through the icon! ((It's long, I know D: But this is one of my simplest icon already ;~;))
7. Duplicate the 'prettified' base, drag it all the way up top of all the layers. Set it on Multiply 10%
Duplicated it again and drag that up top Soft Light 49%
8. Let's fast forward from starting here then! New layer. I selected 1 slim bar using the Rectangular Marquee Tools. Filled it with a light creme colour, #F6F9EF. I then selected Filter --> Blur --> Gaussian Blur at 3-4.
I left the layer with the settings Normal 62%
Duplicate it, shift it around, change opacity.
What the heck was all that for you ask? That's where your text is gonna go.
8. So slap the text on... write whatever you want. I used a quote from Oscar Wilde because that was the theme for that week; but you don't need to know that. What you might need to know is that I used Times New Roman - all caps, kerning 100, 6pt.
While you're at it, make your own tiny text, or slap on a tiny text brush like I did. The one I used was made by colorfilter
9. I swear it's nearly finished.
- Softlight 20%
Duplicate it, set on Screen 100%
If you're wondering where I got that starry texture from, keep reading this small text, if not, skip to the next step.
I got it by cropping from pictures of nebulae; the pics are from here. After cropping, duplicate it twice on Color Dodge and once on Overlay. It takes about 2 seconds and you'll get the starry thing.
10. Last layer! YAY! Gradient also by crumblingwalls

- Lighten 100%
If you want, put a border on it like I did.
There you go, it's done! :D *hands out cookies to all those who made it this far*
I hope the tutorial was helpful, or at least understandable xD I would love to see what you come up with ^o^
The icon we're making won Second Place at clamp_icontest -- so it can't be as crap as I thought it was xD

------>

Be warn: basic knowledege of PS7.0, tolerance to pointless rambles and a lot of patience is needed for this tut.
1. First we need our base~ I used this picture of Karen Kasumi from X/1999; just because it was the only picture in my pitiful CLAMP folder that I haven't used yet. But you guys can use whatever you like 8D
So I cropped it, pasted it onto a 100x100 canvas and rotate it around abit, and we get our base :D

2. Yes, the base looks a bit icky, but we're going to touch it up now. Go to Image --> Adjustment --> Colour Balance. Have the preview box ticked and play around with those little bars a bit until you're satisfied.
When you're finished with the colouring, go to Image --> Adjustment --> Brightness/Contrast and fiddle around with that until you're happy with the brightness of the picture
Here is my edited base:

3. Now, let's open a new canvas at 100x100! In this new canvas, I used a gradient by crumblingwalls and slapped some pretty star-cluster brushes from Hybrid Genesis on top. Merge those layers and duplicated once on Overlay, merge again.
We get this thing here:

4. Copy the 'thing' and Paste on top of your base. Set it on Soft Light - 100%
You may get rid of the canvas that you used to make the 'thing' now, you don't need it anymore 8D
5. Duplicate the thing. Set it on Lighten 100%. Fiddle around with the Hue and Saturation bar ((found by pressing Ctrl + B)) to find the colours that would match the icon most. You can also lower the opacity of the layer to suit your liking.
My duplicated 'thing' turned out like this in the end:

6. Anyhow, that's all the work we're going to do with the 'thing' today. Next, we go mad with gradients~ All the following gradients are by crumblingwalls

- Overlay 100%

- Soft Light - 67%

- Soft Light - 100% I erased a bit of where the gradient was covering her hair
Kk, what colour gradients to use all depends on what picture you're dealing with. And don't just stick to one colour scheme. Always refer to that Hue and Saturation bar when your icon is looking a bit wrong. A bit of hue-modification on one gradient can make a lot of diffrence!
Kay -- with that said, we're half-way through the icon! ((It's long, I know D: But this is one of my simplest icon already ;~;))
7. Duplicate the 'prettified' base, drag it all the way up top of all the layers. Set it on Multiply 10%
Duplicated it again and drag that up top Soft Light 49%
8. Let's fast forward from starting here then! New layer. I selected 1 slim bar using the Rectangular Marquee Tools. Filled it with a light creme colour, #F6F9EF. I then selected Filter --> Blur --> Gaussian Blur at 3-4.
I left the layer with the settings Normal 62%
Duplicate it, shift it around, change opacity.
What the heck was all that for you ask? That's where your text is gonna go.
8. So slap the text on... write whatever you want. I used a quote from Oscar Wilde because that was the theme for that week; but you don't need to know that. What you might need to know is that I used Times New Roman - all caps, kerning 100, 6pt.
While you're at it, make your own tiny text, or slap on a tiny text brush like I did. The one I used was made by colorfilter
9. I swear it's nearly finished.

- Softlight 20%
Duplicate it, set on Screen 100%
If you're wondering where I got that starry texture from, keep reading this small text, if not, skip to the next step.
I got it by cropping from pictures of nebulae; the pics are from here. After cropping, duplicate it twice on Color Dodge and once on Overlay. It takes about 2 seconds and you'll get the starry thing.
10. Last layer! YAY! Gradient also by crumblingwalls

- Lighten 100%
If you want, put a border on it like I did.
There you go, it's done! :D *hands out cookies to all those who made it this far*
I hope the tutorial was helpful, or at least understandable xD I would love to see what you come up with ^o^