anty_: Tutorial 04 -- Rinoa Heartilly; "FANTASY"
Another of those tutorials where I ramble excessively. I couldn't decide which icon to make a tutorial out of from my last batch, so I asked my dear flist instead. A majority of them wanted this one, so here we go :B~
Made in Photoshop 7.0 -- but I think it should translate to other programs... not that I would know, I'm too poor to afford anything else 8D
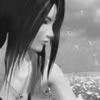
How to turn this: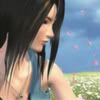
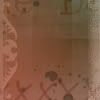
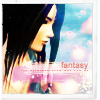
into this: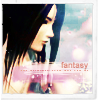
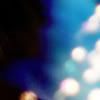
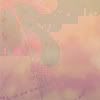
or even this.
Assume every step is a new layer, unless I say otherwise.
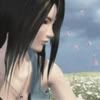
1. Choose your base, I'll be using Rinoa as our model today 8D~
2. Duplicate it, set on Screen 100%.
3. Fill it with a blue gradient ((by crumblingwalls)), set on Exclusion 40%.

4. A greenish gradient this time ((also by crumblingwalls, Colour Burn 44%.

5. Duplicate base and bring it to the top layer, set on Overlay 100%.
6. Duplicate base again, use the Hue and Saturation ((CTRL + B)) to desaturate the image. It all depends on you how much to desaturate. Mine came out like this:
: Overlay 100%
7. Here comes the text layers. I used these two brushes by ewanism to make my text visible:

((#D78DC5 Normal 100%))

((#FDF6F1 Normal 100%))
8. No, the actual text doesn't come yet; now we put this pretty light texture ((by tihana)) on it, Lighten 100%.
9. A completely desaturated version of the base, on Soft Light 100%.
10. Now comes the text. I typed 'fantasy' with font Arial, 6pt, bold. Colour #CE7674. I also added another layer for some tiny text ((a brush by chouchoune)), but that's optional.
11. Nearly done, I swear. Fill it with a light blue colour ((#81A7D2)), set on Soft Light 87%.
12. A texture by faded_icons, Overlay 71%.
13. Now add another gradient by crumblingwalls, set on Saturation 41%. How low or high the opacity is depends on how bright you want the icon to be... it probably doesn't make sense now, but you'll see 8D!

14. Final texture layer, put this texture by gender on Overlay 100%
15. For the finishing touch, put on a polaroid brush. Trend whore? Yes, yes, I am. ((I can't for the life of me remember who it's by ;o; Sorry, but I think its either ewanism or 77words))
And tadaaaa~!:
And if you have skipped step 13, you'll have something blindingly bright like this:
Which some people might like, I dunno 8D...
Ummm, yes, this tutorial has been incredibly long-winded... >>;; *unwittingly spent 40 minutes on it* But I hope it was helpful :DDD I'd love to see what you guys come up with using it :DD Enjoy~ ((and please don't copy the tutorial word for word, it works differently for each image :3))
RANDOM AFFILIATE PLUG: Visit sakuramaboroshi, the icon journal of silma ((formerly known as lilychan85)). There are lots of shiny shiny CLAMP icons. She also write tutorials :DD
Made in Photoshop 7.0 -- but I think it should translate to other programs... not that I would know, I'm too poor to afford anything else 8D
How to turn this:
into this:
or even this.
Assume every step is a new layer, unless I say otherwise.
1. Choose your base, I'll be using Rinoa as our model today 8D~
2. Duplicate it, set on Screen 100%.
3. Fill it with a blue gradient ((by crumblingwalls)), set on Exclusion 40%.
4. A greenish gradient this time ((also by crumblingwalls, Colour Burn 44%.
5. Duplicate base and bring it to the top layer, set on Overlay 100%.
6. Duplicate base again, use the Hue and Saturation ((CTRL + B)) to desaturate the image. It all depends on you how much to desaturate. Mine came out like this:
: Overlay 100%
7. Here comes the text layers. I used these two brushes by ewanism to make my text visible:
((#D78DC5 Normal 100%))
((#FDF6F1 Normal 100%))
8. No, the actual text doesn't come yet; now we put this pretty light texture ((by tihana)) on it, Lighten 100%.
9. A completely desaturated version of the base, on Soft Light 100%.
10. Now comes the text. I typed 'fantasy' with font Arial, 6pt, bold. Colour #CE7674. I also added another layer for some tiny text ((a brush by chouchoune)), but that's optional.
11. Nearly done, I swear. Fill it with a light blue colour ((#81A7D2)), set on Soft Light 87%.
12. A texture by faded_icons, Overlay 71%.
13. Now add another gradient by crumblingwalls, set on Saturation 41%. How low or high the opacity is depends on how bright you want the icon to be... it probably doesn't make sense now, but you'll see 8D!
14. Final texture layer, put this texture by gender on Overlay 100%
15. For the finishing touch, put on a polaroid brush. Trend whore? Yes, yes, I am. ((I can't for the life of me remember who it's by ;o; Sorry, but I think its either ewanism or 77words))
And tadaaaa~!:
And if you have skipped step 13, you'll have something blindingly bright like this:
Which some people might like, I dunno 8D...
Ummm, yes, this tutorial has been incredibly long-winded... >>;; *unwittingly spent 40 minutes on it* But I hope it was helpful :DDD I'd love to see what you guys come up with using it :DD Enjoy~ ((and please don't copy the tutorial word for word, it works differently for each image :3))
RANDOM AFFILIATE PLUG: Visit sakuramaboroshi, the icon journal of silma ((formerly known as lilychan85)). There are lots of shiny shiny CLAMP icons. She also write tutorials :DD