Keira tutorial...
This is my first tutorial ever, but because someone requested it, i decided to give it a try.
I just hope it makes any sense!
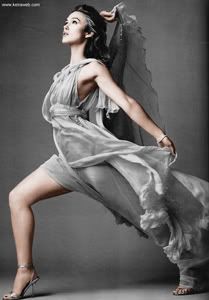
Learn how to go from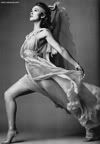
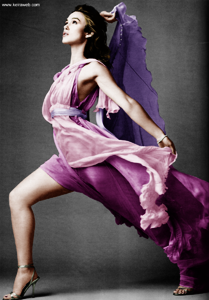
to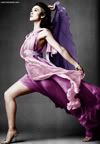
Step 1: Get yourself a large and pretty picture (i decided to use this ), desaturate it if that's necessary, and duplicate the layer (the extra layer is used to make edges more visible by setting it to soft light, multiply or screen)
Step 2: Make a new layer and set it to color (this way you're able to see the picture and the color you're using), select a soft, round brush and pick a color to use for the skin (you can do this by selecting a darker color from the original picture or you can use a brownish/pinkish color, duplicate the skin layer a few times, and mess with variations a bit) and use the brush to cover every pixel of skin.
For my first skin-layer i used #CA9680 and i set the layer to overlay. That turned my lovely picture into this (at 100%):
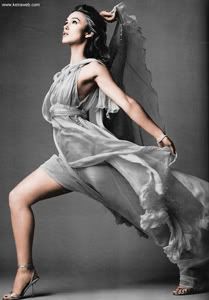
Not bad, but definately too much orange!
Step 3: So duplicate the skin-layer twice (naming them layer 2 and 3 or something like that of course), and using variations i added one layer with #DBAE8D (set to soft light) and one with #DDA19B (also set to soft light).
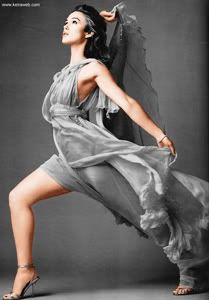
Step 4: I can imagine you're thinking "Where the heck is the improvement?" but, don't forget about the opacity. Set the first skin-layer to 53%, the second to 41% and the third to 34%! That results into this:
Step 5: Now on to the rest! It's basically the same technique for every little part or the picture. Make a layer, name it to make sure you know what's on it, pick a pretty color, use the brushes to cover it up and set the layer to overlay or soft light! The main difference between overlay and soft light is the brightness of the colors, layers set to overlay stand out more than layers set to soft light!
Step 6: For the dress i used #E984AE for the lightpink parts,#730057 for the darkerpink part and #9D7CC3 for the purple parts. Set all the layers to soft light.
I'm not sure about the rest of the colors, because i forgot to save the .psd file after i did the dress. I know, stupid, but i messed around a bit, and the colors mentioned in the next part are pretty close to the original.
Step 7: For the hair i used #4E4329 (set to overlay) and #7C6222 (set to soft light) as an extra color on the lighter parts of her hair.
The eyebrows are the same color as the highlights, but i set the opacity to about 60-70% to make sure they didn't turn out too harsh (they're also set to soft light btw)
Step 8: For the lips i used #803A54, use Gaussian Blur (somewhere between 2 and 3) and set the layer to soft light at 75%.
Step 9: The bracelet and shoes get the same color, #3D4830, set to overlay at 60%.
And in the end you're suppose to get something like this:
Extra tips:
- I didn't color the eyes this time, because they were hardly visible and too dark to color, but normally i use about 3 different colors for them. A medium shade around the iris, a dark shade for the outer circle and a light one in between.
- When you have really blurry edges and it's really hard to see where one part ends and the other part begins, try messing around with the duplicate of your original picture. Sometimes vivid light and linear light can be very helpful.
Comment, try and have fun!!! And don't forget to join!!!
And something totally different, i need your opinion about something, please read this and let me know what you think! it's nothing weird, i promise, just some community stuff!
I just hope it makes any sense!
Learn how to go from

to

Step 1: Get yourself a large and pretty picture (i decided to use this ), desaturate it if that's necessary, and duplicate the layer (the extra layer is used to make edges more visible by setting it to soft light, multiply or screen)
Step 2: Make a new layer and set it to color (this way you're able to see the picture and the color you're using), select a soft, round brush and pick a color to use for the skin (you can do this by selecting a darker color from the original picture or you can use a brownish/pinkish color, duplicate the skin layer a few times, and mess with variations a bit) and use the brush to cover every pixel of skin.
For my first skin-layer i used #CA9680 and i set the layer to overlay. That turned my lovely picture into this (at 100%):

Not bad, but definately too much orange!
Step 3: So duplicate the skin-layer twice (naming them layer 2 and 3 or something like that of course), and using variations i added one layer with #DBAE8D (set to soft light) and one with #DDA19B (also set to soft light).

Step 4: I can imagine you're thinking "Where the heck is the improvement?" but, don't forget about the opacity. Set the first skin-layer to 53%, the second to 41% and the third to 34%! That results into this:

Step 5: Now on to the rest! It's basically the same technique for every little part or the picture. Make a layer, name it to make sure you know what's on it, pick a pretty color, use the brushes to cover it up and set the layer to overlay or soft light! The main difference between overlay and soft light is the brightness of the colors, layers set to overlay stand out more than layers set to soft light!
Step 6: For the dress i used #E984AE for the lightpink parts,#730057 for the darkerpink part and #9D7CC3 for the purple parts. Set all the layers to soft light.
I'm not sure about the rest of the colors, because i forgot to save the .psd file after i did the dress. I know, stupid, but i messed around a bit, and the colors mentioned in the next part are pretty close to the original.
Step 7: For the hair i used #4E4329 (set to overlay) and #7C6222 (set to soft light) as an extra color on the lighter parts of her hair.
The eyebrows are the same color as the highlights, but i set the opacity to about 60-70% to make sure they didn't turn out too harsh (they're also set to soft light btw)
Step 8: For the lips i used #803A54, use Gaussian Blur (somewhere between 2 and 3) and set the layer to soft light at 75%.
Step 9: The bracelet and shoes get the same color, #3D4830, set to overlay at 60%.
And in the end you're suppose to get something like this:

Extra tips:
- I didn't color the eyes this time, because they were hardly visible and too dark to color, but normally i use about 3 different colors for them. A medium shade around the iris, a dark shade for the outer circle and a light one in between.
- When you have really blurry edges and it's really hard to see where one part ends and the other part begins, try messing around with the duplicate of your original picture. Sometimes vivid light and linear light can be very helpful.
Comment, try and have fun!!! And don't forget to join!!!
And something totally different, i need your opinion about something, please read this and let me know what you think! it's nothing weird, i promise, just some community stuff!