Any Program Tutorial
Here I come with another tutorial! Since school has started, I don't have much time on the laptop.
MAKE THESE:




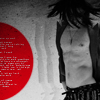


USING ANY PROGRAM!!
01 Open a 100 x 100 canvas and paste this texture BY ME.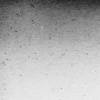
02 Now open any picture MAKE SURE IT HAS A SOLID BG!! If it does not have a solid colored bg. Then figure it out :)
03 Crop your picture however you want it to be. Now press CTRL + SHIFT + U (desaturate) or go to hue/sat. and set the sat. to - 100 and flatten
04 copy your picture (cropped) and paste it on the texture. Set it on Multiply 100%. If the bg is still showing a bit; using a soft brush, erase the edges.
05 Now make a new layer at Multiply 100%. Click on the brush tool and pick a round brush with the size of your choice. I chose a number from 50-80. But that's your choice. Now pick a bright/light color. And on the new layer, stamp the brush. If you do not like the color, undo it and choose another color.
06 Now if you want to make a hole in the circle; choose the eraser tool and pick a round brush but make sure it's smaller than the brush you stamped. Now in the middle of the circle.
07 If you want to put some tiny text. I used Arriere Garde (dafont.com) and wrote:
b;ah blujghjkhfgorhjg
jkdsfhgjklhrlktyjhlkgh
hlrkthglkrthglkrhlk
hrlkhgklrhgjlkrthjlkjhglkrthj with the text size on 3-4 px. The color was white so I put the text layer on Soft Light 90-100%.
DONE!! Wasn't that so easy to accomplish a very nice icon??
RESULTS = LOVE
COMMENTS = LOVE
MAKE THESE:

USING ANY PROGRAM!!
01 Open a 100 x 100 canvas and paste this texture BY ME.
02 Now open any picture MAKE SURE IT HAS A SOLID BG!! If it does not have a solid colored bg. Then figure it out :)
03 Crop your picture however you want it to be. Now press CTRL + SHIFT + U (desaturate) or go to hue/sat. and set the sat. to - 100 and flatten
04 copy your picture (cropped) and paste it on the texture. Set it on Multiply 100%. If the bg is still showing a bit; using a soft brush, erase the edges.
05 Now make a new layer at Multiply 100%. Click on the brush tool and pick a round brush with the size of your choice. I chose a number from 50-80. But that's your choice. Now pick a bright/light color. And on the new layer, stamp the brush. If you do not like the color, undo it and choose another color.
06 Now if you want to make a hole in the circle; choose the eraser tool and pick a round brush but make sure it's smaller than the brush you stamped. Now in the middle of the circle.
07 If you want to put some tiny text. I used Arriere Garde (dafont.com) and wrote:
b;ah blujghjkhfgorhjg
jkdsfhgjklhrlktyjhlkgh
hlrkthglkrthglkrhlk
hrlkhgklrhgjlkrthjlkjhglkrthj with the text size on 3-4 px. The color was white so I put the text layer on Soft Light 90-100%.
DONE!! Wasn't that so easy to accomplish a very nice icon??
RESULTS = LOVE
COMMENTS = LOVE