Tutorial Time!
Simple Ugly Betty Tutorial
This tutorial is also used to help smooth out pixely pictures, as from-tv-caps so often are.
Go from:
to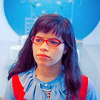
Made in PSCS2, Selective Color. Not translatable (...only in coloring. But there are tips for dealing with pixelation).
Tut in
Step 1: Start with your base, duplicate it. Set duplicated base to Gaussian Blur - 6.0, Softlight 100%

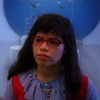
This will really soften up the pixilation. It's subtle in the end, but it can really help. (8.0 is also a good setting)
Step 2: Add screen layers to lighten up the image. (Two for this image, second one at 55%)
Be sure to keep your softlight layer UNDERNEATH the screen layers.

Step 3: Colorfill layer: This will also help soften things a bit
A golden yellow: #f2c437 Softlight 55%

Step 4: New Adjustment Layer - Hue/Saturation:
Saturation +15

It is a good idea to not have too many adjustment layers, especially ones with extreme settings, as this tends to amplify pixel problems.
Step 5: New Adjustment Layer - Selective Color
R: -100, 0, +100, +50
Y: -90, 0, 0, 0
C: +50, 0, 0, +50
Neu: +70, -19, -70, +18
Blacks: 0, 0, 0, +55

Step 6: Merge Visible/Flatten Image. Filter - Sharpen
Then, Edit - Fade Sharpen - Opacity 40%

Other icons made with this tut:
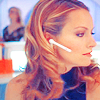
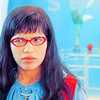

Remember to play with opacities and settings. This isn't the most pixely pic in the history of ever, so there will of course be discrepancies between caps. The surface blur filter is also a great tool to play around with, especially after sharpening.
Hope this was helpful!
This tutorial is also used to help smooth out pixely pictures, as from-tv-caps so often are.
Go from:

to

Made in PSCS2, Selective Color. Not translatable (...only in coloring. But there are tips for dealing with pixelation).
Tut in
Step 1: Start with your base, duplicate it. Set duplicated base to Gaussian Blur - 6.0, Softlight 100%


This will really soften up the pixilation. It's subtle in the end, but it can really help. (8.0 is also a good setting)
Step 2: Add screen layers to lighten up the image. (Two for this image, second one at 55%)
Be sure to keep your softlight layer UNDERNEATH the screen layers.

Step 3: Colorfill layer: This will also help soften things a bit
A golden yellow: #f2c437 Softlight 55%

Step 4: New Adjustment Layer - Hue/Saturation:
Saturation +15

It is a good idea to not have too many adjustment layers, especially ones with extreme settings, as this tends to amplify pixel problems.
Step 5: New Adjustment Layer - Selective Color
R: -100, 0, +100, +50
Y: -90, 0, 0, 0
C: +50, 0, 0, +50
Neu: +70, -19, -70, +18
Blacks: 0, 0, 0, +55

Step 6: Merge Visible/Flatten Image. Filter - Sharpen
Then, Edit - Fade Sharpen - Opacity 40%

Other icons made with this tut:


Remember to play with opacities and settings. This isn't the most pixely pic in the history of ever, so there will of course be discrepancies between caps. The surface blur filter is also a great tool to play around with, especially after sharpening.
Hope this was helpful!