Penelo cosplay WIP, craft foam leather
NOTE: This is gonna be my last post on LJ! Not that it matters seeing that all of -2 people follow me here, but I thought I'd post a link to where I will be posting from now on:
Nominis Expers will be my new online home!
I finally finished my Penelo cosplay! Well, almost. There are some touch-ups I want to do, and there are a couple details I still need to hand-stitch in, but it's (pretty much) done!
After dying some heavy fabric a nice marigold yellow (which is actually a tad too bright, so I might go in and dirty it up or leave it in the sun or something to age it) I just cut it into two even strips, pinned those suckas on while I was wearing the blue jumpsuit piece and then hand-stitched the yellow pieces on. I didn't want to spend more money than I already had, so instead of putting buckles on the part that goes around the lower thigh I just sewed in some elastic. Doesn't look as cool, but it's way more comfortable!
For the leather bits I scrapped both the pieces that I had cut out of the upholstery material and the ones I had made from the faux suede material. Instead, I found a super duper handy method of making craft foam look like leather! The method I used is actually a combination of a bunch of tips I found floating around the interwebs, but this video is the basis of how I did my stuff.
Here's the step-by-step of how I did it, if you're interested in the differences/don't want to watch the video.
Materials:
craft foam
iron
stylus
acrylic paint
black shoe polish
[no picture for this one, sorry! Use your ~*imagination*~]
First I drew the shapes onto the craft foam in pen and then cut them out. Pretty obvious step. The pen lines will soften and help darken the edges of the craft foam after ironing.
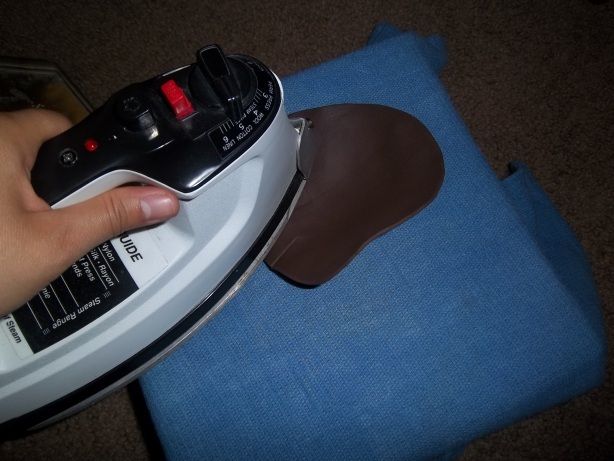
Next I ironed the pieces until they were the right color/texture and then, while they were still warm, shaped them. Just holding them in the desired shape until they cool will make them stay pretty much how you want them, but for some pieces like the wingalingers and greaves I ironed the creases in to get a more permanent form, and also to make it look, uh, sharper I guess? If you do this just be careful not to rip the craft foam while you're ironing it; it'll stick a little bit to the iron at first, and it's sort of delicate while it's hot.
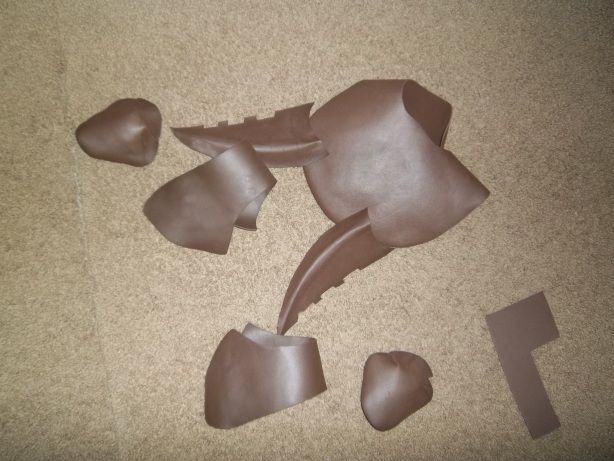
These are the pieces for the shoulder armor after they've all been ironed. In the corner is a piece of "raw" craft foam, so you can see the difference in color and texture.
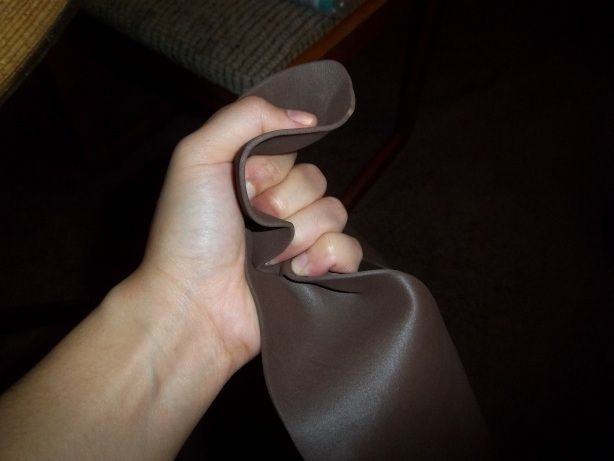
For some of the pieces I opted to try to add a bit more texture by crushing the ironed craft foam in my tiny hands. It does help to make it look more aged, and the foam actually goes back to its pre-crushed shape pretty easily.
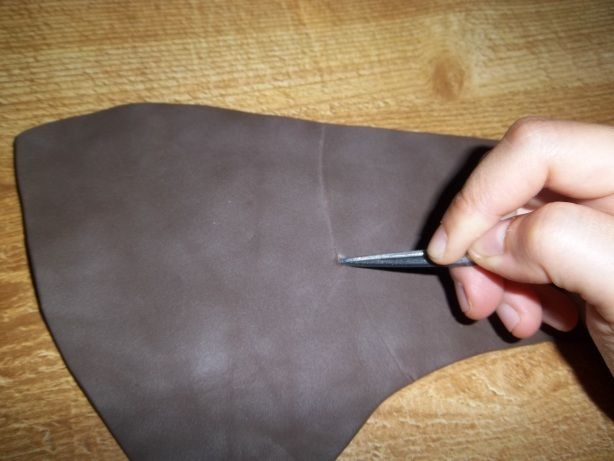
To get the designs on I scored the foam with a letter opener (an actual stylus probably works better, but hey you use what you've got right?). Then I went over the lines with a really blunt chopstick to make them more noticeable. I wasn't careful and in a few spots I actually wound up cutting straight through the foam while I was scoring it in a couple places, so be wary of that.
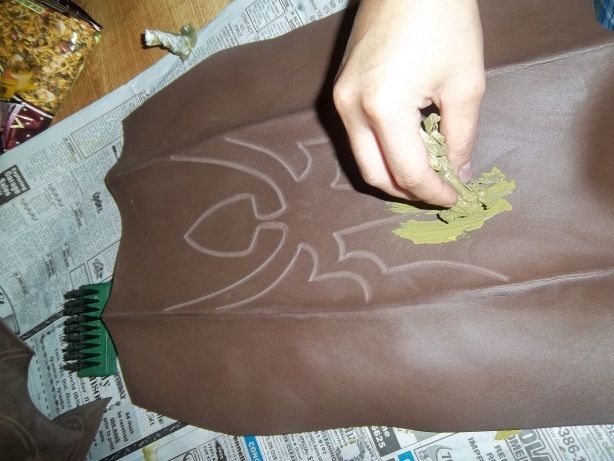
I mixed some acrylic paint to a brownish yellow color, then took a napkin and sort of just went crazy rubbing the paint on. Since I was going for a more used, aged look I didn't apply it in nice even coats; it's better to get it on unevenly so there's a greater variation of shades.
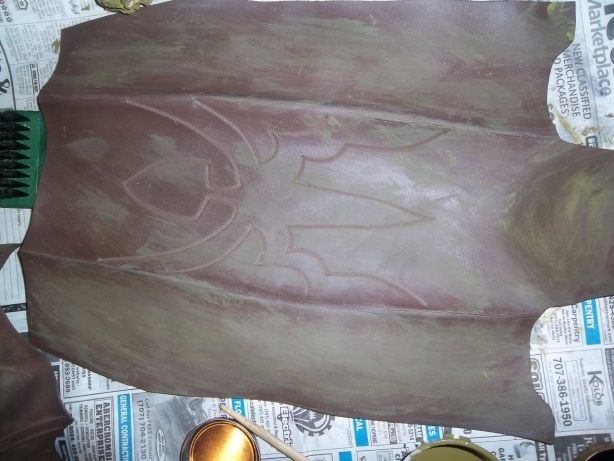
The strokes are pretty evident at first, but after everything soaks in and dries it'll give the foam a weathered, mottled look.
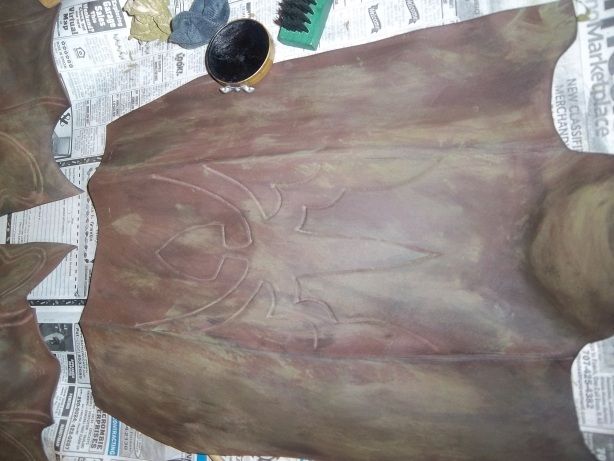
Finally I went and did the same thing but with black shoe polish. The result wasn't half bad, if I might say so m'self.
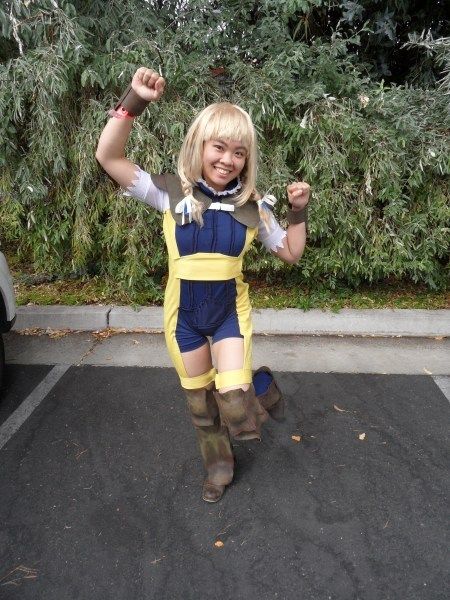
Here's the finished product, the culmination of hours of toil and freaking out! Sure, it's not gonna win any awards, but considering how much of it consisted of techniques I'd never tried before and materials I'd never worked with before, I'ma go ahead and be a little prideful.
Nominis Expers will be my new online home!
I finally finished my Penelo cosplay! Well, almost. There are some touch-ups I want to do, and there are a couple details I still need to hand-stitch in, but it's (pretty much) done!
After dying some heavy fabric a nice marigold yellow (which is actually a tad too bright, so I might go in and dirty it up or leave it in the sun or something to age it) I just cut it into two even strips, pinned those suckas on while I was wearing the blue jumpsuit piece and then hand-stitched the yellow pieces on. I didn't want to spend more money than I already had, so instead of putting buckles on the part that goes around the lower thigh I just sewed in some elastic. Doesn't look as cool, but it's way more comfortable!
For the leather bits I scrapped both the pieces that I had cut out of the upholstery material and the ones I had made from the faux suede material. Instead, I found a super duper handy method of making craft foam look like leather! The method I used is actually a combination of a bunch of tips I found floating around the interwebs, but this video is the basis of how I did my stuff.
Here's the step-by-step of how I did it, if you're interested in the differences/don't want to watch the video.
Materials:
craft foam
iron
stylus
acrylic paint
black shoe polish
[no picture for this one, sorry! Use your ~*imagination*~]
First I drew the shapes onto the craft foam in pen and then cut them out. Pretty obvious step. The pen lines will soften and help darken the edges of the craft foam after ironing.

Next I ironed the pieces until they were the right color/texture and then, while they were still warm, shaped them. Just holding them in the desired shape until they cool will make them stay pretty much how you want them, but for some pieces like the wingalingers and greaves I ironed the creases in to get a more permanent form, and also to make it look, uh, sharper I guess? If you do this just be careful not to rip the craft foam while you're ironing it; it'll stick a little bit to the iron at first, and it's sort of delicate while it's hot.

These are the pieces for the shoulder armor after they've all been ironed. In the corner is a piece of "raw" craft foam, so you can see the difference in color and texture.

For some of the pieces I opted to try to add a bit more texture by crushing the ironed craft foam in my tiny hands. It does help to make it look more aged, and the foam actually goes back to its pre-crushed shape pretty easily.

To get the designs on I scored the foam with a letter opener (an actual stylus probably works better, but hey you use what you've got right?). Then I went over the lines with a really blunt chopstick to make them more noticeable. I wasn't careful and in a few spots I actually wound up cutting straight through the foam while I was scoring it in a couple places, so be wary of that.

I mixed some acrylic paint to a brownish yellow color, then took a napkin and sort of just went crazy rubbing the paint on. Since I was going for a more used, aged look I didn't apply it in nice even coats; it's better to get it on unevenly so there's a greater variation of shades.

The strokes are pretty evident at first, but after everything soaks in and dries it'll give the foam a weathered, mottled look.

Finally I went and did the same thing but with black shoe polish. The result wasn't half bad, if I might say so m'self.
Here's the finished product, the culmination of hours of toil and freaking out! Sure, it's not gonna win any awards, but considering how much of it consisted of techniques I'd never tried before and materials I'd never worked with before, I'ma go ahead and be a little prideful.
