Miyavi tutorial
Doing my first tutorial ever, because my friends ask me to teach them Photoshop.
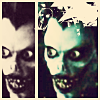
Going from
to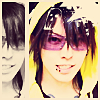
for Adobe Photoshop CS ( should be translatable to most versions, but then again, I'm not sure. Please don't hate me ).
Alright, first start off with your base at 100 x 100 pixels, which for me is Miyavi's l0vely VISAGE:
Now duplicate your base ( layer > duplicate ) and set it to Soft Light at 100%.
I then flattened the image ( layer > flatten image ).
Time to add some color! Add a new fill layer ( to do this you go to layer > new fill layer ) and set the color to #020E29. Set that layer to Exclusion at 100%.
Another fill layer, this time at pink; #DD9AD4. Set this layer to Soft Light at 75%.
Flatten your image once again ( note: I like flattening )
Duplicate your new base layer ( the bottom one ) and then desaturate it ( desaturate means "turn to black and white", and you do this by going to image > adjustments > desaturate ) and set it to Linear Light at 60%.
More fill layers... New fill layer: #BAEDCA. Set to Color Burn at 100%
New fill layer: #F4EDD1. Set to Hard Light at 50%
Duplicate base layer and drag it to the top and set it to Overlay at 77%
FLATTEN IMAGE.
Select this entire layer and add a white outline to it. To do this, go to edit > stroke > and have the settings at 3 pixels on Center with the color as white ( duh ).

Copy this inversed mask by latexandleather and paste it on top then set it to Screen at 100%. Place it anywhere you desire... the upper-right hand corner tickled my fancy. Using rectangular marquee tool, select part of Miyavi’s face from top to bottom on your base layer. ( random note: the outline isn't in this shot, I kinda wrote this after I did stuff )

Then Edit > Copy > Paste
Using the Move Tool, drag the layer over to the left of the bottom layer so you can see both of the faces. Desaturate the layer with the slice of the face and then select that layer and add an outline with the same settings as the other ( 3 px, center, white ). If the outline doesn't go along the left side of the duplicated face, just use the marquee tool to make a very small rectangle on the left side and then add a new fill layer of white ( I ran into this problem after going through the tutorial again ).
FILL LAYERS AGAIN. These go above all of the previous work.
New fill layer: #020E29. Set to Exclusion at 100%
New fill layer: #F6D4D4. Set to Color Burn at 100%
Then flatten the image and you are done!
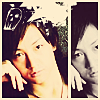
Other icons made using the same technique: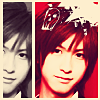
Then you can add text or sharpen it ( I did a little ) or whatnot.
If you have any questions, feel free to ask.
Going from
to
for Adobe Photoshop CS ( should be translatable to most versions, but then again, I'm not sure. Please don't hate me ).
Alright, first start off with your base at 100 x 100 pixels, which for me is Miyavi's l0vely VISAGE:
Now duplicate your base ( layer > duplicate ) and set it to Soft Light at 100%.
I then flattened the image ( layer > flatten image ).
Time to add some color! Add a new fill layer ( to do this you go to layer > new fill layer ) and set the color to #020E29. Set that layer to Exclusion at 100%.
Another fill layer, this time at pink; #DD9AD4. Set this layer to Soft Light at 75%.
Flatten your image once again ( note: I like flattening )
Duplicate your new base layer ( the bottom one ) and then desaturate it ( desaturate means "turn to black and white", and you do this by going to image > adjustments > desaturate ) and set it to Linear Light at 60%.
More fill layers... New fill layer: #BAEDCA. Set to Color Burn at 100%
New fill layer: #F4EDD1. Set to Hard Light at 50%
Duplicate base layer and drag it to the top and set it to Overlay at 77%
FLATTEN IMAGE.
Select this entire layer and add a white outline to it. To do this, go to edit > stroke > and have the settings at 3 pixels on Center with the color as white ( duh ).
Copy this inversed mask by latexandleather and paste it on top then set it to Screen at 100%. Place it anywhere you desire... the upper-right hand corner tickled my fancy. Using rectangular marquee tool, select part of Miyavi’s face from top to bottom on your base layer. ( random note: the outline isn't in this shot, I kinda wrote this after I did stuff )
Then Edit > Copy > Paste
Using the Move Tool, drag the layer over to the left of the bottom layer so you can see both of the faces. Desaturate the layer with the slice of the face and then select that layer and add an outline with the same settings as the other ( 3 px, center, white ). If the outline doesn't go along the left side of the duplicated face, just use the marquee tool to make a very small rectangle on the left side and then add a new fill layer of white ( I ran into this problem after going through the tutorial again ).
FILL LAYERS AGAIN. These go above all of the previous work.
New fill layer: #020E29. Set to Exclusion at 100%
New fill layer: #F6D4D4. Set to Color Burn at 100%
Then flatten the image and you are done!
Other icons made using the same technique:
Then you can add text or sharpen it ( I did a little ) or whatnot.
If you have any questions, feel free to ask.