(no subject)
Icon Tutorial 02
Going from this to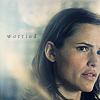
Icon Tutorial 02 - Made by ealias of Bedazzling. Credit is appreciated :)
Step 1: Original image - As always, I duplicate the original. Crop and sharpen.

Step 2: Duplicate the cropped image and set it to Screen.

Step 3: Add a new layer and fill it with #A8D386. Set to Color Burn at 28% opacity.

Step 4: Add this light texture by gender. Set it to Screen and mask out the areas that cover Sydney's face.
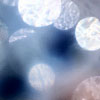

Step 5: Add this light texture by awmpdotnet (which I flipped horizontally), set it to Hard Light, and mask the bit of light on the upper-right corner that cover's Sydney's hair.


Step 6: Add a new layer. Fill it with #051026. Set it to Exclusion and duplicate the layer.

Step 7: Duplicate the first cropped layer (not the original image). Bring it to the top of all the other layers. Desaturate it and set it to Soft Light. Set your foreground and background colors to black and white, respectively, and apply a Diffused Glow with the settings 0, 14, 12.

Step 8: Add text. I used Times New Roman, 6pt, 300 tracking, and anti-alias Crisp.

Step 9: The icon looks done, but I think it's still missing something. I add this light texture by awmpdotnet (which I rotated 180 degrees) beneath the text layer. Set it to Hard Light with 60% opacity.


Step 10: The text stands out too much so I drop its opacity down to 60%.

Step 11: Again, the icon looks just about finished, but I wanted to add more color. I add this gradient that I made and set it to Soft Light with 30% opacity.

Final image:
Let me know how this works out for you. People posted some great icons following my first tutorial--check out the comments.
Picture from VartnHo.com, textures from awmpdotnet and gender
Going from this to
Icon Tutorial 02 - Made by ealias of Bedazzling. Credit is appreciated :)
Step 1: Original image - As always, I duplicate the original. Crop and sharpen.

Step 2: Duplicate the cropped image and set it to Screen.

Step 3: Add a new layer and fill it with #A8D386. Set to Color Burn at 28% opacity.

Step 4: Add this light texture by gender. Set it to Screen and mask out the areas that cover Sydney's face.


Step 5: Add this light texture by awmpdotnet (which I flipped horizontally), set it to Hard Light, and mask the bit of light on the upper-right corner that cover's Sydney's hair.


Step 6: Add a new layer. Fill it with #051026. Set it to Exclusion and duplicate the layer.

Step 7: Duplicate the first cropped layer (not the original image). Bring it to the top of all the other layers. Desaturate it and set it to Soft Light. Set your foreground and background colors to black and white, respectively, and apply a Diffused Glow with the settings 0, 14, 12.

Step 8: Add text. I used Times New Roman, 6pt, 300 tracking, and anti-alias Crisp.

Step 9: The icon looks done, but I think it's still missing something. I add this light texture by awmpdotnet (which I rotated 180 degrees) beneath the text layer. Set it to Hard Light with 60% opacity.


Step 10: The text stands out too much so I drop its opacity down to 60%.

Step 11: Again, the icon looks just about finished, but I wanted to add more color. I add this gradient that I made and set it to Soft Light with 30% opacity.

Final image:
Let me know how this works out for you. People posted some great icons following my first tutorial--check out the comments.
Picture from VartnHo.com, textures from awmpdotnet and gender