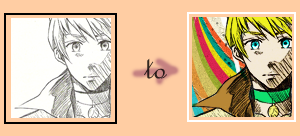
B/W Coloring Tutorial; Featuring Guy Cecil
A tutorial as requested by aoisita! Comment~?
(I've got another tut up and coming afterwards, one requested by dragonsquee!)

** done using Adobe Photoshop CS2
** no Selective Coloring, obviously.
** very translatable.
I forgot how many tuts I've made, so I'll get back to the number XD Anyway, we're turning this black and white anthology scan icon of Guy Cecil (scanned by able) into a nice colorful icon for everyday LJ use. X3 Please rememeber, try and experiment with settings and coloring/textures. :D So, let's begin shall we? :DD
And since I'm in a little hurry for something as well, I'll get to the point and avoid some side comments I seem to be making all the time I post XDD I'm opinionated, so what? XDD
1.) Crop your desired manga/anthology/B&W scan to 100 x 100.
2.) Use some Auto Levels, Auto Contrast and Auto Color on it. These are all Image > Adjustments menu in CS2.
3.) Duplicate your base and set it to Soft Light at full opacity. (I did this, but you can change the opacity as you wish.)
4.) Make a new layer and fill it with white. Set it to Color. (This is a little trick I learned from my friend at school. It just takes away those annoying yellow spots when you scan, but sometimes has no effect elsewhere if you have a nice clean scan.)
5.) Flatten your image.
6.) Now comes the coloring part. You just take the Brush tool, try the hard brushes, and color in the parts of your icon that need color. Make a new layer for every color that you put, to make our lives easier. Here's what I did for the Guy icon.
HAIR: Yellow; Multiply @ 80%; Did some Brightness/Contrast. This is Layer 1.
EYES: Bright Blue; Color @ 100%; This is Layer 2.
SKIN: Peachy/Tan; Linear Burn @ 50-65%; Darker shades of the color at the shadowy areas, 70% opacity. This is Layer 3.
CLOTHES/ACCESSORIES: Collar was Green, medal on the collar was Yellowish, the rest is Brown. All on different layers (4 and 5). Multiply @ 80%
7.) After you're finished with the coloring, go to Select > All and then Copy Merged. Then paste it on top of everything else. Set this pasted layer on Soft Light at 30% opacity.
8.) Duplicate that Soft Light layer and change the opacity to Color Burn/Burn at the same opacity, or ranging from 30-40%.
9.) Add this texture (from inxsominiax) on top of everything and set it to Multiply at full opacity.
10.) Use the eraser tool to erase parts of the icon that are covered by the texture. I used a Vector Mask so I wouldn't be damaging the texture as I moved along erasures.
Flatten your image and there you have your wonderful icon. ^^
TIPS:
** When coloring, avoid using soft brushes, as they tend to overlap lines when you use them. I used hard brushes for all my colorings.
** Experiment with the settings, try Overlay, Multiply and the Burn settings for the colors.
** There are tons of textures out there fit for your icon! :DD Go on, explore!
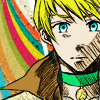
That's it. My final product is this:

Enjoy~
How'd you like it? Love it? Hate it? Tell me what you think and comment! :DD Remember to experiment with your icons ^^ Ja.
(c) blackrose_023 [c]
(I've got another tut up and coming afterwards, one requested by dragonsquee!)

** done using Adobe Photoshop CS2
** no Selective Coloring, obviously.
** very translatable.
I forgot how many tuts I've made, so I'll get back to the number XD Anyway, we're turning this black and white anthology scan icon of Guy Cecil (scanned by able) into a nice colorful icon for everyday LJ use. X3 Please rememeber, try and experiment with settings and coloring/textures. :D So, let's begin shall we? :DD
And since I'm in a little hurry for something as well, I'll get to the point and avoid some side comments I seem to be making all the time I post XDD I'm opinionated, so what? XDD
1.) Crop your desired manga/anthology/B&W scan to 100 x 100.
2.) Use some Auto Levels, Auto Contrast and Auto Color on it. These are all Image > Adjustments menu in CS2.
3.) Duplicate your base and set it to Soft Light at full opacity. (I did this, but you can change the opacity as you wish.)
4.) Make a new layer and fill it with white. Set it to Color. (This is a little trick I learned from my friend at school. It just takes away those annoying yellow spots when you scan, but sometimes has no effect elsewhere if you have a nice clean scan.)
5.) Flatten your image.
6.) Now comes the coloring part. You just take the Brush tool, try the hard brushes, and color in the parts of your icon that need color. Make a new layer for every color that you put, to make our lives easier. Here's what I did for the Guy icon.
HAIR: Yellow; Multiply @ 80%; Did some Brightness/Contrast. This is Layer 1.
EYES: Bright Blue; Color @ 100%; This is Layer 2.
SKIN: Peachy/Tan; Linear Burn @ 50-65%; Darker shades of the color at the shadowy areas, 70% opacity. This is Layer 3.
CLOTHES/ACCESSORIES: Collar was Green, medal on the collar was Yellowish, the rest is Brown. All on different layers (4 and 5). Multiply @ 80%
7.) After you're finished with the coloring, go to Select > All and then Copy Merged. Then paste it on top of everything else. Set this pasted layer on Soft Light at 30% opacity.
8.) Duplicate that Soft Light layer and change the opacity to Color Burn/Burn at the same opacity, or ranging from 30-40%.
9.) Add this texture (from inxsominiax) on top of everything and set it to Multiply at full opacity.
10.) Use the eraser tool to erase parts of the icon that are covered by the texture. I used a Vector Mask so I wouldn't be damaging the texture as I moved along erasures.
Flatten your image and there you have your wonderful icon. ^^
TIPS:
** When coloring, avoid using soft brushes, as they tend to overlap lines when you use them. I used hard brushes for all my colorings.
** Experiment with the settings, try Overlay, Multiply and the Burn settings for the colors.
** There are tons of textures out there fit for your icon! :DD Go on, explore!
That's it. My final product is this:

Enjoy~
How'd you like it? Love it? Hate it? Tell me what you think and comment! :DD Remember to experiment with your icons ^^ Ja.
(c) blackrose_023 [c]