Easy Animation Tutorial
Making this simple animated icon using ImageReady CS2 and Photoshop.

A basic general knowledge of IR and Photoshop required, I've included some clickable thumbnails of my screen to help you along. I hope it helps. ♥
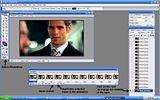
ImageReady screenshot, with basic description
1. With all your caps in one folder, open ImageReady. Open the caps in IR by choosing File - Import - Folder as Frames.
2. Now take all the frames over to Photoshop to do most of the editing and adjustments. Choose Edit in Photoshop. The frames will now open in Photoshop.
3. Using the crop tool, crop the caps to suit and then resize to suit, making sure you have ‘constrain proportions’ selected so you don’t stretch your image out of shape.
4. Now I added a new adjustment layer just to brighten up the image. In your layer pallette your adjustment layers need to be at the top, above all your caps.
5. Now, we want a 100x100 canvas for our icon. Go to Image - Canvas Size and choosing pixels, make it 100x100. Click OK. Your original image should now be in the middle of a blank canvas.
6. Next create a new layer. Drag this layer down to the very bottom of your layer pallette, below all the others. Now, using the flood fill tool fill the layer with a colour of your choice.
7. Create another new layer. This time, using the Rectangular Marquee Tool draw around your animation picture. Turn off the visibility of the layer above (so you can better see your selected area). Choose a colour in a lighter shade to your background and using the flood fill tool fill the in the selected area. It should look like this:
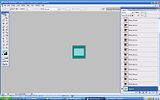
Shows rectangular marquee selection and layers in Photoshop
8. Create another new layer above this to add your text. Add whatever text you want and centre it in the middle of your icon. Turn on the visibility of the layer above this, and your icon should now look like this:

Final layers and image in Photoshop
9. The icon is nearly finished now, we just need to take it back to ImageReady to finish the animation. Choose ‘Edit in ImageReady’.
10. Turn the visibility of the first picture layer again so that, in your animation window, the first frame now shows the text you added previously. In the animation window duplicate the first frame.
11. Making sure that the first frame in your animation window is selected, turn off the visibility of the text layer in your layer pallette. The text will now disappear from the first two animation frames. Select the second frame and turn the text visibility back on. Now choose ‘tween’ and ‘tween with previous frame’ adding two frames.
12. Now all you need to do is change the frame delay times on each frame to suit your animation. And you’re done! Congratulations. In your main window, choose ‘optimized’ and ‘two-up’ so you can check the file size of your icon. Open your optimize window and play with the settings to get it to below 40kb if necessary. Your final screen should look like this:
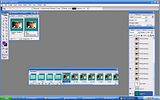
Final screen, layers pallette, animation pallette and optimized icon

A basic general knowledge of IR and Photoshop required, I've included some clickable thumbnails of my screen to help you along. I hope it helps. ♥

ImageReady screenshot, with basic description
1. With all your caps in one folder, open ImageReady. Open the caps in IR by choosing File - Import - Folder as Frames.
2. Now take all the frames over to Photoshop to do most of the editing and adjustments. Choose Edit in Photoshop. The frames will now open in Photoshop.
3. Using the crop tool, crop the caps to suit and then resize to suit, making sure you have ‘constrain proportions’ selected so you don’t stretch your image out of shape.
4. Now I added a new adjustment layer just to brighten up the image. In your layer pallette your adjustment layers need to be at the top, above all your caps.
5. Now, we want a 100x100 canvas for our icon. Go to Image - Canvas Size and choosing pixels, make it 100x100. Click OK. Your original image should now be in the middle of a blank canvas.
6. Next create a new layer. Drag this layer down to the very bottom of your layer pallette, below all the others. Now, using the flood fill tool fill the layer with a colour of your choice.
7. Create another new layer. This time, using the Rectangular Marquee Tool draw around your animation picture. Turn off the visibility of the layer above (so you can better see your selected area). Choose a colour in a lighter shade to your background and using the flood fill tool fill the in the selected area. It should look like this:

Shows rectangular marquee selection and layers in Photoshop
8. Create another new layer above this to add your text. Add whatever text you want and centre it in the middle of your icon. Turn on the visibility of the layer above this, and your icon should now look like this:

Final layers and image in Photoshop
9. The icon is nearly finished now, we just need to take it back to ImageReady to finish the animation. Choose ‘Edit in ImageReady’.
10. Turn the visibility of the first picture layer again so that, in your animation window, the first frame now shows the text you added previously. In the animation window duplicate the first frame.
11. Making sure that the first frame in your animation window is selected, turn off the visibility of the text layer in your layer pallette. The text will now disappear from the first two animation frames. Select the second frame and turn the text visibility back on. Now choose ‘tween’ and ‘tween with previous frame’ adding two frames.
12. Now all you need to do is change the frame delay times on each frame to suit your animation. And you’re done! Congratulations. In your main window, choose ‘optimized’ and ‘two-up’ so you can check the file size of your icon. Open your optimize window and play with the settings to get it to below 40kb if necessary. Your final screen should look like this:

Final screen, layers pallette, animation pallette and optimized icon