Tutorial: Seperates Meshing - Part Two
An extra mini-tutorial where I go into what happens if your top bottom is shorter (and/or skintight) or you're seperating the bottom instead and what to do when you want to seperate a pair of pants but the top is covering the waistline. This tutorial covers the combining of two mesh parts and merging of vertex data/normal data so there are no gaps at the waist. It is basically Part Two of the previous tutorial (or Questions and Answers time, if you want).
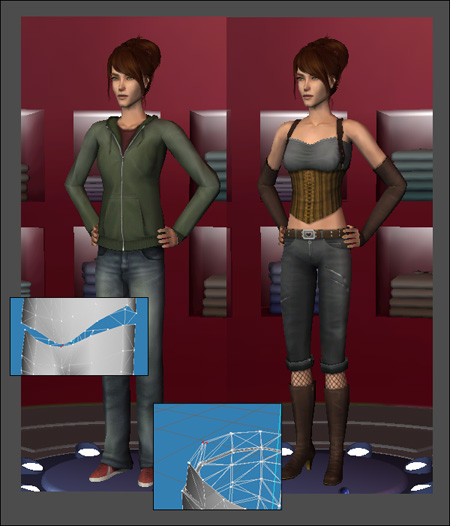
For this mini tutorial I am going to assume you've read my other meshing tutorial or are atleast familiar enough with the material to make sense of this. I'll be skipping quite a few steps and really only going into the necessary bits. I am not fixing any textures, importing or exporting meshes, making mesh packages, etc. You should be able to do all that or again, read the other tutorial.
In essence this is an extended part of my tutorial that I just couldn't quite fit into that one without making a confusing mess of it all. This is here to tell you how to deal with situations where your seperates are gappy at the waist or you don't know how to seperate something that's partially covered (such as a pair of pants covered by a very long sweater). This last bit is very similar to how to swap shoes on a mesh or similar things also handled in MTS2's Unimesh tutorials, part 3 (link forthcoming, MTS2 is currently down).
Make sure you have the normal data merge and vertex data merge plugins.
---------------------------------------------------------------------------------------------------------------------------------------
Part One
(skin tight/short tops and bottoms)
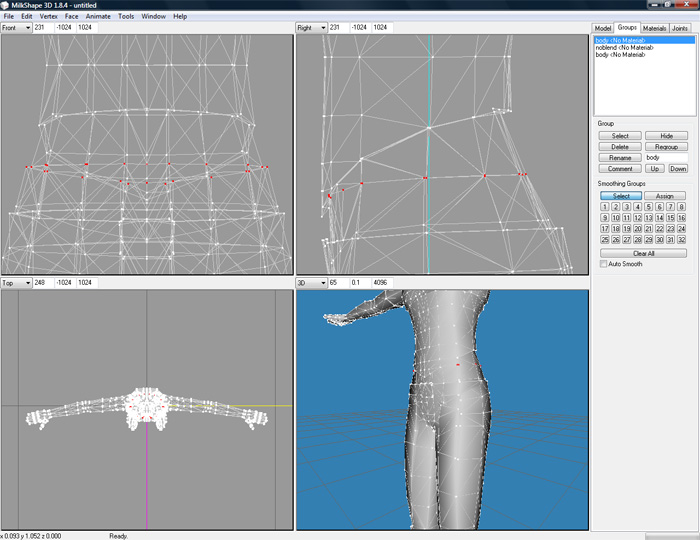
You may have already noticed that sometimes you want to seperate a bottom (or a top) and it looks like you can just cut it in half and be done with it. Such as for this outfit (if we pretend the top isn't extending down in front of the waist). Most of the waist looks perfectly fine already, a simple cutting off of the legs and done, right?
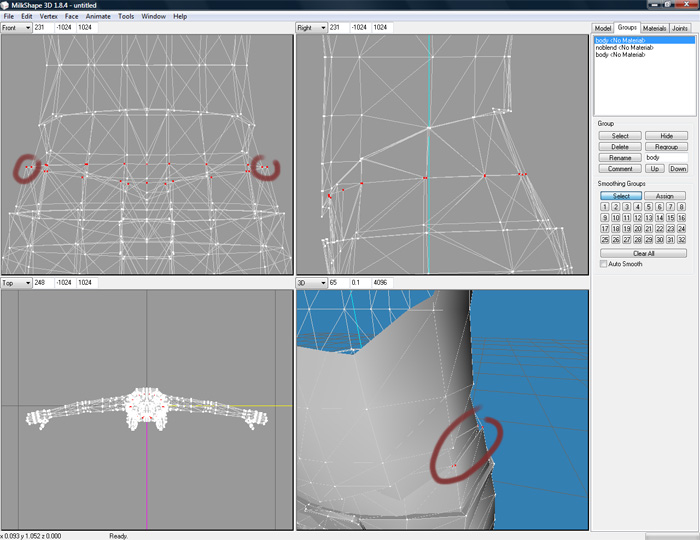
Except when you swivel the camera (or maybe you already imported it in game) you notice there are gaps! Things don't line up nicely as the full body mesh is narrower than the top row of normal pair of bottoms (or bottom row of a top).
For cases where a you are making a bottom, or for tops where the shirt is shorter than the waist, you always have to make sure to align the top row (for bottoms) or bottom row (for tops) exactly so that it matches up smoothly and without seams or gaps.
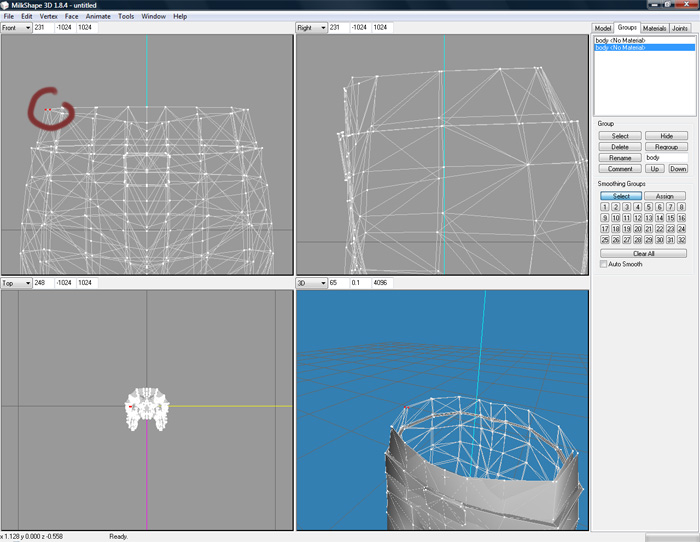
The solution is quite easy. With both groups not hidden, select a pair of vertices that should be at the same location (but aren't), such as indicated in the screenshot.
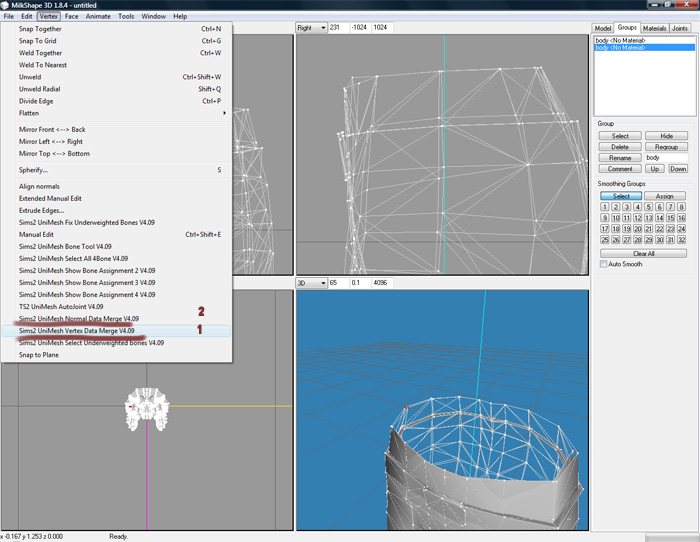
Now for the easy way to fix this. With the two vertices selected click on Vertex -> Vertex Data Merge then click on Vertex -> Normal Data Merge.
What this does is copy the coordinates from the vertices in the first group onto those of the second group, essentially moving them all in the same position. Handy, huh?
Now if you repeat this for all the vertex pairs around the waist (one pair at a time) you'll have a totally smooth and gap-free waistline.
Here's a little extra tip: This works for morphs too! But if you want to copy the data from a morph, make sure you rename the guideline morph (the one whose data you're copying) or you'll get an error.
Note: Normals are what control the shading of the outfit. If the normal data isn't merged your mesh may appear to have a seam at the waist because the light is bounced off it differently than the top you're putting above the waist.
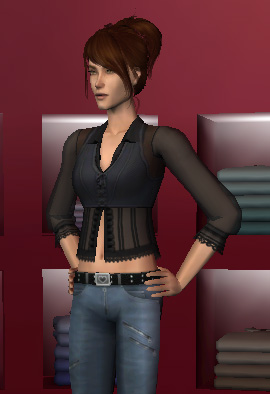
You'll still have to go through all the other steps of seperating a mesh, renaming the file, etc etc but really, that's all there is to it. One seamless seperated pair of pants with no gaps.
There is also a hard way and I'm going to put it here in italics so you can learn a bit extra about the whys and hows of these tools. If you don't want to learn more (although I really recommend you do), skip this part and go on to part two.
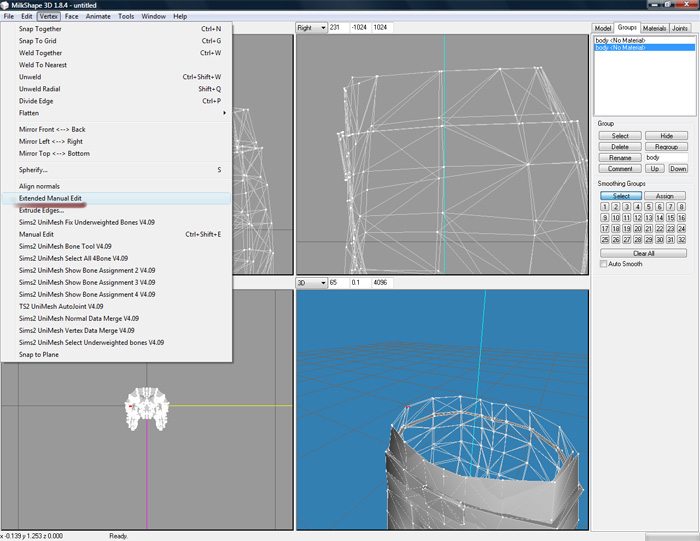
Going back to an earlier point in our tutorial, while having the two vertices selected, click on Vertex -> Extended Manual Edit
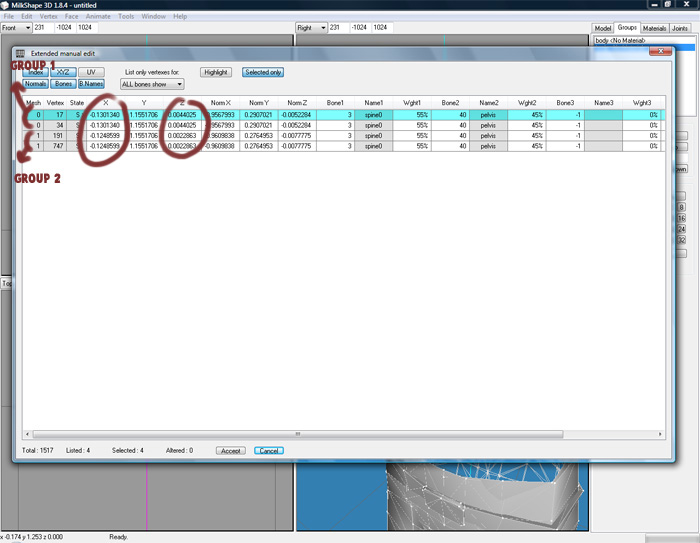
This looks really intimidating the first time. But what you're looking at is a set of tables that list the coordinates of every selected vertex, their normal coordinates and the bone assignments (if you have the top left buttons selected as I do anyway).
The two rows with the 0 in front of them are two vertices from our first group and the two rows with the 1 in front of them belong to the second group. It is perfectly normal to have more than one vertex in the exact same location, so in this case our 2 selected vertices are actually 4. If you look at the x and the z coordinates you see that while the two vertices from the same group match, between the two groups they do not.
If you change the numbers in the tables you actually move the vertices. So another way to get the vertices in the same position is a simple copying of the data. You want everything to be aligned to the first group (this is your actual in-game bottom mesh, after all, that is already gapless and smooth). Simply copy the number listed under the X from Mesh 0 onto the numbers for Mesh 1 then do the same with the Z coordinates. Repeat for the normal coordinates. Done! So basically what the merge tools do is exactly this (copying the numbers) but without you having to do a lot of copy-pasting.
One last thing. I am not going to explain the bones right now, animations are better left alone still, but note how they are the same across all 4 vertices. This is important. If one of the bones is assigned different and you load your mesh in game you'll also get weird gaps, even if it looks normal when the sim is standing still. So if the bone assignments differ you'll also have to copy these over.
----------------------------------------------------------------------------------------------------------------------------------
Part Two:
(Help! My pants have no waist!)
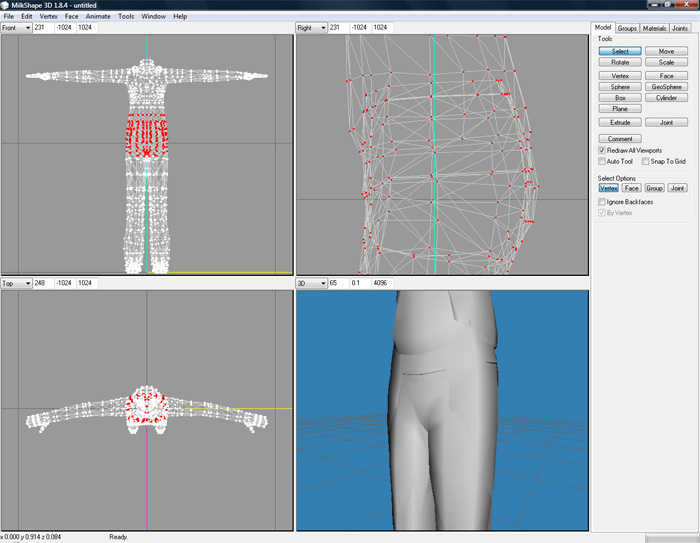
Here we have a situation that's a bit more difficult. This pair of pants doesn't have a waist due to the length of the sweater. We could cut it in half but then we'd be taking half a sweater along with it and that wouldn't look good at all.
But something can be done about that too.
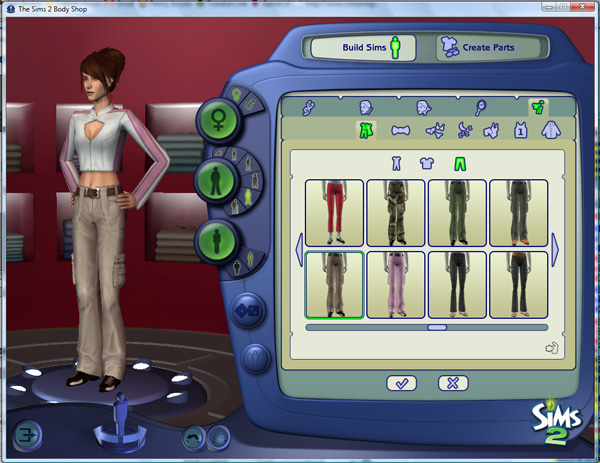
Before we start on a mesh like this we're going to pick a bottom as our base that has the kind of waist you want. Take your time to select the one you think is most appropriate to fit onto the pants you wanna seperate. Here I've picked these baggy pants.
When starting your new mesh import these bottoms then import the full body mesh. As explained in the other tutorial.
(Remember to copy out the text in the comment file)
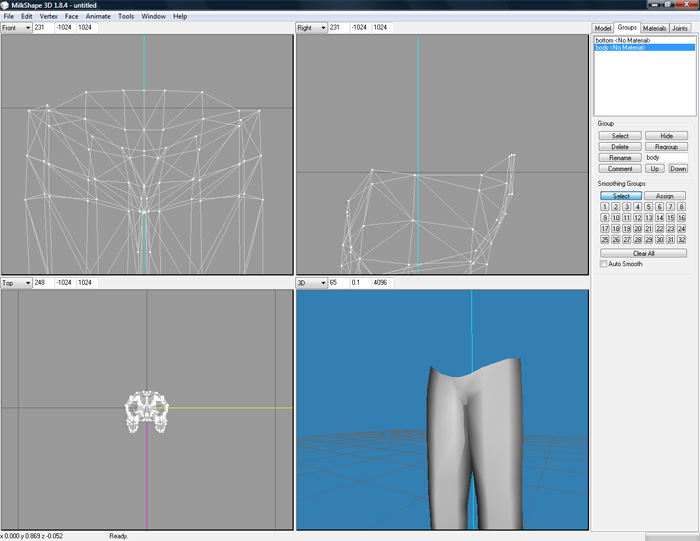
First Let's remove the parts of the full body mesh we don't need (with the bottom group hidden). When we're done we'll probably have quite a low cut waist like this, maybe there isn't even much of a waist left.
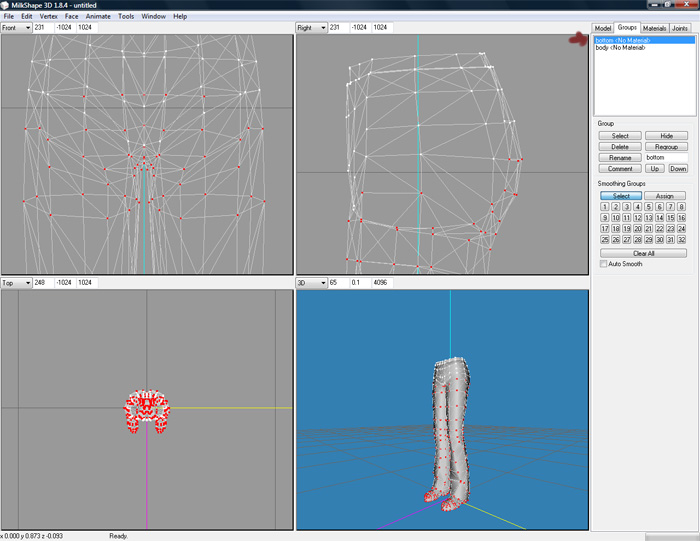
Now select the bottom mesh. While normally we leave this one alone until the end, this time we're going to cut pieces out of this one too.
Select all of it from the shoes up until about where you think the other mesh begins and delete it. Basically what we want left is only the waist, long enough so that it matches as close as possible to where we cut the other mesh. The closer a cut you can make the better so search for the best location (it is possible to remove more from the full body mesh, for example, if that gives you a cleaner cut).
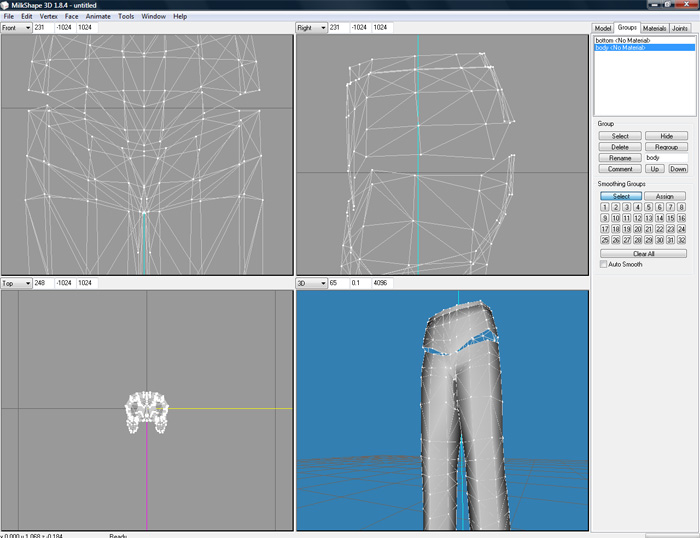
With both groups unhidden the end result looks something like this. Sometimes you can have a cut so clean that you can't tell there even has been a cut, unfortunately this pair of pants was a bit more complicated.
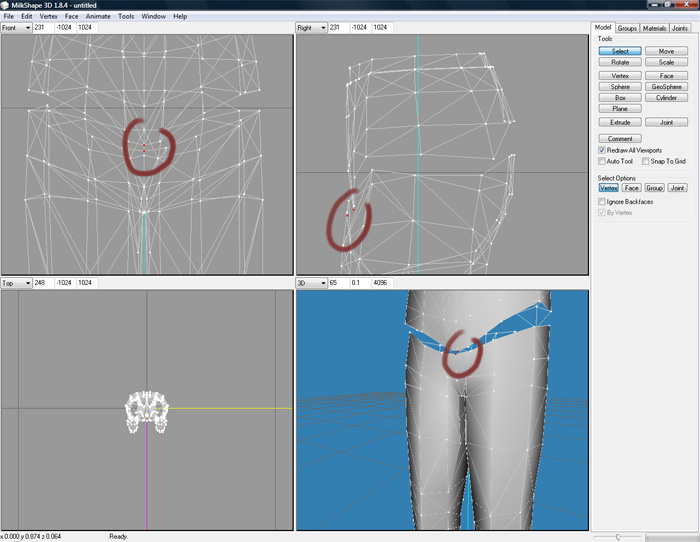
Now select a pair of vertices like this. Aha, you say, we're going to do the vertex data and normal data merge again, aren't we!? Yep.
However, to those that wish to know more I'm going to point out a little something here.
(you can skip the next two bits if you don't want to be confused by this for now, again I suggest you do study up on this eventually. It pays to know what you're doing and why)
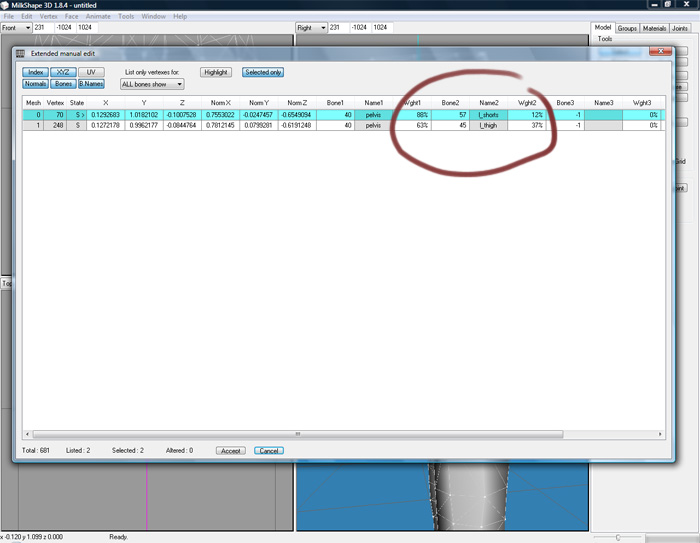
If we look at the extended manual edit (Vertex -> Extended Manual Edit) data for these vertices you can see something. Here the bone assignments do not line up. Had you merely copied the coordinates and put this mesh in game you would have some huge gaps once the sim started moving.
Always check the bone assignments!
I believe the data merge tools copy the bone assignments anyway, but it doesn't hurt to double check.
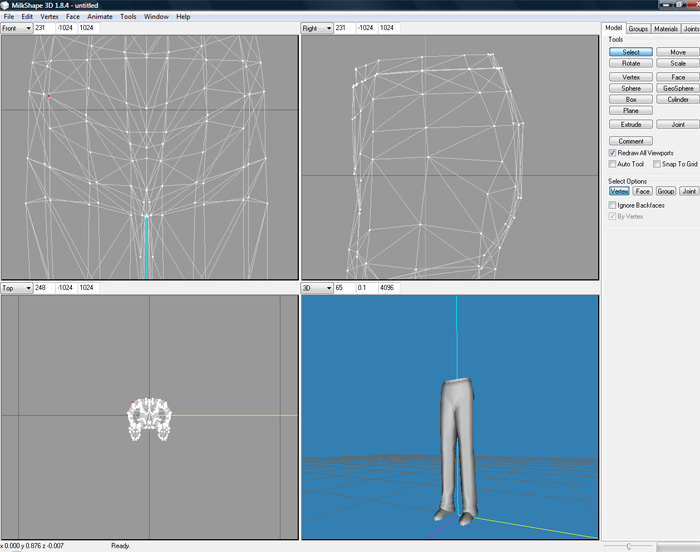
Having done the vertex and normal data merge for every vertex pair we should have something that looks like this. Good right? Now we're done?
Sadly, not quite.
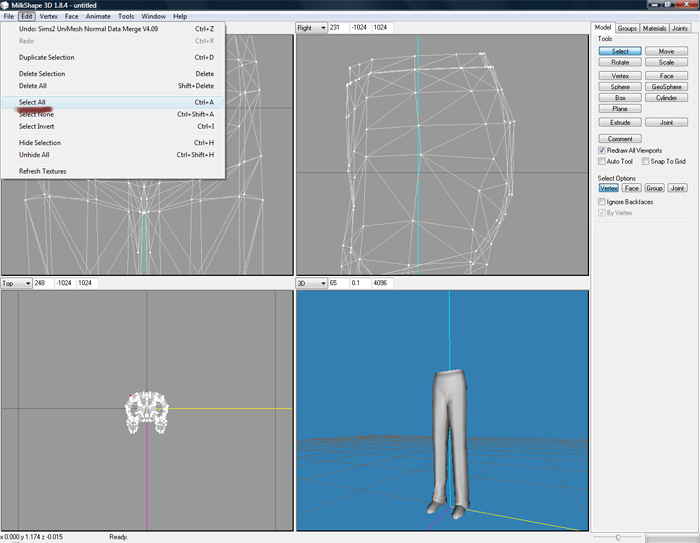
Select the entire mesh (Edit -> Select All).
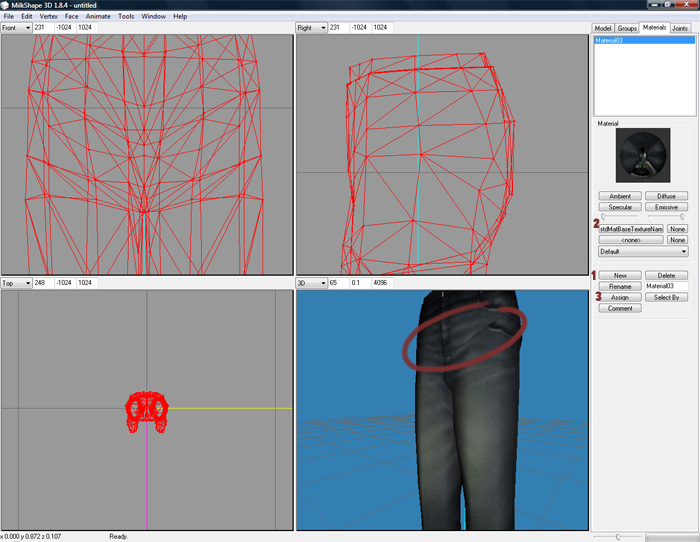
We're going to assign a texture to the entire mesh, you remember how to right? (1. Click New, 2. Click to select a texture 3. Click assign).
Oh dear, now you can see in the circled area where we connected the two meshes that the texture doesn't look right at all.
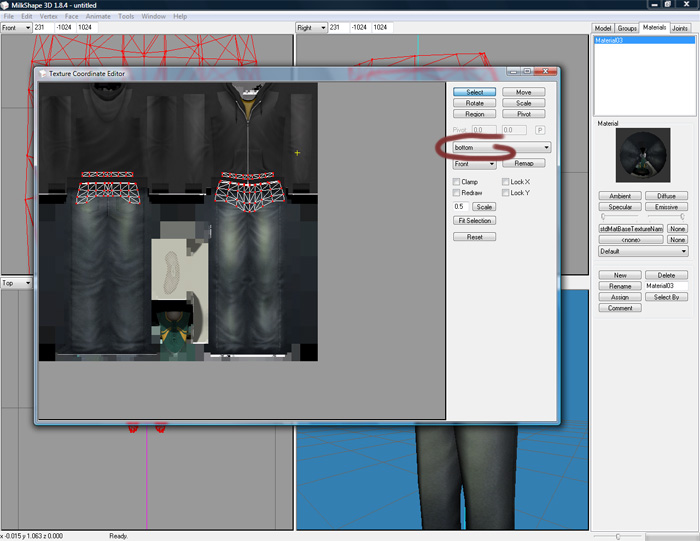
Open the Texture Coordinate Editor (Window -> Texture Coordinate Editor)
The Coordinate Editor seperates the different groups. Look at the circled part and see that it says bottom in the pull-down menu. That is our first group.
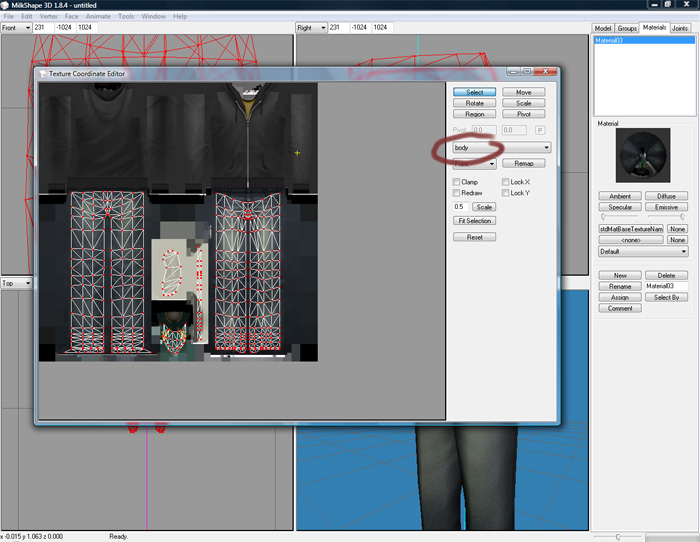
If you pull down and select the other one (body) you get to see the rest of the mesh.
This isn't very useful, is it? How can you fix it if we've got these parts split over two groups! Well, we can merge the groups into one. But before we do that we need to do one little thing.
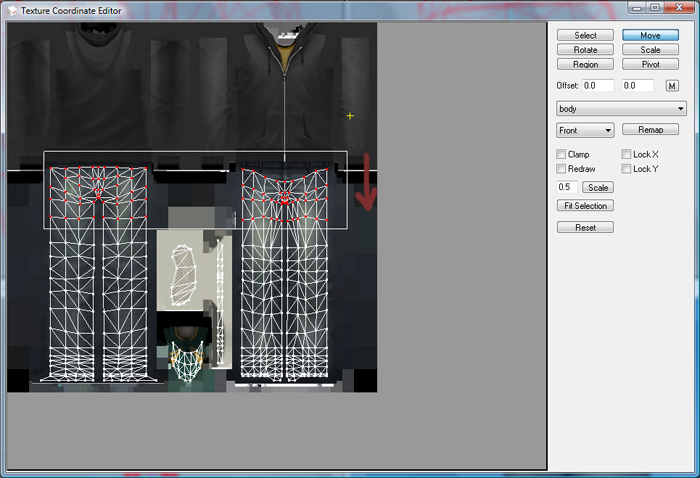
On the body group, select the top few rows. We're going to move these down a little. If we don't and we merge the two groups part of them will overlap and that'll make it really hard to fix our problem.
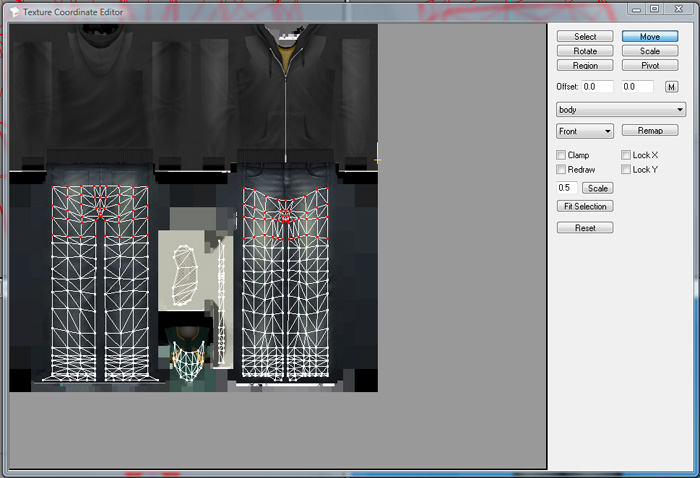
There, that's better.
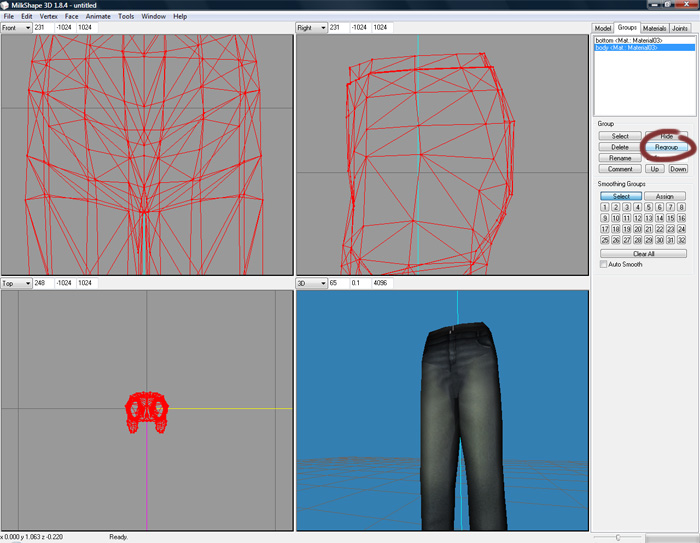
Now with both groups still selected, click on the regroup button.
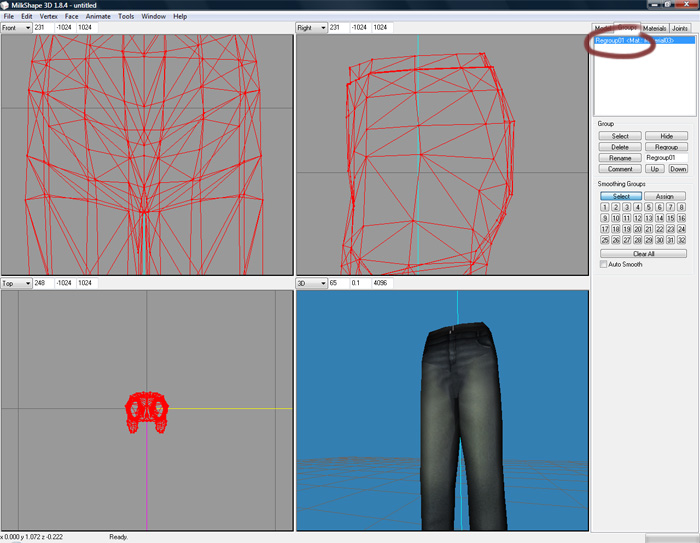
We should end up with one group, usually named Regroup01 or something like that.
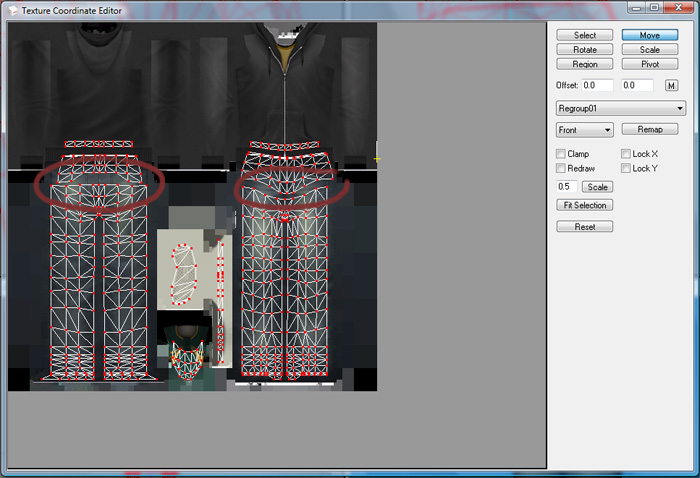
Now back to our Texture Coordinate Editor.
Notice the gap between the two parts? Part of that is because we moved it a bit, of course, but this is why the texture looked so strange on the model.
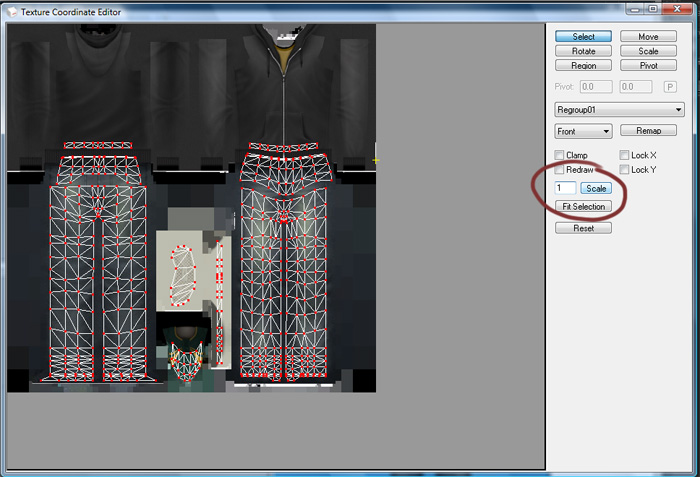
First let's make things a bit easier to work with. Change the number next to scale (I've here changed it to 1) and click the scale button. This'll zoom things in a bit.
As in regular Milkshape, you can hold down CTRL and click+drag to move things so you can center the part you need to work on.
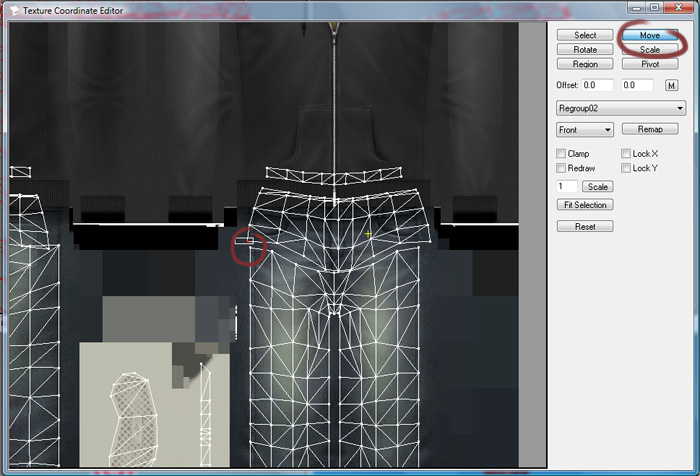
Now with things a bit more zoomed in, select a vertice as shown. And simply move it to it's matching vertice below.
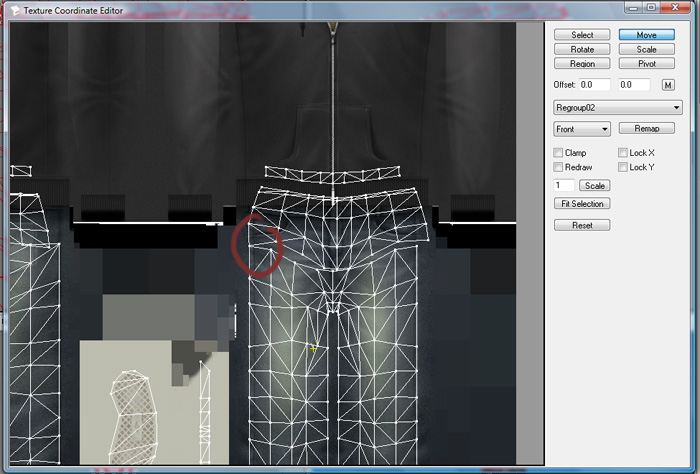
Like this.
You'll want to do this for every pair of vertices until the two parts line up completely.
I believe there is also a UV merge tool on MTS2 somewhere that could do this far easier (like the vertex and normal data merge, except for the UV map). I have never used it however (only learned about it recently actually) so I am doing it this way for now.
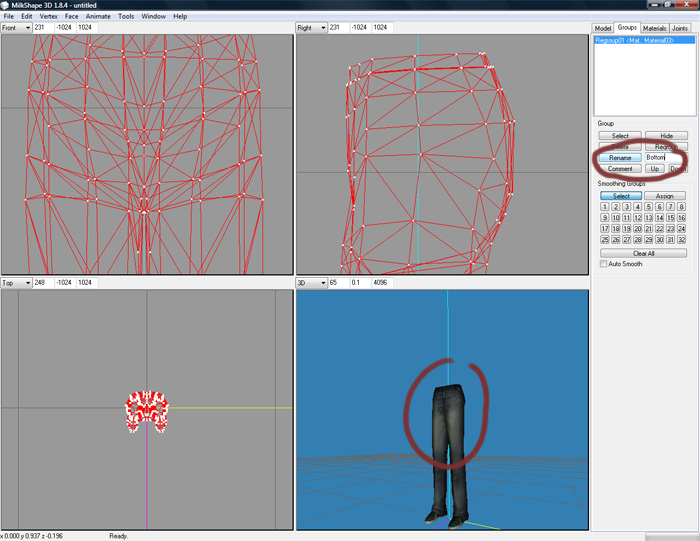
Once you've completely lined up both halves of the pants and there is no more gap on the UV map you can close the Editor. As you can see in the 3d view now, the texture looks a lot better.
Now we just need to rename our group to bottom.
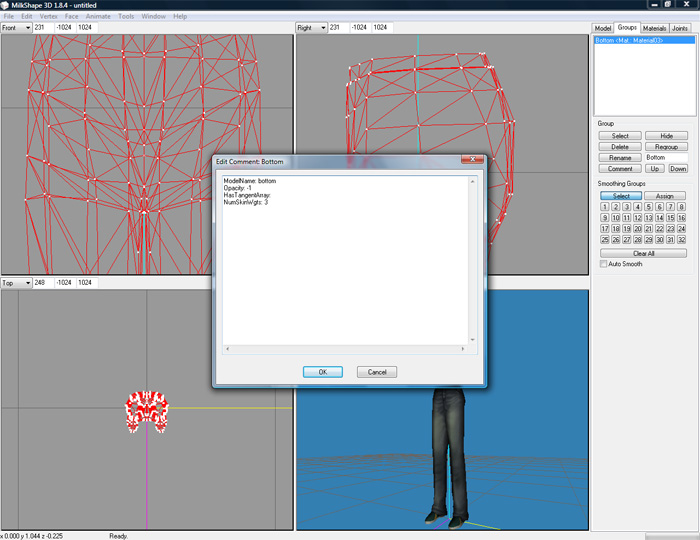
And copy the comments over from the original bottom group.
(as it'll probably have merged the two sets of comments)
Now you can treat it just like any regular mesh you've already made.
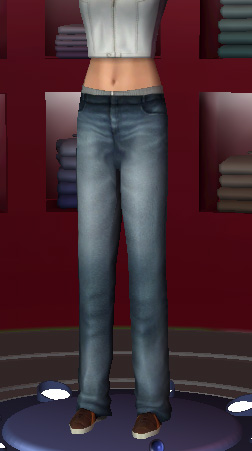
And that's it. Well, except for the texture. As most full body meshes like this do not have a waist painted on the texture either you're going to have to paint one in yourself. That is something for a different kind of tutorial however.
Warnings: More headache inducing stuff, pictures.