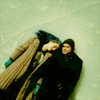
Tutorial #1: Clem and Joel
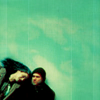
How to go from

to
using Photoshop CS2, as requested by nyi.
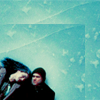
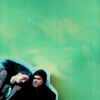
How to go from
to
using Photoshop CS2, as requested by nyi.
Please note that these steps will not work for all bases; also, this is a set of guidelines. Please do not copy the icon exactly and call it your own.
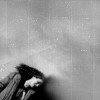
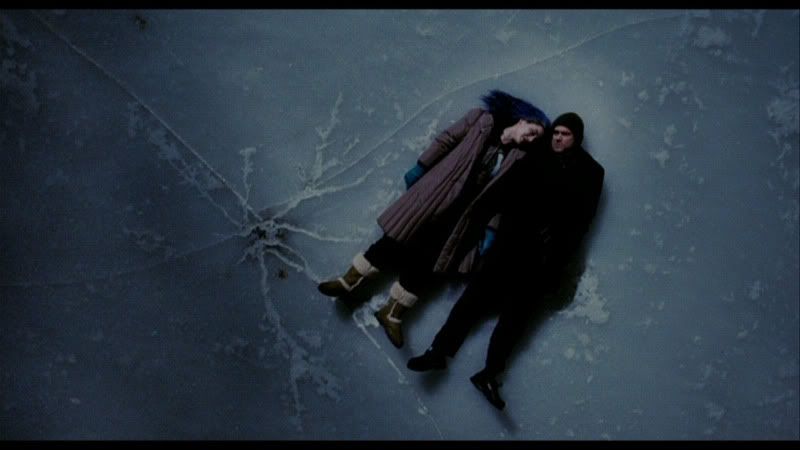
1. Start with a base. I started with this base and resized it to a 100x100 base from Eternal Sunshine of the Spotless Mind.
2. Duplicate the base once, set it to screen, 100% opacity.
3. Create a new hue/saturation layer, set it to screen, 32% opacity, and put the following settings:
Hue: +5
Saturation: +50
Lightness: +1
4. Create a new layer and fill it with a yellow (#fffc00). Set the layer on soft light, 79% opacity.

>
5. Create a new selective colors layer and put the following settings:
REDS
Cyan: -100
Yellow: +100
Black: +100
YELLOWS
Cyan: -32
Yellow: -42
MAGENTAS
Cyan: -100
Magenta: -100
Yellow: -100
NEUTRALS
Cyan: +58
Magenta: -21
Yellow: -61
Black: +27
Put the layer on normal, 100% opacity.
>
6. Create a new selective colors layer and put the following settings:
REDS
Cyan: -94
Magenta: +21
Yellow: +25
Black: -5
YELLOWS
Yellow: -38
NEUTRALS
Black: +15
BLACK
Black: +25
Put the layer on normal, 25% opacity.
>
7. Create a new Brightness/Contrast layer, normal, 100% opacity, and put the following settings:
Brightness: -5
Contrast: +9
8. Dublicate the background layer, place it above the brightness/contrast layer, and set it to soft light, 45% opacity.
9. Select all the layers and merge them together in order to create a new base.

10. Open up a new, blank 100x100 document. Paste the new base onto the document and move the image until Clem and Joel are in the bottom corner. Merge the layers together.
>
NOTE: The process with the coloring and the placement in order to create the final product are the same; however, I am now using the caps from the original icon. Meaning, that depending on the way you crop the original image, the outcome will vary slightly.
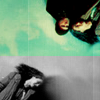
11. Copy the new base twice. Move the second layer until no white is visible.
>
12. Merge the three layers together.
13. Copy the base layer once. Use the smudge tool to make the backround of the image appear marbled.
>
14. Take a cloud texture, the one is used is from ofthesky, and paste in onto the image. Set it to Overlay, 50% fill.

>
15. Take the same texture and rotate it vertical once, and horizontal once. Paste it onto the same image. Set it to Overlay, 57% opacity, 78% fill.
16. Duplicate the smudged layer and drag it to the top; thereby, making it the first layer.
17. Use the lasso tool to cut an outline around the head's of Joel and Clem.
>
18. Take this texture by peoplemachines, flip it, and paste it beneath the cutout image of Clem and Joel, but above the cloud texture.
>
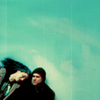
19. The final result should look something like this:
Other icons made in a similar way:
I hope this made some sense. If there are any questions, please don't hesitate to ask! I'd love to see your results if you use this!
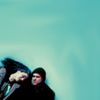
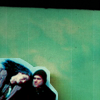
to
using Photoshop CS2, as requested by nyi.
How to go from
to
using Photoshop CS2, as requested by nyi.
Please note that these steps will not work for all bases; also, this is a set of guidelines. Please do not copy the icon exactly and call it your own.
1. Start with a base. I started with this base and resized it to a 100x100 base from Eternal Sunshine of the Spotless Mind.
2. Duplicate the base once, set it to screen, 100% opacity.
3. Create a new hue/saturation layer, set it to screen, 32% opacity, and put the following settings:
Hue: +5
Saturation: +50
Lightness: +1
4. Create a new layer and fill it with a yellow (#fffc00). Set the layer on soft light, 79% opacity.
>
5. Create a new selective colors layer and put the following settings:
REDS
Cyan: -100
Yellow: +100
Black: +100
YELLOWS
Cyan: -32
Yellow: -42
MAGENTAS
Cyan: -100
Magenta: -100
Yellow: -100
NEUTRALS
Cyan: +58
Magenta: -21
Yellow: -61
Black: +27
Put the layer on normal, 100% opacity.
>
6. Create a new selective colors layer and put the following settings:
REDS
Cyan: -94
Magenta: +21
Yellow: +25
Black: -5
YELLOWS
Yellow: -38
NEUTRALS
Black: +15
BLACK
Black: +25
Put the layer on normal, 25% opacity.
>
7. Create a new Brightness/Contrast layer, normal, 100% opacity, and put the following settings:
Brightness: -5
Contrast: +9
8. Dublicate the background layer, place it above the brightness/contrast layer, and set it to soft light, 45% opacity.
9. Select all the layers and merge them together in order to create a new base.
10. Open up a new, blank 100x100 document. Paste the new base onto the document and move the image until Clem and Joel are in the bottom corner. Merge the layers together.
>
NOTE: The process with the coloring and the placement in order to create the final product are the same; however, I am now using the caps from the original icon. Meaning, that depending on the way you crop the original image, the outcome will vary slightly.
11. Copy the new base twice. Move the second layer until no white is visible.
>
12. Merge the three layers together.
13. Copy the base layer once. Use the smudge tool to make the backround of the image appear marbled.
>
14. Take a cloud texture, the one is used is from ofthesky, and paste in onto the image. Set it to Overlay, 50% fill.
>
15. Take the same texture and rotate it vertical once, and horizontal once. Paste it onto the same image. Set it to Overlay, 57% opacity, 78% fill.
16. Duplicate the smudged layer and drag it to the top; thereby, making it the first layer.
17. Use the lasso tool to cut an outline around the head's of Joel and Clem.
>
18. Take this texture by peoplemachines, flip it, and paste it beneath the cutout image of Clem and Joel, but above the cloud texture.
>
19. The final result should look something like this:
Other icons made in a similar way:
I hope this made some sense. If there are any questions, please don't hesitate to ask! I'd love to see your results if you use this!