Great Base Tutorial
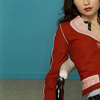
Go from
to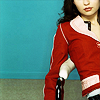

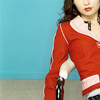
to

to
Okay, this a tutorial for a really simple way to make bases that really set up your icon for the best results. I promise. It's for Photoshop, but from what I know of Paint Shop Pro you should be able to translate it if you know what you're doing. Please try and make yourself use a different image then the one I used; you'll learn more that way.
Warning: As with most tutorials, this is not for every picture. Please ask your doctor if this tutorial is right for you.
Note: I use Photoshop version 5.5! While I am able to follow tutorials for version 7.0 with ease, there are some differences, which may include where you can find options to do things such as desaturate layers. When in doubt, refer to the help manual.
1. Find a picture, and crop it into a square. I am not going to tell you how to crop your picture because this is not a tutorial on cropping. Do any picture preps like blurring people's skin, using the dodge tool over eyes, smoothing out the frizzies on people's hair, whatever. Then resize to 100x100 and sharpen. The image I'm using is of Emily Browning (compliments of Emily-Browning.com.)
2. Duplicate the picture and set it to screen.
3. Duplicate that and desaturate it.

4. Set that layer to soft light and marvel at how much better it looks.
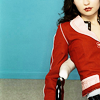
5. Now we're going to change the color of that top layer. Go to image > adjust > selective color. Since that layer is desaturated, select 'neutrals' from the drop-down list entitled 'Colors.' Then adjust the colors to your liking. For this icon I did cyan +52 ; red +20 ; yellow +38; and black +8.
6. Do whatever else you like with the icon. You could even just add text and call it a day. Have fun!
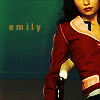


Note: Please do not take the Hermione icon -- it was a request and is not my best work anyway. However, feel free to take the Emily and/or Cedric ones as long as you credit.) Hermione and Cedric pictures compliments of MuggleNet.
to
to
to
Okay, this a tutorial for a really simple way to make bases that really set up your icon for the best results. I promise. It's for Photoshop, but from what I know of Paint Shop Pro you should be able to translate it if you know what you're doing. Please try and make yourself use a different image then the one I used; you'll learn more that way.
Warning: As with most tutorials, this is not for every picture. Please ask your doctor if this tutorial is right for you.
Note: I use Photoshop version 5.5! While I am able to follow tutorials for version 7.0 with ease, there are some differences, which may include where you can find options to do things such as desaturate layers. When in doubt, refer to the help manual.
1. Find a picture, and crop it into a square. I am not going to tell you how to crop your picture because this is not a tutorial on cropping. Do any picture preps like blurring people's skin, using the dodge tool over eyes, smoothing out the frizzies on people's hair, whatever. Then resize to 100x100 and sharpen. The image I'm using is of Emily Browning (compliments of Emily-Browning.com.)
2. Duplicate the picture and set it to screen.
3. Duplicate that and desaturate it.
4. Set that layer to soft light and marvel at how much better it looks.
5. Now we're going to change the color of that top layer. Go to image > adjust > selective color. Since that layer is desaturated, select 'neutrals' from the drop-down list entitled 'Colors.' Then adjust the colors to your liking. For this icon I did cyan +52 ; red +20 ; yellow +38; and black +8.
6. Do whatever else you like with the icon. You could even just add text and call it a day. Have fun!
Note: Please do not take the Hermione icon -- it was a request and is not my best work anyway. However, feel free to take the Emily and/or Cedric ones as long as you credit.) Hermione and Cedric pictures compliments of MuggleNet.