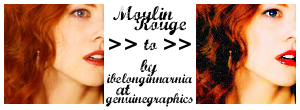
Icon Tutorial #10

Requested by
qwertykate88, from this post, thanks dear!
Made in GIMP 2.
Fairly simple and translatable.
Uses color balance and floodfill layers.
Do NOT hotlink any of the images!
01) Open your image and crop to your liking. For this icon, I used a base (found here) by
karanna1 at
dont_be_so_base.
02) Duplicate your base twice; you now have three (3) layers.
Set the second layer to screen at 40% opacity. Set the third layer to soft light at 60% opacity.
Remember, you can always mess with the opacities, they vary depending upon the image.
03) On the soft light layer, open Color Balance (Layer > Colors > Color Balance) and use the settings:
MIDTONES:
Red: 65
Green: 40
Blue: 45
Now merge the layers.
04) Open Color Balance again and use the settings:
MIDTONES:
Red: -90
SHADOWS:
Green: -10
Blue: 20
05) Now open Hue-Saturation (Layer > Colors > Hue-Saturation) and use the settings:
MASTER:
Saturation: 18
06) Create two (2) new layers.
Floodfill the first with blue #7AE6F6 and set it to burn.
Floodfill the second with pink #FDB2B2 and set it to soft light.
Merge layers.
07) Use your sharpening tool (I used hard circle size 5, 100% opacity) and go over the eyes and lips once or twice.
08) Duplicate your base, and set it to burn 100% opacity.
Use your eraser tool and erase all but the eyes and lips.
09) Open a scratchy texture (I used this one by
toybirds from here) and set it to screen 40% opacity.
10) At this point you can add text, brushes and other doodads, but I'm done! XD
DON'T REPEAT THIS TUTORIAL EXACTLY! IF YOU INTEND TO USE THIS TUTORIAL, PLEASE COMMENT!
I ALSO LOVE SEEING YOUR RESULTS, TOO! ;D
RESOURCES - REQUESTS - TUTORIAL INDEX
Questions? Ask away!
Feel free to JOIN or FRIEND the community!