And another!
putting all these (images by ladymalone):
Z E B R A
into this:

step one:
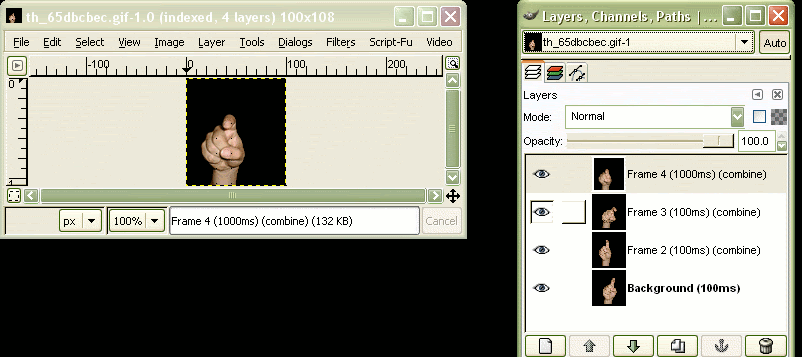
i saved the "z" animation to my computer and opened it in gimp. this is what it came up as:
step two:
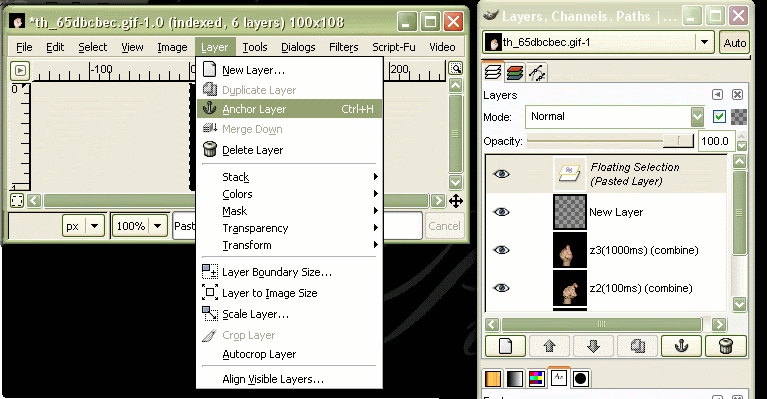
i opened each subsequent letter, one at a time, so i wouldn't get confused by all the windows. so, in this picture, it's the "e" that i'm working with. i copied the "e" and pasted it as a new layer into the "z." then since it came up as a floating selection, i selected the option highlighted to anchor it to the new layer. do that with "b" "r" and "a" and you're done copy/pasting
step three:
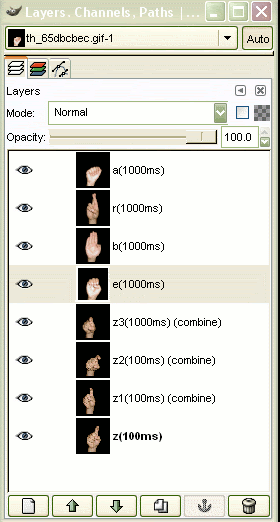
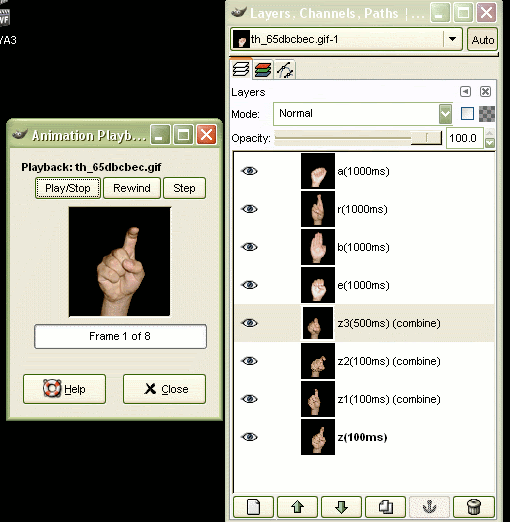
i renamed all my layers to correspond with the letters. in the layer description i also put a time of 1000ms for the "e" "b" "r" "a" (i didn't touch the times on the "z" because it had already been adjusted for that specific letter). that corresponds to how long each layer will run, so in this case i picked 1000ms (or 1second) for each frame. this is what my layers dialog looks like:
step four:
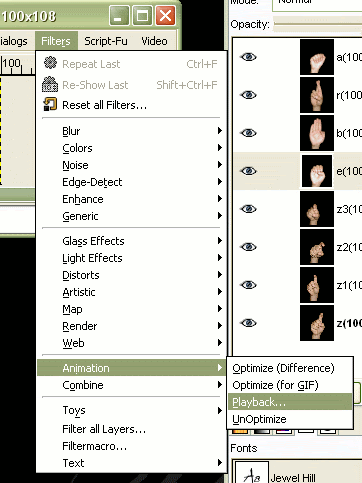
now i wanna see what it looks like. so i go to animation>playback like so:
step five:
and i get this little window. after playing it back, the "z"kind of lingers a little too long, so the time gets adjusted in the layers window:
saving:
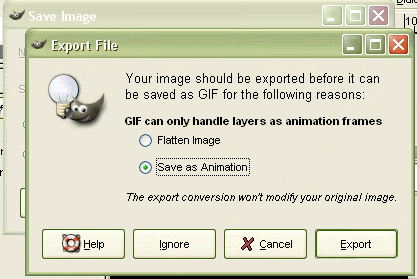
when you go to save your final edition, a screen will prompt you to choose to either flatten the image or save as animation. SAVE AS ANIMATION! it may seem silly to point this out, but i learned the hard way that you can't just hit the okay button too quickly, lol. so after you select save as animation, hit export.
annddd... you're done!

voila!
Z E B R A
into this:

step one:
i saved the "z" animation to my computer and opened it in gimp. this is what it came up as:

step two:
i opened each subsequent letter, one at a time, so i wouldn't get confused by all the windows. so, in this picture, it's the "e" that i'm working with. i copied the "e" and pasted it as a new layer into the "z." then since it came up as a floating selection, i selected the option highlighted to anchor it to the new layer. do that with "b" "r" and "a" and you're done copy/pasting

step three:
i renamed all my layers to correspond with the letters. in the layer description i also put a time of 1000ms for the "e" "b" "r" "a" (i didn't touch the times on the "z" because it had already been adjusted for that specific letter). that corresponds to how long each layer will run, so in this case i picked 1000ms (or 1second) for each frame. this is what my layers dialog looks like:

step four:
now i wanna see what it looks like. so i go to animation>playback like so:

step five:
and i get this little window. after playing it back, the "z"kind of lingers a little too long, so the time gets adjusted in the layers window:

saving:
when you go to save your final edition, a screen will prompt you to choose to either flatten the image or save as animation. SAVE AS ANIMATION! it may seem silly to point this out, but i learned the hard way that you can't just hit the okay button too quickly, lol. so after you select save as animation, hit export.

annddd... you're done!

voila!