House Tut
Go from this to 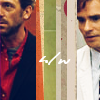
.
I'm using PSP8 for this, but it's very easily transferrable to other programs. Also, don't follow this tut exactly- use it as a tool, especially for lighter, higher quality pics.
1. Take your picture , crop it to 100x100 pixels. I'm using PSP, so as I create the cropping area, I can see how large it is in the toolbar.
Note on cropping: This can be one of the best things about an icon. Try to have an interesting cropping, where perhaps you only crop part of their faces and a lot of background.

2. Don't sharpen yet. It looks a little blurry, but you never know if it'll look better that way in the end or not.
3. Duplicate the layer. Set duplicate to screen, opacity 50.
4. Duplicate bottom layer again, bring it to the top. Press Shift and h, and make sure the left bar of the pop-up is completely at the bottom. Press OK. (You just desaturated the layer).
5. Set desaturated layer to Hard Light at 100% opacity.
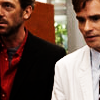
6. Create a new raster layer and flood-fill with a very dark blue, such as #160B45. Set to Lighten 100%.
7. New raster layer flood-filled with a lightish neon green, like #76F87C. Set to Burn at 22%.
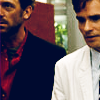
8. Duplicate bottom layer and set it at Soft Light 100%. Leave it above the base.
9. Next, I opened a texture by Tre and using the rectangular marquee tool, I copy-pasted little bits of it onto the image, not changing the settings or opacity.
10. Then I opened a vector layer and using AlphaMack AOE, I typed 'h/w' and resized it to my liking.
11. Decided it wasn't as light as I wanted, so I duplicated the bottom layer, placed it above the blue flood-fill layer, set it to 'screen' at 54% opacity.

The end! Happy slashing! ;)
I'd really love to see what you guys made with this. :)

.
I'm using PSP8 for this, but it's very easily transferrable to other programs. Also, don't follow this tut exactly- use it as a tool, especially for lighter, higher quality pics.
1. Take your picture , crop it to 100x100 pixels. I'm using PSP, so as I create the cropping area, I can see how large it is in the toolbar.
Note on cropping: This can be one of the best things about an icon. Try to have an interesting cropping, where perhaps you only crop part of their faces and a lot of background.

2. Don't sharpen yet. It looks a little blurry, but you never know if it'll look better that way in the end or not.
3. Duplicate the layer. Set duplicate to screen, opacity 50.
4. Duplicate bottom layer again, bring it to the top. Press Shift and h, and make sure the left bar of the pop-up is completely at the bottom. Press OK. (You just desaturated the layer).
5. Set desaturated layer to Hard Light at 100% opacity.

6. Create a new raster layer and flood-fill with a very dark blue, such as #160B45. Set to Lighten 100%.
7. New raster layer flood-filled with a lightish neon green, like #76F87C. Set to Burn at 22%.

8. Duplicate bottom layer and set it at Soft Light 100%. Leave it above the base.
9. Next, I opened a texture by Tre and using the rectangular marquee tool, I copy-pasted little bits of it onto the image, not changing the settings or opacity.
10. Then I opened a vector layer and using AlphaMack AOE, I typed 'h/w' and resized it to my liking.
11. Decided it wasn't as light as I wanted, so I duplicated the bottom layer, placed it above the blue flood-fill layer, set it to 'screen' at 54% opacity.

The end! Happy slashing! ;)
I'd really love to see what you guys made with this. :)