Tutorial 1 : Edward & Alphonse Elric
Okay! This is my first tutorial!
inparusu wanted to know how to make to make this :
So, I wrote a tutorial for it.
We'll go from this
to this
In Photoshop 7.0. I don't know if its translatable, but I'll try! (Since inparusu has PSP.)
Alright you have your picture open, crop, (base prep if you want. I didn't.)
I have that.
Duplicate your base and set it to Soft Light.

I have this now.
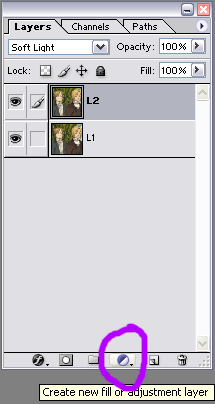
See whats circled? Click it, and find Hue/Saturation and up the saturation to about +37 or whatever you like.

You should have something like this.
Now make a new layer, and fill it with #00116A and set it to Extulsion at 100%.

You got this now.
Now the tricky part for PSP users because I don't know if it works in PSP...
Make a new layer and and turn off the extulsion layer then press Alt + Crl + Shft + E that will make a duplicate of what the icon looks like.
Then turn the extulsion layer back on and set the duplicated layer to Soft Light.

And thats all!
This is for if you can't do that whole 'Tricky part'.
Its time for me to sound smart and try to help people with PSP.
Make a new 100x100 canvas and drag (if you can) every layer and flatten it all and then drag it back to the icon and set it to Soft Light or whatever is close to that.
Okay! Now it IS all done! I really hope it makes sense! I'm really bad at explaining things! If not, just say so and I'll try and help!
inparusu wanted to know how to make to make this :
So, I wrote a tutorial for it.
We'll go from this
to this
In Photoshop 7.0. I don't know if its translatable, but I'll try! (Since inparusu has PSP.)
Alright you have your picture open, crop, (base prep if you want. I didn't.)
I have that.
Duplicate your base and set it to Soft Light.
I have this now.
See whats circled? Click it, and find Hue/Saturation and up the saturation to about +37 or whatever you like.
You should have something like this.
Now make a new layer, and fill it with #00116A and set it to Extulsion at 100%.
You got this now.
Now the tricky part for PSP users because I don't know if it works in PSP...
Make a new layer and and turn off the extulsion layer then press Alt + Crl + Shft + E that will make a duplicate of what the icon looks like.
Then turn the extulsion layer back on and set the duplicated layer to Soft Light.
And thats all!
This is for if you can't do that whole 'Tricky part'.
Its time for me to sound smart and try to help people with PSP.
Make a new 100x100 canvas and drag (if you can) every layer and flatten it all and then drag it back to the icon and set it to Soft Light or whatever is close to that.
Okay! Now it IS all done! I really hope it makes sense! I'm really bad at explaining things! If not, just say so and I'll try and help!