Icon Tutorial >> iPod icons
...So, since I've had a few people ask on my other journal and in IM, I figured I'd compile a proper tutorial for making the coveted iPod icon. Since I've NEVER seen one for PSP.
I'm using Paint Shop Pro 7, but this could be easily translated to Photoshop. I'm just too lazy to do a tutorial for that too, since I don't use it.
MAJOR props to grapejelly for being the one who originally taught me to do this, and the steps and everything are total credit to her. I'm just putting it into imagey form.
First, Open your program. Duh. Then select your image. I'll be using this one of Yuna from FFX-2, since it's got a nice white background. (you can use colored backgrounds, you just have to work with it more then.)

Now, you want to go to your menu and select color>>Grayscale
This will make your image all black and white, like so.

Then, you want to go BACK to the color menu, and go to Adjust>>Brightness/Contrast
that'll bring up the Brightness/Contrast window. You want to up your Contrast up a LOT. I usually have it somewhere in the 80s or 70s threshold. You can go to 100 if you want, but it might look bad, depending on the image. The brightness, depending on the background and the picture you're making into a silouette you can either up or down. Play with it, and find out what works best for each image.
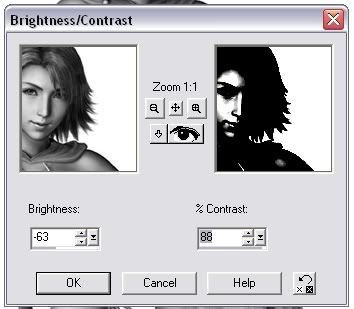
now your image will be really dark, but there will be some white on it still, more than likely.
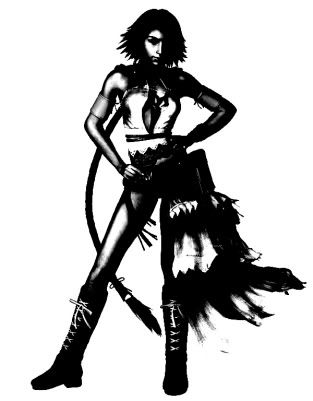
So, then you need to go BACK into the color dropdown (note the pattern? XD) Adjust>>Gamma Correction and click!
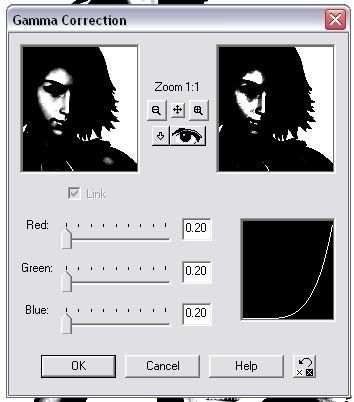
This will bring you to the Gamma correction palette. Just pull it down so it's darker. sometimes you can skip this step, but I won't here.
Now, make a new layer (Layers>>New Raster Layer)
On the new layer, color everything that you can see white black. With your paintbrush, or airbrush. I always use my airbrush because my paintbrush is reserved for special brushes.
Once you're done, your image should look something like this.

Okay, now, you need to go back to your color palette, all the way to the bottom, and click Increase Color Depth. Then to the bottom of that submenu, and 16 million colors. Which should be the only thing not greyed out anyway. This will allow you to make your background color.
After that, make another new layer, and put it below all your other layers.
Then, fill it with the color of your choice. I chose my favorite pink (#FF7BAA) the entire layer should be colored then.
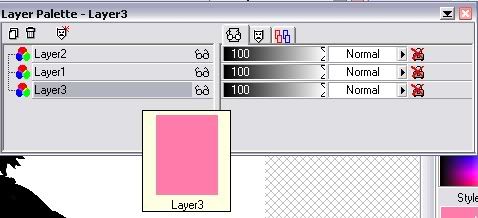
Next, go to the layer your image is on, and set it to Multiply. this will turn everything white pink.
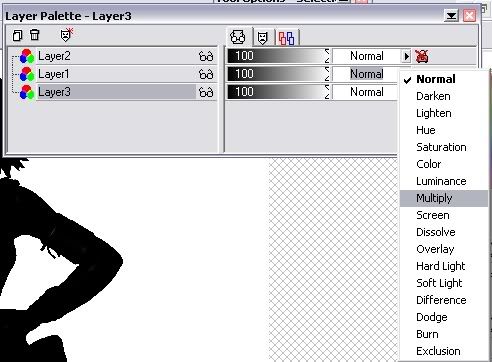

Now for the tricky part. make a new layer above all the other layers, and change your color to white, and shut off your BG color.

Then you need to draw in the wires. I use a bezier curve line, and you'll just have to expirament with it until it looks right to you. To make it easier to match up the ears, I suggest making the layer which you colored the black in on off, so you can tell where the ears are better. Once you finish that, the image should look something like this
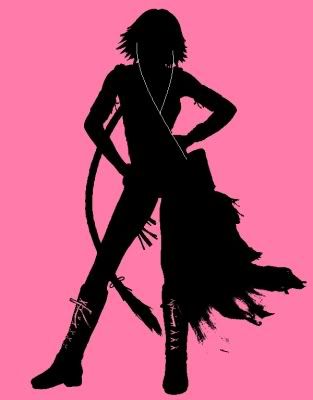
Now, it's up to you to leave it like that, or add an actual iPod, (or iShuffle, if you'd rather.) THOSE, you can make with an easy rectangle tool filled white, and then a circle tool. I'm still expiramenting with that, so feel free to figure out what works best for you too. I'll edit this once I figure out what works best. Right now I just used the retangle tool, and then two smaller circles from the shapes palette, set with their opacity low.

This is my final result. Now, you can merge it, resize it as you will, and put it into an icon!
Here's my final result!

Hope that was helpful! ^__^ Any questions, feel free to ask them!
I'm using Paint Shop Pro 7, but this could be easily translated to Photoshop. I'm just too lazy to do a tutorial for that too, since I don't use it.
MAJOR props to grapejelly for being the one who originally taught me to do this, and the steps and everything are total credit to her. I'm just putting it into imagey form.
First, Open your program. Duh. Then select your image. I'll be using this one of Yuna from FFX-2, since it's got a nice white background. (you can use colored backgrounds, you just have to work with it more then.)

Now, you want to go to your menu and select color>>Grayscale
This will make your image all black and white, like so.

Then, you want to go BACK to the color menu, and go to Adjust>>Brightness/Contrast
that'll bring up the Brightness/Contrast window. You want to up your Contrast up a LOT. I usually have it somewhere in the 80s or 70s threshold. You can go to 100 if you want, but it might look bad, depending on the image. The brightness, depending on the background and the picture you're making into a silouette you can either up or down. Play with it, and find out what works best for each image.

now your image will be really dark, but there will be some white on it still, more than likely.

So, then you need to go BACK into the color dropdown (note the pattern? XD) Adjust>>Gamma Correction and click!
This will bring you to the Gamma correction palette. Just pull it down so it's darker. sometimes you can skip this step, but I won't here.

Now, make a new layer (Layers>>New Raster Layer)
On the new layer, color everything that you can see white black. With your paintbrush, or airbrush. I always use my airbrush because my paintbrush is reserved for special brushes.
Once you're done, your image should look something like this.

Okay, now, you need to go back to your color palette, all the way to the bottom, and click Increase Color Depth. Then to the bottom of that submenu, and 16 million colors. Which should be the only thing not greyed out anyway. This will allow you to make your background color.
After that, make another new layer, and put it below all your other layers.
Then, fill it with the color of your choice. I chose my favorite pink (#FF7BAA) the entire layer should be colored then.

Next, go to the layer your image is on, and set it to Multiply. this will turn everything white pink.


Now for the tricky part. make a new layer above all the other layers, and change your color to white, and shut off your BG color.

Then you need to draw in the wires. I use a bezier curve line, and you'll just have to expirament with it until it looks right to you. To make it easier to match up the ears, I suggest making the layer which you colored the black in on off, so you can tell where the ears are better. Once you finish that, the image should look something like this

Now, it's up to you to leave it like that, or add an actual iPod, (or iShuffle, if you'd rather.) THOSE, you can make with an easy rectangle tool filled white, and then a circle tool. I'm still expiramenting with that, so feel free to figure out what works best for you too. I'll edit this once I figure out what works best. Right now I just used the retangle tool, and then two smaller circles from the shapes palette, set with their opacity low.

This is my final result. Now, you can merge it, resize it as you will, and put it into an icon!
Here's my final result!

Hope that was helpful! ^__^ Any questions, feel free to ask them!