Tutorial Three
Learn how to go from 
to
.
First, crop your image however you like it.

Sharpen it once (you may want to sharpen it a little more; go ahead and sharpen it twice and you can then adjust that sharpness by going to Edit->Fade Sharpen and playing with the percentage), then use the Smudge tool to make the skin smoother.
Now adjust the brightness/contrast. You can do this by going to Image->Adjustments->Brightness/Contrast or by duplicating the base, setting the new layer to screen, duplicating it again and bringing it to the top and setting that one to soft light. Play with the opacities to see what you like. Both methods will yeild the same results.
You should end up with something like this:

Merge your layers all together.
Now, put this gradient by colortone on top and set it to exclusion, 100%.

Take this light texture by anais-dirge, rotate it so that it best fits your image (making sure to paint in black over the parts that might cover the face, etc) and set it to screen, 70%. (The opacity depends on your image. You might want to change it later.)
You should have something like this so far:

Make a new layer. Select a tan color like #CCB194, flood fill the layer with it, and set it on multiply, 100%.
Make a new layer. Select a light blue color like #D3ECFD, flood fill the layer with it, and set it on color burn, 100%. (Remember to play with colors so that they suite your image; you might need a lighter or darker blue, for instance.)
Put on this gradient by colortone and set to overlay, 100%.

Put on this gradient by colortone and set to soft light, 40%.

You should have something like this:

Now we're going to put on a gradient map! In your layers window, click the half black, half white circle near the bottom and select gradient map. Hit the little arrow to the right of the color bar and select the black and white gradient. Then hit okay. Put this gradient layer to 30%, on normal blend mode.
Duplicate your light blue color burn layer and bring it to the top.
You should have something like this:

Make a new layer. Take a dark red color like #741413 and flood fill that layer. Set it to color dodge, 52%, and erase the red on the skin.
Make a new layer. Holding down control, click on the red layer below. This will select everything in that layer. Hover over your icon, right click and select select inverse. This will select all the skin that you erased the red color on.
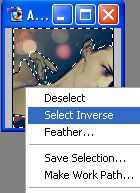
Click on the top most, empty layer. With the inverse of the previous layer still selected, flood fill it with the same red color. Set this layer to color dodge, 19%.
Duplicate your base layer. Bring it to the top, desaturate it, and set it to soft light, 35%.
You could stop here, but I felt like it needed some text. So I took this brush by _coquettish and stuck it in the corner.
And there you go, all finished! Remember to play around the opacities; different images will handle them different. I hope you enjoyed it!

.

to

.
First, crop your image however you like it.

Sharpen it once (you may want to sharpen it a little more; go ahead and sharpen it twice and you can then adjust that sharpness by going to Edit->Fade Sharpen and playing with the percentage), then use the Smudge tool to make the skin smoother.
Now adjust the brightness/contrast. You can do this by going to Image->Adjustments->Brightness/Contrast or by duplicating the base, setting the new layer to screen, duplicating it again and bringing it to the top and setting that one to soft light. Play with the opacities to see what you like. Both methods will yeild the same results.
You should end up with something like this:

Merge your layers all together.
Now, put this gradient by colortone on top and set it to exclusion, 100%.

Take this light texture by anais-dirge, rotate it so that it best fits your image (making sure to paint in black over the parts that might cover the face, etc) and set it to screen, 70%. (The opacity depends on your image. You might want to change it later.)

You should have something like this so far:

Make a new layer. Select a tan color like #CCB194, flood fill the layer with it, and set it on multiply, 100%.
Make a new layer. Select a light blue color like #D3ECFD, flood fill the layer with it, and set it on color burn, 100%. (Remember to play with colors so that they suite your image; you might need a lighter or darker blue, for instance.)
Put on this gradient by colortone and set to overlay, 100%.

Put on this gradient by colortone and set to soft light, 40%.

You should have something like this:

Now we're going to put on a gradient map! In your layers window, click the half black, half white circle near the bottom and select gradient map. Hit the little arrow to the right of the color bar and select the black and white gradient. Then hit okay. Put this gradient layer to 30%, on normal blend mode.
Duplicate your light blue color burn layer and bring it to the top.
You should have something like this:

Make a new layer. Take a dark red color like #741413 and flood fill that layer. Set it to color dodge, 52%, and erase the red on the skin.
Make a new layer. Holding down control, click on the red layer below. This will select everything in that layer. Hover over your icon, right click and select select inverse. This will select all the skin that you erased the red color on.

Click on the top most, empty layer. With the inverse of the previous layer still selected, flood fill it with the same red color. Set this layer to color dodge, 19%.
Duplicate your base layer. Bring it to the top, desaturate it, and set it to soft light, 35%.
You could stop here, but I felt like it needed some text. So I took this brush by _coquettish and stuck it in the corner.

And there you go, all finished! Remember to play around the opacities; different images will handle them different. I hope you enjoyed it!

.