(no subject)
Pretty simple little tutorial that was requested. I'm hoping it'll make sense... there's lotsa different ways to use light effects, this is just how I do it sometimes. :)
Icon we're making today:

So tutorial! I'm assuming a general understanding of PS, so I'm not explaining things in detail, but we're using the basic settings and brushes so it's nothing too complicated. If you have any questions just ask, and if you figure you've got a better way of doing this- tell me! Always trying to find new tricks and things, you know how it is ;)
Start with this uber hot pic of Jack.
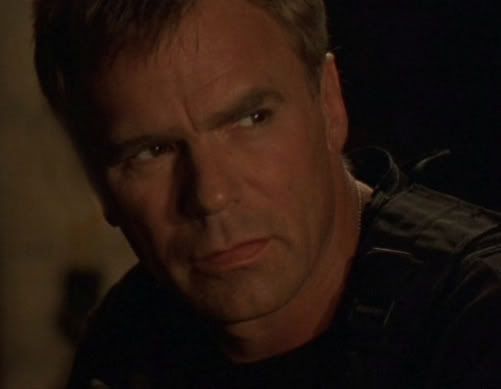
Now resize the cap to 150 x 116, and crop it down to 100x100 like so:

So this is our base layer that we’ll call layer 1.
Duplicate layer 1 four times, and set each layer to screen.
So now from bottom to top, you’ve got:
+ Layer 1
+ Screened layer 1
+ Screened layer 2
+ Screened layer 3
+ Screened layer 4
Desaturate screened layers 3 and 4 completely.
Duplicate screened layer 4 and set it to soft light. So now we have…

Select Layer 1 (that would be layer 1, and not screened layer 1) and sharpen it four times.
Here’s where we smooth his skin in layer 1. There’s easier ways of doing this, like despeckling or blurring, but for some reason I like doing it manually.
So tips:
+ Don’t smooth eyes
+ Don’t smooth hair/clothing, just his face
+ Don’t overdo it or it’ll look weird, keep within natural lines.
+ Magnify the pic when you’re doing this so it looks all pixely
+ Use the fluffy circle (soft round) tool, size 10px, strength 11% when smoothing

So let’s look at magnified Jack before & after smoothing:


Now zoom out, and it looks… better.

Merge all your layers.
Make a new layer above layer 1, fill with # E0CA9A, set to Multiply, keep opacity at 100%
Now we just throw this light texture by ridiculously talented awmp over top:

Set the texture to hard light, rotate it once to the left. Make sure it’s on top of your Multiply layer!

Erase the circle bits in the way of Jack’s prettiness:

Doesn’t look dark enough, so duplicate your # E0CA9A Multiply layer and set it to 33%
That’ll do. Now, slap on the 'alive'. The font is AvantGarde, white, size 24. Put it in behind his neck and shoulder *takes a moment to ponder Jack's neck and shoulders*. Simplify the layer, and erase anything that overlaps him.
Then draw two black lines at the top/bottom of the pic, and make the bottom line a little thicker than the top… just because someone somewhere thought it would be cool.
Ta da!

Icon we're making today:

So tutorial! I'm assuming a general understanding of PS, so I'm not explaining things in detail, but we're using the basic settings and brushes so it's nothing too complicated. If you have any questions just ask, and if you figure you've got a better way of doing this- tell me! Always trying to find new tricks and things, you know how it is ;)
Start with this uber hot pic of Jack.

Now resize the cap to 150 x 116, and crop it down to 100x100 like so:

So this is our base layer that we’ll call layer 1.
Duplicate layer 1 four times, and set each layer to screen.
So now from bottom to top, you’ve got:
+ Layer 1
+ Screened layer 1
+ Screened layer 2
+ Screened layer 3
+ Screened layer 4
Desaturate screened layers 3 and 4 completely.
Duplicate screened layer 4 and set it to soft light. So now we have…

Select Layer 1 (that would be layer 1, and not screened layer 1) and sharpen it four times.
Here’s where we smooth his skin in layer 1. There’s easier ways of doing this, like despeckling or blurring, but for some reason I like doing it manually.
So tips:
+ Don’t smooth eyes
+ Don’t smooth hair/clothing, just his face
+ Don’t overdo it or it’ll look weird, keep within natural lines.
+ Magnify the pic when you’re doing this so it looks all pixely
+ Use the fluffy circle (soft round) tool, size 10px, strength 11% when smoothing

So let’s look at magnified Jack before & after smoothing:


Now zoom out, and it looks… better.

Merge all your layers.
Make a new layer above layer 1, fill with # E0CA9A, set to Multiply, keep opacity at 100%
Now we just throw this light texture by ridiculously talented awmp over top:

Set the texture to hard light, rotate it once to the left. Make sure it’s on top of your Multiply layer!

Erase the circle bits in the way of Jack’s prettiness:

Doesn’t look dark enough, so duplicate your # E0CA9A Multiply layer and set it to 33%
That’ll do. Now, slap on the 'alive'. The font is AvantGarde, white, size 24. Put it in behind his neck and shoulder *takes a moment to ponder Jack's neck and shoulders*. Simplify the layer, and erase anything that overlaps him.
Then draw two black lines at the top/bottom of the pic, and make the bottom line a little thicker than the top… just because someone somewhere thought it would be cool.
Ta da!
