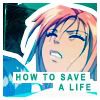
Anime Capture Tutorial in PS
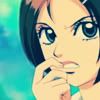
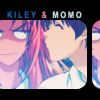
Go from this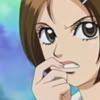
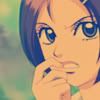
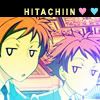
======>> this
This tutorial deals with selective coloring, hue and saturation, and color balance. Not translatable in versions of PSP 9 and lower.
======>>
1. Open your anime capture base. Instead of sharpening it, go to IMAGE>>FILTER>>BLUR>>BLUR For the reason of organization please rename this layer STEP 1

2. Duplicate your STEP 1 layer. Set layer mode to SOFT LIGHT at 100%. Rename this layer STEP 2.

3. Duplicate layer in step 2. Set layer mode to SCREEN at 50 %. Rename this layer STEP 3
4. Go to LAYER>>NEW ADJUSTMENT LAYER>>HUE/SATURATION You can play around it if you want, but I just leave it alone till I'm done making the icon.
5. Create a new layer called STEP 5. Fill it with 0C61B0 . Set blending mode to EXCLUSION 100%
6. Duplicate your STEP 1 layer and drag it on top of all layers. Set to SOFT LIGHT 100%. Rename this layer STEP 6 if you like.
7. Duplicate the layer in step 6. Set this layer mode to SOFT LIGHT 100%, HARD LIGHT 100% or OVERLAY 100%. I chose OVERLAY 100%. Rename this layer STEP 7 if you like.

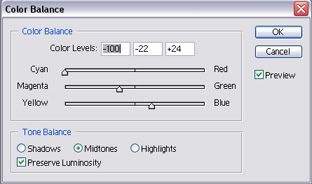
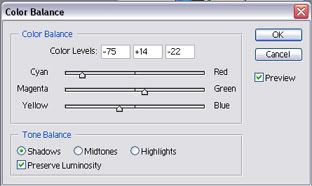
8. Go to LAYER>>NEW ADJUSTMENT LAYER>>COLOR BALANCE Here are my settings. Do not touch highlights.
Midtones
Shadows
9. Go to LAYER>>NEW ADJUSTMENT LAYER>>SELECTIVE COLOR Here are my settings.
REDS
CYAN: -100
MAGENTA: 69
YELLOW: 40
BLACK: 5
YELLOWS
CYAN: -22
MAGENTA: -49
CYANS
CYAN: 44
MAGENTA: -26
YELLOW: -26
BLACK: -25
BLUES
CYAN: -45
MAGENTA: -43
YELLOW: -49
BLACK : 58
NEUTRALS
CYAN: -36
MAGENTA : -11
YELLOW : -36
BLACK: 17
10. Create a new fill layer called STEP 10 and flood it with 000A38 Set blending mode to EXCLUSION 100%
11. Now select your image and go to EDIT>>COPY MERGED. Make sure you have the layer STEP 7 selected. Next go to LAYER>>NEW>>LAYER VIA COPY. Set blending mode to HARD LIGHT 100% and move up to the top of all your layers. Rename this layer STEP 11.

12. Select a simple gradient that contains black and a dominant color in your image. I chose blue. Flood it with your chosen gradient and set to SCREEN 100%. This layer is called STEP 12.

+
=
13. Now make another gradient with the two main colors of your icon. I chose blue and purple. Make a new layer and flood it with your new gradient. Set this mode to LIGHTEN at whatever opacity you like.

14. Now go back to the HUE/SATURATION layers you made earlier in this tutorial. Double click and move the all the sliders until you achieve a desirable effect. I did not do this with the example icons below.
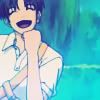
Here's what I end up
Other icons made with this tutorial


I hope you liked my tutorial :) Post what you come up with.
======>> this
This tutorial deals with selective coloring, hue and saturation, and color balance. Not translatable in versions of PSP 9 and lower.
======>>
1. Open your anime capture base. Instead of sharpening it, go to IMAGE>>FILTER>>BLUR>>BLUR For the reason of organization please rename this layer STEP 1
2. Duplicate your STEP 1 layer. Set layer mode to SOFT LIGHT at 100%. Rename this layer STEP 2.
3. Duplicate layer in step 2. Set layer mode to SCREEN at 50 %. Rename this layer STEP 3
4. Go to LAYER>>NEW ADJUSTMENT LAYER>>HUE/SATURATION You can play around it if you want, but I just leave it alone till I'm done making the icon.
5. Create a new layer called STEP 5. Fill it with 0C61B0 . Set blending mode to EXCLUSION 100%
6. Duplicate your STEP 1 layer and drag it on top of all layers. Set to SOFT LIGHT 100%. Rename this layer STEP 6 if you like.
7. Duplicate the layer in step 6. Set this layer mode to SOFT LIGHT 100%, HARD LIGHT 100% or OVERLAY 100%. I chose OVERLAY 100%. Rename this layer STEP 7 if you like.
8. Go to LAYER>>NEW ADJUSTMENT LAYER>>COLOR BALANCE Here are my settings. Do not touch highlights.
Midtones
Shadows
9. Go to LAYER>>NEW ADJUSTMENT LAYER>>SELECTIVE COLOR Here are my settings.
REDS
CYAN: -100
MAGENTA: 69
YELLOW: 40
BLACK: 5
YELLOWS
CYAN: -22
MAGENTA: -49
CYANS
CYAN: 44
MAGENTA: -26
YELLOW: -26
BLACK: -25
BLUES
CYAN: -45
MAGENTA: -43
YELLOW: -49
BLACK : 58
NEUTRALS
CYAN: -36
MAGENTA : -11
YELLOW : -36
BLACK: 17
10. Create a new fill layer called STEP 10 and flood it with 000A38 Set blending mode to EXCLUSION 100%
11. Now select your image and go to EDIT>>COPY MERGED. Make sure you have the layer STEP 7 selected. Next go to LAYER>>NEW>>LAYER VIA COPY. Set blending mode to HARD LIGHT 100% and move up to the top of all your layers. Rename this layer STEP 11.
12. Select a simple gradient that contains black and a dominant color in your image. I chose blue. Flood it with your chosen gradient and set to SCREEN 100%. This layer is called STEP 12.
+
=
13. Now make another gradient with the two main colors of your icon. I chose blue and purple. Make a new layer and flood it with your new gradient. Set this mode to LIGHTEN at whatever opacity you like.
14. Now go back to the HUE/SATURATION layers you made earlier in this tutorial. Double click and move the all the sliders until you achieve a desirable effect. I did not do this with the example icons below.
Here's what I end up
Other icons made with this tutorial
I hope you liked my tutorial :) Post what you come up with.