first tutorial :]
we're going from 
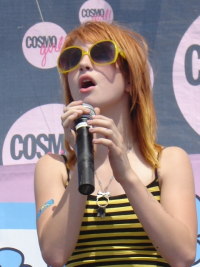
to
in three easy steps.
made for PS7 and higher.
involves selective coloring.
crop your base to your desired settings; screen, sharpen, etc.
my base was fine so i didn't do anything to it.
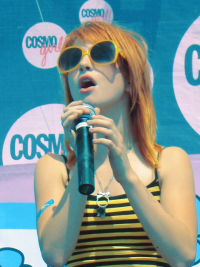
open up a new selective color layer and input these settings:
reds: -100,-33,100, 100
yellows: -100, 0, 100, 0
cyans: 100
blues: 100, 100, 0, 0
magentas: 100,100,100,0
neutrals: 44,-28,-34,0
okay.
your image should now look like this;;
open up another selective color layer:
reds:-100, 0, 100, 100
okay.

layer>>new adjustment layer>>hue saturation:
up the saturation to +17
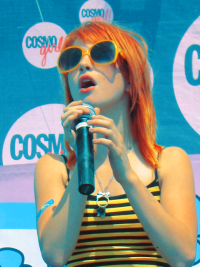
and you're done. :]
other examples;;


x-posted at the_g_spott
to
in three easy steps.
made for PS7 and higher.
involves selective coloring.
crop your base to your desired settings; screen, sharpen, etc.
my base was fine so i didn't do anything to it.
open up a new selective color layer and input these settings:
reds: -100,-33,100, 100
yellows: -100, 0, 100, 0
cyans: 100
blues: 100, 100, 0, 0
magentas: 100,100,100,0
neutrals: 44,-28,-34,0
okay.
your image should now look like this;;
open up another selective color layer:
reds:-100, 0, 100, 100
okay.
layer>>new adjustment layer>>hue saturation:
up the saturation to +17
and you're done. :]
other examples;;
x-posted at the_g_spott