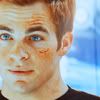
James Tiberius Kirk icon tutorial.

→

Difficulty: medium
Uses: selective coloring, channel mixer,hue/sat.
Program: PSCS3
Translatable?: actaully, i have no idea
PSD?: yep (: at my journal!
in this tutorial you will learn how to give Star Trek screencaps more depth and blue.
it works great on bright images!
1.) Open your base and dublicate it, set the dublicated base on screen.
2.) Got to Layer→New Adjustment Layer→Selective Color:
Reds: -100 / -49 / 100 / 0
Yellows: -100 / +2 /-19 / 0
Neutrals: -7 / -1 / +2 / 0
3.) ok now we want to get there a bit color! go to Layer→New Adjustment Layer→Channel Mixer:
Output Channel red: +98 / -10 / 0 / 0
Output Channel green: 0 / +92 / 0 / 0
Output Channel blue: 0 / 0 / +104 / 0
4.) And again we need a selective coloring layer:
reds: -63 / 0 / +24 / 0
yellows: -46 / 0 / +53 / 100
whites: +34 / 0 / +15 / 0
neutrals: +4 / 0 / -1 / 0
5.) this step is optional. It will give your base a little bit more blue. just make a new fill layer with #380000 the more you increase the opacity the more blue will show up, in this case the opacity was: 26%
6.) Ok we're nearly done! now dublicate the base again, put it on top of everything and set it on soft light.
7.) Now, to give the icon more depth go to Layer→New Adjustment Layer→Hue/Saturation:
Edit: Master:
Hue: 0 / Saturation: +20 / Lightness: 0
8.) Last but not least i added a light texture and a little bit text to make it more interesting.
-please credit (:
spaceshipmonkey
and please direct all your comments there (: you'll fnid the psd there aswell (:
other examples:


