Tutorial: How to create an animation in Photoshop CS3
How to make a coloured, animated gif in Photoshop CS3 (ETA: I use Extended version of PS CS 3) out of an actual video clip (no screencaps needed).
From a video (Criminal Minds, 1x10) to t h i s and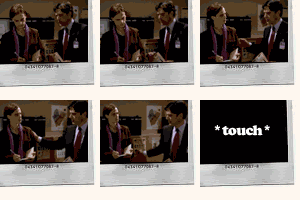
This tutorial includes: cropping, colouring, rendering, minimizing and converting a video to a gif in a handful of steps.
Beware: Large graphics behind the cut.
1st step: prepare your video clip
In Photoshop you can open almost every video format as long as your computer has the right codecs installed. Personally, I can't use avi files (Photoshop and Quicktime work together, and my QT can't play avi), so I use two other programmes, first: to capture the video sequence and second: to convert it to mp4/mov.
Software (freeware) I use: The KM Player, XMedia Recode, K-Lite Codec Pack
Basically you don't actually need to capture the video sequence, because it doesn't make much difference to PS CS3 how long the video file itself is, but it's easier for the cutting process. You can also use the Windows Movie Maker or the program that comes with your Apple computer to do this.
2nd step: crop, colour, shorten the video
Photoshop lets you colour, resize, shorten, crop, etc. an entire video. It deals with a clip like with normal screencap layers. Either drag and drop your video file into Photoshop or go to File -> Open. Go to Window and click on animation for the animation/timeline tab. This will let you play and shorten the video file in Photoshop.
1. To shorten the video length, you have to move the blue/gray stripes to mark beginning and end of animation.
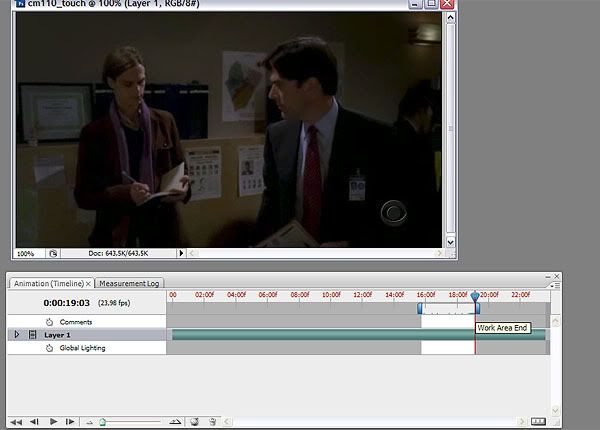
2. Crop the video to your prefered size. I make my animations around 320px-180px. Use the normal crop tool (Shift + C) to do this. A Photoshop Alert will pop up that will ask you to convert the video to a smart object, click convert.
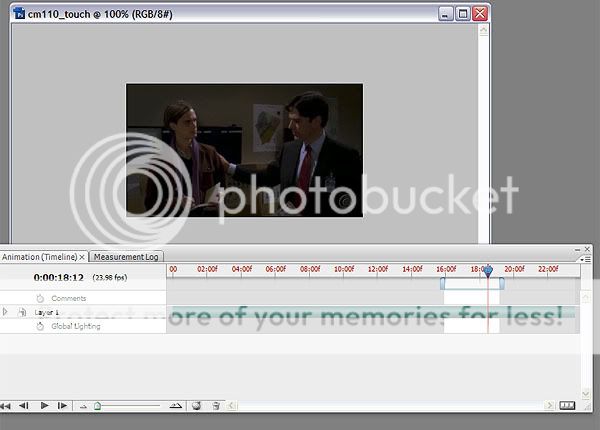
3. The next step is colouring the video. Everything you do will be shown on the entire animation. This saves you *tons* of time, because you don't have to do it on every frame.
The colouring for my video:
a. To lighten I copied the base layer and set it to Screen. Another Timeline will be added to the Animation tab. This will happen everytime you create a new layer.
b. Levels: RGB - 14 ; 1,08 ; 240
c. Color Fill: #e3c311 on Soft Light (Opacity: 40% ; Fill: 36 %)
d. Colour Balance: Shadows: +1 -4 +13 ; Midtones: -4 -5 -12 ; Highlights: +1 -1 +3
e. Surface Blur (Radius: 1, Threshold: 2) on the two video layers
f. Sharpen the faces which most likely will be a bit blurry by now. Use the Unsharp Mask (about 30%, Radius: 1, Threshold: 2) on the base layer.
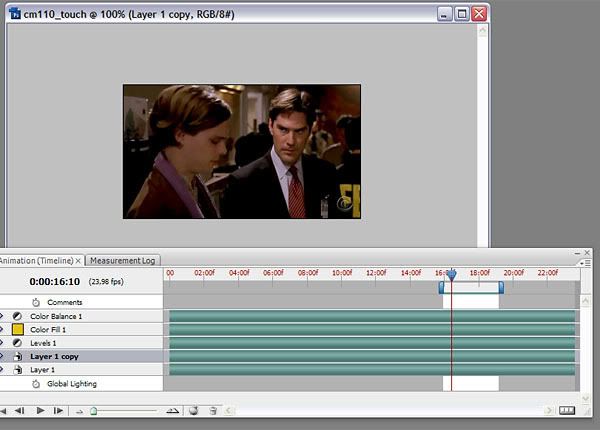
4. There are two ways to process now. You either go to File - Save to Web & Devices (which will save the file on spot as a gif with video speed and frame number) OR render the file to a fully working Quicktime mov (or avi, mp4, etc.). Do the latter if you want to use the new video for an animated icon or if you want to add more frames (or delete some for that matter which will make the file size *smaller*) and change the speed.
Since I still have plans for this gif, let's do the second step and render the video. Go to File -> Export -> Render Video and a new window will open. You have a few different options from which you can choose, but I stayed with the original settings. Click render.
3rd step: the animated gif
Open the new mov file you've created of the now coloured/cropped vid, go to File -> Import -> Video Frames to Layers. I usually choose Limit to every 2 Frames which is good enough for a standard gif. Make sure that Make Frame Animation is checked and click OK. Usually the set speed of 0,04 seconds is too fast, to change it hold the shift key from the first frame to the last to hightlight them all in the Animation tab and click on the number. A more natural speed is around 0,08 seconds usually.
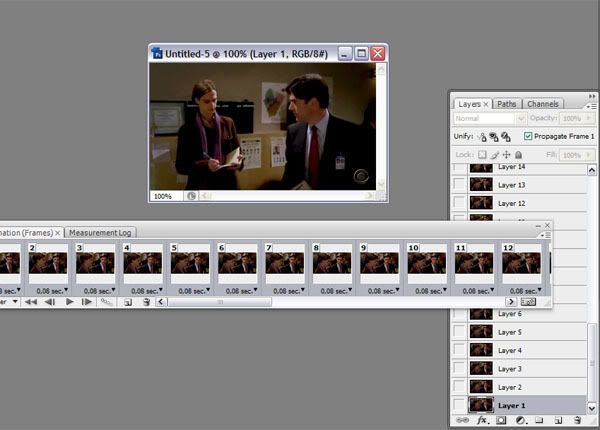
You can delete layers or add layers now as much as you want. How to make an icon out of this I will explain later. Now go to File - Save for Web & Devices and a new window will open that gives you options to make your gif smaller or if it's an animated icon to fit it LJ standards.
My settings for this animation:
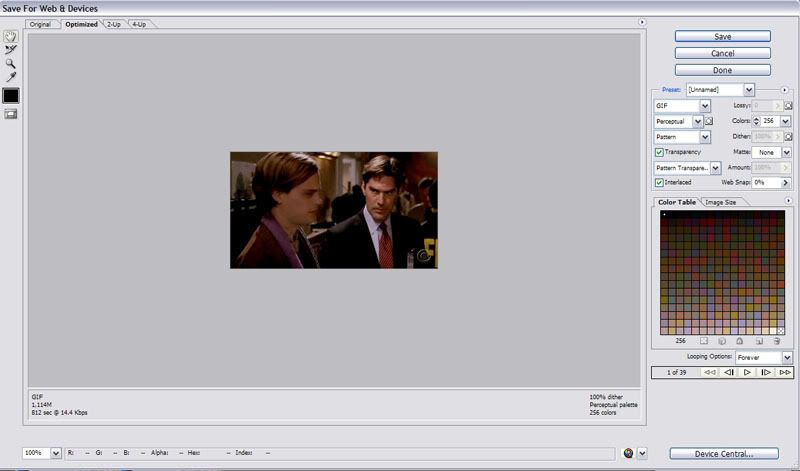
Make sure the loop options is set on Forever. And voilà, you're done. This will take no longer than 15 minutes once you've done it a few times. I am sure that it's possible to do this with older versions of Photoshop and ImageReady because I remember that a friend used to make animations using mov files in PS/IR 7.
Result:

Extra: How to make an animated icon
Repeat everything up to point 4 of step 2. The rest will be done the old fashioned way.
Prepare your animation background (and text). I used a texture by chaoticfae and a text layer saying *touch*. Now Import the mov as Frames to Layers and either skip a few layers or use only the moment you want to animate (for me it's the touch).
Crop the layers the way you want them. I used the black background of the polaroid as my my cropping sample. As you can see, when ever you open up a movie to layers file, all layers are listed. Hold shift to highlight them all and drag them onto the animation background you've prepared.
Now you will only see the base showing up in your Animation tab. Best is, if you set the speed for the animation now, it will be copied onto the next frame. Click on the first layer and make it visible (the eye). Duplicate the selected frame (image) and in your layers palette choose the next layer to make it visible. Repeat this step until you have enough frames for your gif.
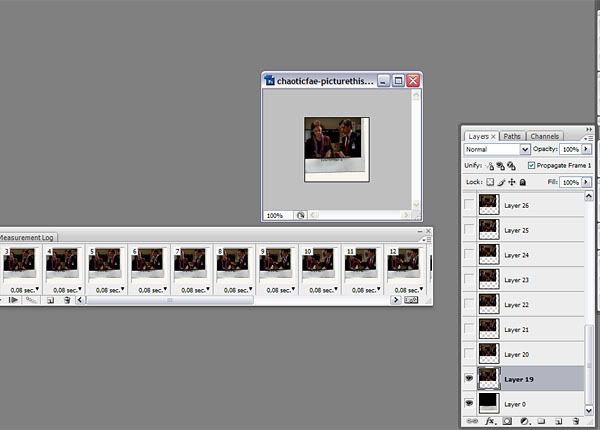
Now basically you can repeat the Third Step of this tutorial. Go to File -> Save for Web & Devices and change the settings to fit lj standard (40kb). This will likely tune the quality of the gif down, so keep in mind not to use too many layers.
Result:

(I know the gif is rather ugly, but it's good enough to show the process xD)
Thanks for reading! If you have questions, let me know and I'll try to answer them.
comment, please * resources * friend my icon community stormfronticons
From a video (Criminal Minds, 1x10) to t h i s and
This tutorial includes: cropping, colouring, rendering, minimizing and converting a video to a gif in a handful of steps.
Beware: Large graphics behind the cut.
1st step: prepare your video clip
In Photoshop you can open almost every video format as long as your computer has the right codecs installed. Personally, I can't use avi files (Photoshop and Quicktime work together, and my QT can't play avi), so I use two other programmes, first: to capture the video sequence and second: to convert it to mp4/mov.
Software (freeware) I use: The KM Player, XMedia Recode, K-Lite Codec Pack
Basically you don't actually need to capture the video sequence, because it doesn't make much difference to PS CS3 how long the video file itself is, but it's easier for the cutting process. You can also use the Windows Movie Maker or the program that comes with your Apple computer to do this.
2nd step: crop, colour, shorten the video
Photoshop lets you colour, resize, shorten, crop, etc. an entire video. It deals with a clip like with normal screencap layers. Either drag and drop your video file into Photoshop or go to File -> Open. Go to Window and click on animation for the animation/timeline tab. This will let you play and shorten the video file in Photoshop.
1. To shorten the video length, you have to move the blue/gray stripes to mark beginning and end of animation.

2. Crop the video to your prefered size. I make my animations around 320px-180px. Use the normal crop tool (Shift + C) to do this. A Photoshop Alert will pop up that will ask you to convert the video to a smart object, click convert.

3. The next step is colouring the video. Everything you do will be shown on the entire animation. This saves you *tons* of time, because you don't have to do it on every frame.
The colouring for my video:
a. To lighten I copied the base layer and set it to Screen. Another Timeline will be added to the Animation tab. This will happen everytime you create a new layer.
b. Levels: RGB - 14 ; 1,08 ; 240
c. Color Fill: #e3c311 on Soft Light (Opacity: 40% ; Fill: 36 %)
d. Colour Balance: Shadows: +1 -4 +13 ; Midtones: -4 -5 -12 ; Highlights: +1 -1 +3
e. Surface Blur (Radius: 1, Threshold: 2) on the two video layers
f. Sharpen the faces which most likely will be a bit blurry by now. Use the Unsharp Mask (about 30%, Radius: 1, Threshold: 2) on the base layer.

4. There are two ways to process now. You either go to File - Save to Web & Devices (which will save the file on spot as a gif with video speed and frame number) OR render the file to a fully working Quicktime mov (or avi, mp4, etc.). Do the latter if you want to use the new video for an animated icon or if you want to add more frames (or delete some for that matter which will make the file size *smaller*) and change the speed.
Since I still have plans for this gif, let's do the second step and render the video. Go to File -> Export -> Render Video and a new window will open. You have a few different options from which you can choose, but I stayed with the original settings. Click render.
3rd step: the animated gif
Open the new mov file you've created of the now coloured/cropped vid, go to File -> Import -> Video Frames to Layers. I usually choose Limit to every 2 Frames which is good enough for a standard gif. Make sure that Make Frame Animation is checked and click OK. Usually the set speed of 0,04 seconds is too fast, to change it hold the shift key from the first frame to the last to hightlight them all in the Animation tab and click on the number. A more natural speed is around 0,08 seconds usually.

You can delete layers or add layers now as much as you want. How to make an icon out of this I will explain later. Now go to File - Save for Web & Devices and a new window will open that gives you options to make your gif smaller or if it's an animated icon to fit it LJ standards.
My settings for this animation:

Make sure the loop options is set on Forever. And voilà, you're done. This will take no longer than 15 minutes once you've done it a few times. I am sure that it's possible to do this with older versions of Photoshop and ImageReady because I remember that a friend used to make animations using mov files in PS/IR 7.
Result:

Extra: How to make an animated icon
Repeat everything up to point 4 of step 2. The rest will be done the old fashioned way.
Prepare your animation background (and text). I used a texture by chaoticfae and a text layer saying *touch*. Now Import the mov as Frames to Layers and either skip a few layers or use only the moment you want to animate (for me it's the touch).
Crop the layers the way you want them. I used the black background of the polaroid as my my cropping sample. As you can see, when ever you open up a movie to layers file, all layers are listed. Hold shift to highlight them all and drag them onto the animation background you've prepared.
Now you will only see the base showing up in your Animation tab. Best is, if you set the speed for the animation now, it will be copied onto the next frame. Click on the first layer and make it visible (the eye). Duplicate the selected frame (image) and in your layers palette choose the next layer to make it visible. Repeat this step until you have enough frames for your gif.

Now basically you can repeat the Third Step of this tutorial. Go to File -> Save for Web & Devices and change the settings to fit lj standard (40kb). This will likely tune the quality of the gif down, so keep in mind not to use too many layers.
Result:
(I know the gif is rather ugly, but it's good enough to show the process xD)
Thanks for reading! If you have questions, let me know and I'll try to answer them.
comment, please * resources * friend my icon community stormfronticons