Shimmer and Shine
Going from this picture: 
To this icon: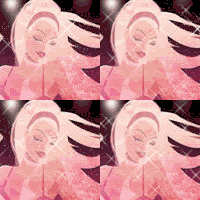
Also this is a good tutorial for the "sparkle technique" if that’s all you want to learn then skip down to step number 10.
My community for more tutorials etc l_y_l_a_s
1. Find a good base. For this effect it’s good to find an image that has a lot of dark space and a lot of white space and not much else. This icon has a dark background and the girl’s hair is nice and white, etc
2. Open your base.
3. Open a pre-made texture like this one
I’ve found lots of nice ones from people like alaskanicons and made my own as well.
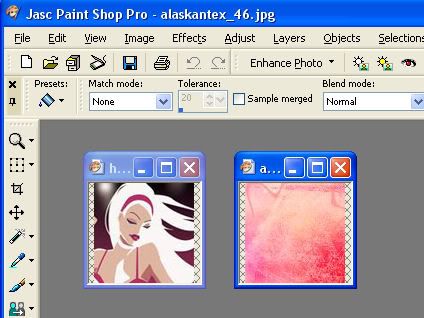
4. Copy the texture
5. Paste the texture as a new layer on top of your base. (you can now close the texture image)
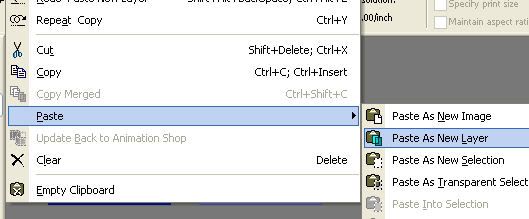
6. You will not be able to see your base anymore, that’s ok. Go to Layers > Properties> Reduce the Opacity until you can see your image under the layer.
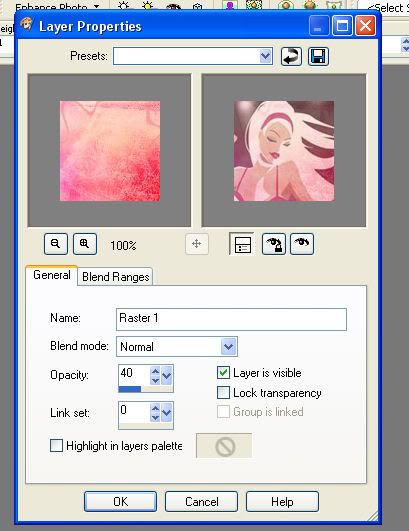
7. Zoom in on your new image
8. Erase the texture over the background so that only the white spaces are filled with texture. Use the eraser tool set to a small round eraser.
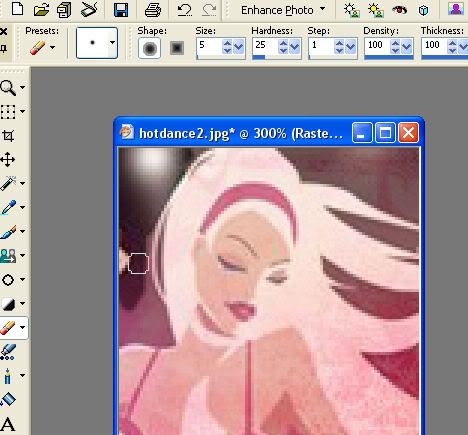
if you would like to add a border or text, now is the time to do it! I didn't, so moving on...
9. Merge all visible layers
HERE IS WHERE WE ADD THE SPARKEL EFFECT!!
Note: To use the sparkle effect you will need a sparkle or glitter brush set and an animation program, I use Animation Shop 3. I got the set of glitter brushes I’m using in this tutorial at this website: celestial-star
The glitter brush set will contain several brushes with little stars and specks on them in a random but somewhat matching pattern
10. Copy your image.
11. Paste as a new image and repeat until you have the desired number of images you want for your animation. (I made 4) Line them up doing down your screen, in order.
12. Go to the first image. Create a new raster layer.
13. Select a brush color that will show up well on your image. I believe I picked a silver gradient for this icon.
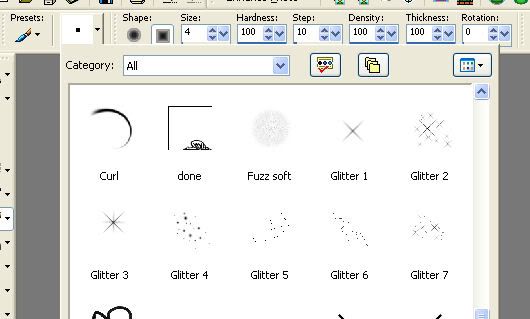
14. Select the glitter brush with large sparkles in it. Apply to your image. Click once for a small amount of sparkle and more than once to add more sparkle. You can use the "move" tool to move your sparkles around to get them just where you want them.
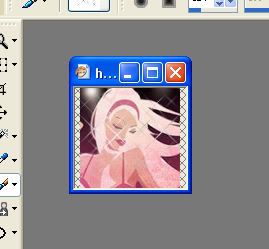
14. Merge Visible layers. (OR wait until the end to do this so that you can make changes in the glitter possessions)
15. Save image as a .png file. (I usually name mine things like icon1, icon2, icon3 for animation purposes so that I animate them in the right order later.)
16. Go to the next image. Repeat steps 12-15, however, use another brush from the same glitter set, use one with smaller sparkles this time.
17. Go to your third layer - you know the drill by now, but here you might want to add at least once nice big "star" or "sparkle"
18. Keep repeating this process until you have all your images done. In this case we have made four.
Note: when you place your glitter brushes make sure the glitter is not going on the exact same spots on each image or you won’t get a very noticeable effect.
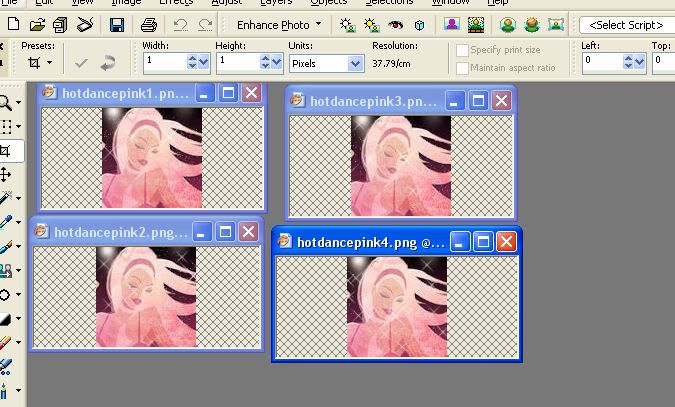
19. Open Animation Shop 3 (no screen shots, sorry)
20. Select Wizard
21. Follow these steps
First screen select same size as first frame and Transparent
Next screen select centered and with canvas color and check mark scale to fit box
Next screen Yes, repeat and set speed to 15
Next Screen add your images
Next screen finish
22. View animation. You can use the frame properties to change the speed if you want.
23. Save the animation as a .gif file
You’re Done!
Questions can be posted below. Also I’d love to see anything you make!!

To this icon:

Also this is a good tutorial for the "sparkle technique" if that’s all you want to learn then skip down to step number 10.
My community for more tutorials etc l_y_l_a_s
1. Find a good base. For this effect it’s good to find an image that has a lot of dark space and a lot of white space and not much else. This icon has a dark background and the girl’s hair is nice and white, etc
2. Open your base.
3. Open a pre-made texture like this one
I’ve found lots of nice ones from people like alaskanicons and made my own as well.

4. Copy the texture
5. Paste the texture as a new layer on top of your base. (you can now close the texture image)

6. You will not be able to see your base anymore, that’s ok. Go to Layers > Properties> Reduce the Opacity until you can see your image under the layer.

7. Zoom in on your new image
8. Erase the texture over the background so that only the white spaces are filled with texture. Use the eraser tool set to a small round eraser.

if you would like to add a border or text, now is the time to do it! I didn't, so moving on...
9. Merge all visible layers
HERE IS WHERE WE ADD THE SPARKEL EFFECT!!
Note: To use the sparkle effect you will need a sparkle or glitter brush set and an animation program, I use Animation Shop 3. I got the set of glitter brushes I’m using in this tutorial at this website: celestial-star
The glitter brush set will contain several brushes with little stars and specks on them in a random but somewhat matching pattern
10. Copy your image.
11. Paste as a new image and repeat until you have the desired number of images you want for your animation. (I made 4) Line them up doing down your screen, in order.
12. Go to the first image. Create a new raster layer.
13. Select a brush color that will show up well on your image. I believe I picked a silver gradient for this icon.

14. Select the glitter brush with large sparkles in it. Apply to your image. Click once for a small amount of sparkle and more than once to add more sparkle. You can use the "move" tool to move your sparkles around to get them just where you want them.

14. Merge Visible layers. (OR wait until the end to do this so that you can make changes in the glitter possessions)
15. Save image as a .png file. (I usually name mine things like icon1, icon2, icon3 for animation purposes so that I animate them in the right order later.)
16. Go to the next image. Repeat steps 12-15, however, use another brush from the same glitter set, use one with smaller sparkles this time.
17. Go to your third layer - you know the drill by now, but here you might want to add at least once nice big "star" or "sparkle"
18. Keep repeating this process until you have all your images done. In this case we have made four.
Note: when you place your glitter brushes make sure the glitter is not going on the exact same spots on each image or you won’t get a very noticeable effect.

19. Open Animation Shop 3 (no screen shots, sorry)
20. Select Wizard
21. Follow these steps
First screen select same size as first frame and Transparent
Next screen select centered and with canvas color and check mark scale to fit box
Next screen Yes, repeat and set speed to 15
Next Screen add your images
Next screen finish
22. View animation. You can use the frame properties to change the speed if you want.
23. Save the animation as a .gif file
You’re Done!
Questions can be posted below. Also I’d love to see anything you make!!