Blinkie Tutorial for The GIMP (using GAP)
This is so not dial-up friendly.
Basically, we're going to learn to create a easy blinkie in The GIMP. (As there really aren't enough tutorials for this program.) Per request of kt_stars. And yes, this is first tutorial. So I'm really not going to show more than what I have to. I figure that some things are just basic knowledge by now. If you wish to see the steps without pics (as in you're on a dial-up connection or just don't feel like it) please go here.
Bonus points if you can name the movie.
So, let's begin now.
We're starting off with this image.
Procced to crop, adjust, do whatever you normally do to images. Me? I crop it, resize it, give the background a good sharpen and call it a day. Next, I copied the background layer, set it to Soft Light at 75.7%
I got this:
Add the text:
And then the nice, lovely one pixel border:
And! Base image is done! (You might want to save at this point. I'm saving them as .xcf files, the GIMP's native format, that way I can come back and fiddle with them to my heart's content.) Now, go to Edit -> Copy Visible, and then over to File -> New.
Once your new image is up, c&p the copied layers onto the new image and anchor the pasted layer. (You can do this one of two ways that I've found so far. One, have your rectangular select tool already on and then click on anywhere that's not the picture, or go into your layers menu on the side and hit the little button on the bottom that has an anchor on it. Yay. Done. Don't close out your other image. In the NEW image, create however many layers you think you're going to need, plus a background copy. (As in count up letters and divide by amount of frames you want. For instance, 'serenity' has 8 letters. I wanted one letter colored per frame. Therefore, I created eight new layers.) Drag your background copy up to the top of the layers. That's going to be the last image in the animation.
Should look like this:
You should have two pictures, looking exactly the same on your screen. Got it? Lovely. Let's continue with the real bitch of the work on this. In your ORIGINAL image, make sure that you're working in your text layer. You can use your 'Select By Color' tool (the one with the little hand/finger over the color bar) and click anywhere on the text, or if you miss, you can go to Select -> Invert to get the selection onto your text.
Now. Start coloring. Since I used a bitmap font and the curves of the letters are technically black, my computer also selected those colors. So I used the Pencil tool (painting in hard-edged circles) to get what I wanted. Zoom in to where you feel the most comfrotable. I usually stick to 400%, but you can go up to 800% if you need more visibility.
Color one letter. Go to Edit -> Copy Visible.
In your NEW image, go to the first layer next to the background. (It should be called New Layer.) Make sure that this layer is HIGHLIGHTED. I can't stress this one enough. If you goof, you've got to go back and figure out where you did it at,a nd then fix it. Proceed to c&p. Your Floating Layer will be at the top. Don't panic. Just anchor the layer. Go back to your ORIGINAL image, get the text back to the color it originally was, and start in on the next letter.
Lather, rinse, repeat.
Now. When you're done, all layers should be filled. Like so:
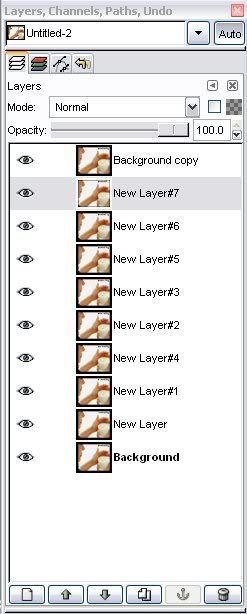
Yay. Hard part is done.
Now for the easy bit.
Go to File -> Save As. Find the folder you want to save your image to, and then name it, making sure to put the extention as .gif.
You'll get the following message:
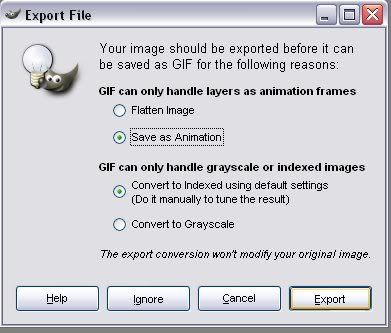
By default, the button will be on 'Flatten Image.' You will want to change it to 'Save As Animation' like I've done in the picture. Now hit Export.
You'll come up to the next message:
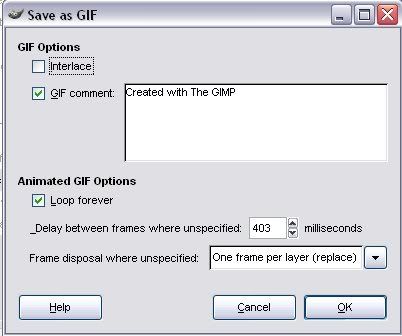
Okay. You'll want most everything to be the same as I've got it in the picture. Interlace off, you can add your own comment or leave it at the default, Loop forever checked. Now for the timing. Please remember, this is in MILLISECONDS. That's one-thousandth of a second. 1000 milliseconds = 1 second. Kay? Smaller the number, faster it goes. I've got it set to 403, but you might want to bump it down if you want a faster blinkie. Just experiment until you find the rate that you like. Make sure that you have your Frame Disposal set to 'One Frame per Layer (replace)'.
Then click okay, and your finished product should look similar to this:

*flumps* If you want said icon, feel free to gack, just credit. I dislike blinkies, so it's doubtful if I'll ever use it.
Go forth and create!
Basically, we're going to learn to create a easy blinkie in The GIMP. (As there really aren't enough tutorials for this program.) Per request of kt_stars. And yes, this is first tutorial. So I'm really not going to show more than what I have to. I figure that some things are just basic knowledge by now. If you wish to see the steps without pics (as in you're on a dial-up connection or just don't feel like it) please go here.
Bonus points if you can name the movie.
So, let's begin now.
We're starting off with this image.
Procced to crop, adjust, do whatever you normally do to images. Me? I crop it, resize it, give the background a good sharpen and call it a day. Next, I copied the background layer, set it to Soft Light at 75.7%
I got this:

Add the text:

And then the nice, lovely one pixel border:

And! Base image is done! (You might want to save at this point. I'm saving them as .xcf files, the GIMP's native format, that way I can come back and fiddle with them to my heart's content.) Now, go to Edit -> Copy Visible, and then over to File -> New.
Once your new image is up, c&p the copied layers onto the new image and anchor the pasted layer. (You can do this one of two ways that I've found so far. One, have your rectangular select tool already on and then click on anywhere that's not the picture, or go into your layers menu on the side and hit the little button on the bottom that has an anchor on it. Yay. Done. Don't close out your other image. In the NEW image, create however many layers you think you're going to need, plus a background copy. (As in count up letters and divide by amount of frames you want. For instance, 'serenity' has 8 letters. I wanted one letter colored per frame. Therefore, I created eight new layers.) Drag your background copy up to the top of the layers. That's going to be the last image in the animation.
Should look like this:

You should have two pictures, looking exactly the same on your screen. Got it? Lovely. Let's continue with the real bitch of the work on this. In your ORIGINAL image, make sure that you're working in your text layer. You can use your 'Select By Color' tool (the one with the little hand/finger over the color bar) and click anywhere on the text, or if you miss, you can go to Select -> Invert to get the selection onto your text.
Now. Start coloring. Since I used a bitmap font and the curves of the letters are technically black, my computer also selected those colors. So I used the Pencil tool (painting in hard-edged circles) to get what I wanted. Zoom in to where you feel the most comfrotable. I usually stick to 400%, but you can go up to 800% if you need more visibility.
Color one letter. Go to Edit -> Copy Visible.
In your NEW image, go to the first layer next to the background. (It should be called New Layer.) Make sure that this layer is HIGHLIGHTED. I can't stress this one enough. If you goof, you've got to go back and figure out where you did it at,a nd then fix it. Proceed to c&p. Your Floating Layer will be at the top. Don't panic. Just anchor the layer. Go back to your ORIGINAL image, get the text back to the color it originally was, and start in on the next letter.
Lather, rinse, repeat.
Now. When you're done, all layers should be filled. Like so:

Yay. Hard part is done.
Now for the easy bit.
Go to File -> Save As. Find the folder you want to save your image to, and then name it, making sure to put the extention as .gif.
You'll get the following message:

By default, the button will be on 'Flatten Image.' You will want to change it to 'Save As Animation' like I've done in the picture. Now hit Export.
You'll come up to the next message:

Okay. You'll want most everything to be the same as I've got it in the picture. Interlace off, you can add your own comment or leave it at the default, Loop forever checked. Now for the timing. Please remember, this is in MILLISECONDS. That's one-thousandth of a second. 1000 milliseconds = 1 second. Kay? Smaller the number, faster it goes. I've got it set to 403, but you might want to bump it down if you want a faster blinkie. Just experiment until you find the rate that you like. Make sure that you have your Frame Disposal set to 'One Frame per Layer (replace)'.
Then click okay, and your finished product should look similar to this:

*flumps* If you want said icon, feel free to gack, just credit. I dislike blinkies, so it's doubtful if I'll ever use it.
Go forth and create!