My first tutorial ever. Blinds, Outline, and Gradients.
Okay, this is my very first tutorial ever, so be somewhat nice. I can take constructive criticism.
Now, we'll be going from this to
. Using Photoshop CS.
Okay, now this is a REALLY easy icon to make it. I did it mainly just to show you all my technique for the outlining effect, which I think looks better than taking a 2px brush and doing it free hand.
All right now, let's get started.
I opened up the image and selected the area I wanted to icon. I cropped it down to 200px. Then I did Filter>Sharpen>>Sharpen (2x)
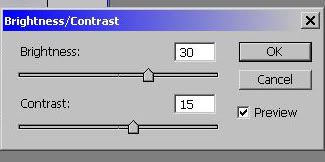
Then I duplicated the background layer and did Image>Adjustments>>Brightness and Contrast.
Now resize the image to 100x100 px.
Get a new layer (Layer>New>>Layer)
I filled it with
made by faeriepagan.
All right. I set Layer 1 to Darken, then duplicated it and set it to Multiply.
Now, on the duplicated Layer 1, I took my Dodge tool:
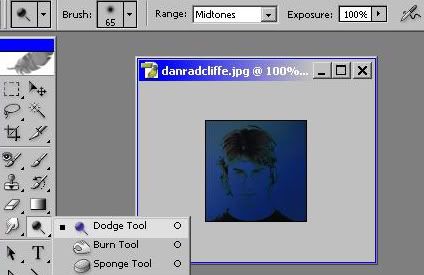
with those settings and ran across the layer once, but I covered the layer completely.
All right, after that I duplicated the luminosity layer (background copy 1) and brought it to the front. Then I applied a black and white gradient map:
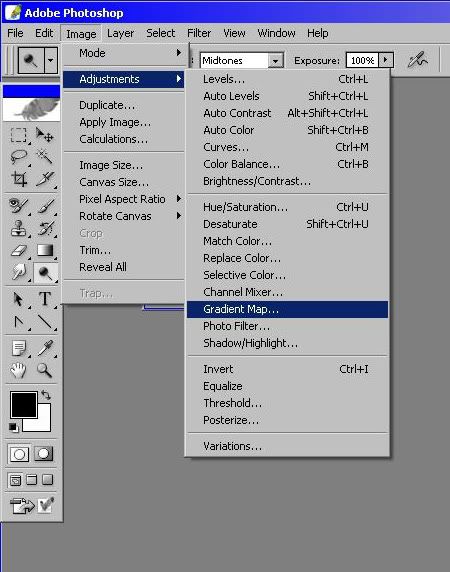
I set that to soft light.
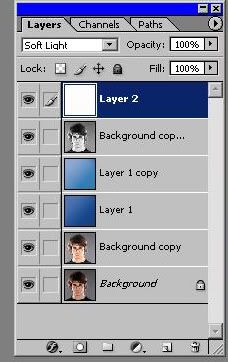
I made another new layer and flooded it with white (#FFFFFF). I set that layer to soft light as well.
Here's what your layers box should look like now:
Okay. Still with me? Good.
I made a new layer and filled it with a diagonal stripes pattern. I got the directions on how to make the pattern from this community, so it's somewhere in here if you look hard enough.
How to make the pattern in a nutshell: ( 4x4 px image. Zoom into maximum ability. Use a 1 px pencil tool and make a diagonal line. Then go to Edit>Define Pattern.)
Next I made a new layer and filled it with
made by me.
I set that layer to Pin Light.
Now, for the outlining effect:
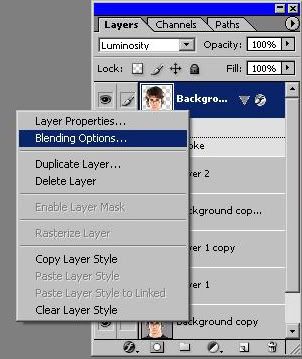
I duplicated background copy 1 again, left it on luminosity, and brought it to the front. Now, here's where most of your time goes. I took my eraser tool and erased everything on that layer that wasn't part of Daneil Radcliffe. Use a small brush to get into the waves of the hair, and around the neck and ears. All right, after that's done, I right clicked on the layer in the box and went into the blending options:
Okay then I clicked stroke and:
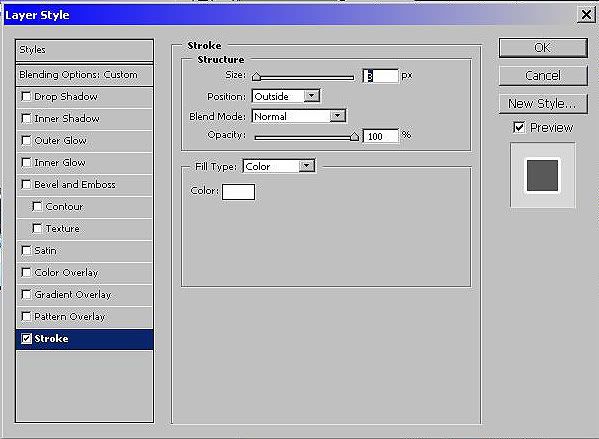
All right, now after that's done, just erase anything that you missed while erasing that got stroked.
Okay, now I gave it just a bit of text using: Georgia, Regular, 8 pt. and a sharp anti-alias.
Then, after that, I just gave it a simple white border. Voila. You're done. Here's what your final layers box should look like:
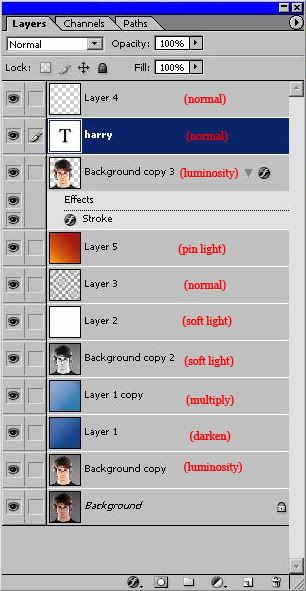
And the final icon:
Now, we'll be going from this to
. Using Photoshop CS.
Okay, now this is a REALLY easy icon to make it. I did it mainly just to show you all my technique for the outlining effect, which I think looks better than taking a 2px brush and doing it free hand.
All right now, let's get started.
I opened up the image and selected the area I wanted to icon. I cropped it down to 200px. Then I did Filter>Sharpen>>Sharpen (2x)
Then I duplicated the background layer and did Image>Adjustments>>Brightness and Contrast.

Now resize the image to 100x100 px.
Get a new layer (Layer>New>>Layer)
I filled it with

made by faeriepagan.
All right. I set Layer 1 to Darken, then duplicated it and set it to Multiply.
Now, on the duplicated Layer 1, I took my Dodge tool:

with those settings and ran across the layer once, but I covered the layer completely.
All right, after that I duplicated the luminosity layer (background copy 1) and brought it to the front. Then I applied a black and white gradient map:

I set that to soft light.
I made another new layer and flooded it with white (#FFFFFF). I set that layer to soft light as well.
Here's what your layers box should look like now:

Okay. Still with me? Good.
I made a new layer and filled it with a diagonal stripes pattern. I got the directions on how to make the pattern from this community, so it's somewhere in here if you look hard enough.
How to make the pattern in a nutshell: ( 4x4 px image. Zoom into maximum ability. Use a 1 px pencil tool and make a diagonal line. Then go to Edit>Define Pattern.)
Next I made a new layer and filled it with

made by me.
I set that layer to Pin Light.
Now, for the outlining effect:
I duplicated background copy 1 again, left it on luminosity, and brought it to the front. Now, here's where most of your time goes. I took my eraser tool and erased everything on that layer that wasn't part of Daneil Radcliffe. Use a small brush to get into the waves of the hair, and around the neck and ears. All right, after that's done, I right clicked on the layer in the box and went into the blending options:

Okay then I clicked stroke and:

All right, now after that's done, just erase anything that you missed while erasing that got stroked.
Okay, now I gave it just a bit of text using: Georgia, Regular, 8 pt. and a sharp anti-alias.
Then, after that, I just gave it a simple white border. Voila. You're done. Here's what your final layers box should look like:

And the final icon: