Blue/Tan colouring
I recently posted this group of icons, all made with the same technique. I really liked the outcome and it's really simple so I made a tutorial for it!
For PSP but pretty easily translatable
Going from
to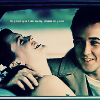
1. So we start with our base. Go to "adjust>sharpness>unsharp mask", sharpen it with the radius set a 1, strength 100, clipping 5. Use the soften tool at 50% opacity and soften a few parts of the skin (mainly where the colours are a bit pixilated). Also use the sharpen tool at 50% opacity to sharpen the eyes, nose and mouth ONCE. WARNING: do not overdo it or the icon looks a bit scary!
2. Now to make the base a bit nicer. It really depends on the image you're using. You want to have a fairly bright image with medium-high contrast if there are dark parts. In this case I duplicated the base twice. The top layer I desaturated (shift+h. Note: I like to set the saturation to -70, not the full -100) and put it on soft light, opacity 100%. The lower layer I set on screen, opacity 100%. However, with the first icon in my set I had two screened layers, nothing more, and on some only a softlight layer, some I added some dodge layers so remember it all depends on your starting pic.
where we are now:

3. So now comes the easy part (aka the steps that were the same for every icon). Create a new layer and flood fill it with dark blue (#0B123B), set to exclusion 100%. Above that create another layer filled with light beige (#F4CDA6), set to multiply 100%. Finally above all that put
this gradient, set to burn 100%. You may want to flip it around depending on where your subject is, so they aren't too dark and blue.
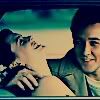
4. Now duplicate the desaturated soft light layer and drag it to the top. Change the opacity to 40%. Duplicate it again and drag the duplicate underneath the soft light layer, set on screen, opacity 40%. Once again this step totally depends on the icon. Sometimes I put just a screen layer, sometimes put only soft light at 50% opacity; mess around with different layers to get your favourite result.
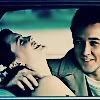
5. Finally add some tiny text in white, use a brush or type it yourself! I typed some lyrics in Sylfaen size 2. I set that layer to screen, 90% opacity and you're done!

Final Layer Palette:
-text, screen, 90% opacity
-desaturated base, softlight, 40% opacity
-desaturated base, screen, 40% opacity
-gradient, burn, 100% opacity
-#F4CDA6, multiply, 100% opacity
-#0B123B, exclusion, 100% opacity
-desaturated base, softlight, 100% opacity
-duplicated base, screen, 100% opacity
-BASE
PS if you've never seen Say Anything Watch it! I love it to pieces!!! ♥
For PSP but pretty easily translatable
Going from

to
1. So we start with our base. Go to "adjust>sharpness>unsharp mask", sharpen it with the radius set a 1, strength 100, clipping 5. Use the soften tool at 50% opacity and soften a few parts of the skin (mainly where the colours are a bit pixilated). Also use the sharpen tool at 50% opacity to sharpen the eyes, nose and mouth ONCE. WARNING: do not overdo it or the icon looks a bit scary!
2. Now to make the base a bit nicer. It really depends on the image you're using. You want to have a fairly bright image with medium-high contrast if there are dark parts. In this case I duplicated the base twice. The top layer I desaturated (shift+h. Note: I like to set the saturation to -70, not the full -100) and put it on soft light, opacity 100%. The lower layer I set on screen, opacity 100%. However, with the first icon in my set I had two screened layers, nothing more, and on some only a softlight layer, some I added some dodge layers so remember it all depends on your starting pic.
where we are now:

3. So now comes the easy part (aka the steps that were the same for every icon). Create a new layer and flood fill it with dark blue (#0B123B), set to exclusion 100%. Above that create another layer filled with light beige (#F4CDA6), set to multiply 100%. Finally above all that put

this gradient, set to burn 100%. You may want to flip it around depending on where your subject is, so they aren't too dark and blue.

4. Now duplicate the desaturated soft light layer and drag it to the top. Change the opacity to 40%. Duplicate it again and drag the duplicate underneath the soft light layer, set on screen, opacity 40%. Once again this step totally depends on the icon. Sometimes I put just a screen layer, sometimes put only soft light at 50% opacity; mess around with different layers to get your favourite result.

5. Finally add some tiny text in white, use a brush or type it yourself! I typed some lyrics in Sylfaen size 2. I set that layer to screen, 90% opacity and you're done!
Final Layer Palette:
-text, screen, 90% opacity
-desaturated base, softlight, 40% opacity
-desaturated base, screen, 40% opacity
-gradient, burn, 100% opacity
-#F4CDA6, multiply, 100% opacity
-#0B123B, exclusion, 100% opacity
-desaturated base, softlight, 100% opacity
-duplicated base, screen, 100% opacity
-BASE
PS if you've never seen Say Anything Watch it! I love it to pieces!!! ♥