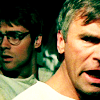
Jack and Danny Coloring Tut
A friend was wondering how I got this coloring so I made this tut...
From
to
Made in PSP9.
First, we start with our image, cropped and resized down to something with a height of 120.
And you get this:
Sharpen it, right click the image layer, New Adjustment Layer>Color Balance>General and pick Screen from the drop down boxes.
And ya get this:
Right click the Screen layer and using the same method for the Screen, set a Soft Light layer.
And ya get zis:
Now, go to Color Balance and this time, mess around with the Adjustment tabs. There's different ways you can set the adjustment tabs to get the coloring you want, varying of course, on the type of picture you're using and what it's color theme is. For this icon, I set the Yellow Midtones to -39, Red Midtones to 61, raised the Yellow Highlights to -27, set the Cyan Highlights for -6, then (this is where you start to get that coloring), set the Blue Shadows for 13, and the Cyan Shadows for -100.
Voila:
This trick with getting that deep kind of blue/green coloring that pops out at you is - in my experience - going to Shadows in Color Balance>Adjustment and jamming the Cyan tab all the way to the edge. That doesn't work ALL the time, mind you, but it's a large part of how you get that coloring. If you're going for a dusky kind of blue or red coloring, the same goes for the Red or Blue tab. Remember, all the colors work together, and the outcome of the icon when using this coloring method depends a lot on the color type in the image you're using.
Hope that helps! :)