Water Droplet Tutorial in PS7
Well, I'm not sure if there's already a tutorial for this, and if there is, please let me know. While this is not an icon tutorial per se, it's a tutorial for an effect that can be used in icons.
I'm using PS7
This is what we're creating:
It looks like a water droplet, yes? I saw a picture of dew and figured out how to get the droplet look on my own. Here we go!
1: To give a basic idea of how to do it, we'll just use simple colours, grays and whites (though it is really rather limitless what you can do). I began with a 100x100 base and filled it with #D2D1D1.
2: I then used my elipses tool to draw a circle on a new layer in white (any colour is fine, you'll be changing it later.) {TIP: Hold down the shift key as you draw the circle so the dimensions are even} I used a rather large size, but at the end we'll make it smaller and it will look better.
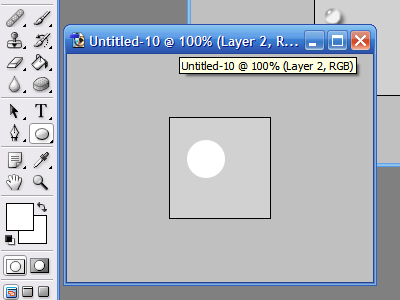
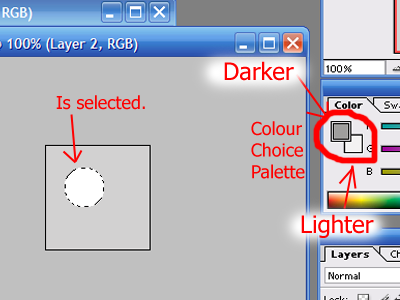
3: Next, use your magic wand tool to select the cirle. Now, only the circle should be highlighted. Over in the colour choice pallette (which is not the name for it, I'm sure, but...) I change my colours like so: In the upper colour choice box, make sure the colour is DARKER than the background {in this case a darker gray and I used #9F9E9D} and in the lower colour choice box, make it a LIGHTER colour than the background {in this case, a lighter gray #F3F2F2}.
4: Using the gradient tool, fill in your circle. The angle and amount of each colour in the circle is up to you, just make sure that the colours are dark in the upper part and light in the lower part.
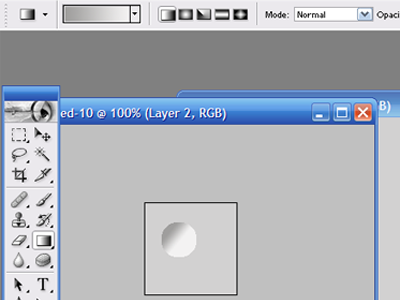
5: With a size 4 brush (or any size, depending on how large your circle is) paint a little light glare on the darkest part of the bubble. Then fade it to about 85% or to your taste.

6: You may notice (once again, depending on the size of your circle, that the edges are kinda rough.) Blur to your tastes.

We're getting close to the end!!
7: At the bottom of the layer pallette, click the small "F" button and slect "Drop Shadow" from the popup menu. Have the settings match mine.
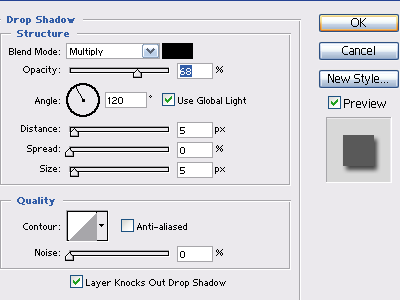
Yay!! A shadow!

The edges between the drop and the shadow are still a tad rough, so again, blur.

Last but not least, I resized it to my needs. (EDIT-->FREE TRANSFORM) {TIP: Hold down the shift key to keep proprtions} And here's the result!
I hope this was helpful. Here are some colour variations.


PS: I'm going out of town and won't be able to answer ?s and comments after Wednesday. Just wanted you to know I'm not ignoring you ^^. Thanks!
I'm using PS7
This is what we're creating:

It looks like a water droplet, yes? I saw a picture of dew and figured out how to get the droplet look on my own. Here we go!
1: To give a basic idea of how to do it, we'll just use simple colours, grays and whites (though it is really rather limitless what you can do). I began with a 100x100 base and filled it with #D2D1D1.
2: I then used my elipses tool to draw a circle on a new layer in white (any colour is fine, you'll be changing it later.) {TIP: Hold down the shift key as you draw the circle so the dimensions are even} I used a rather large size, but at the end we'll make it smaller and it will look better.

3: Next, use your magic wand tool to select the cirle. Now, only the circle should be highlighted. Over in the colour choice pallette (which is not the name for it, I'm sure, but...) I change my colours like so: In the upper colour choice box, make sure the colour is DARKER than the background {in this case a darker gray and I used #9F9E9D} and in the lower colour choice box, make it a LIGHTER colour than the background {in this case, a lighter gray #F3F2F2}.

4: Using the gradient tool, fill in your circle. The angle and amount of each colour in the circle is up to you, just make sure that the colours are dark in the upper part and light in the lower part.

5: With a size 4 brush (or any size, depending on how large your circle is) paint a little light glare on the darkest part of the bubble. Then fade it to about 85% or to your taste.

6: You may notice (once again, depending on the size of your circle, that the edges are kinda rough.) Blur to your tastes.

We're getting close to the end!!
7: At the bottom of the layer pallette, click the small "F" button and slect "Drop Shadow" from the popup menu. Have the settings match mine.

Yay!! A shadow!

The edges between the drop and the shadow are still a tad rough, so again, blur.

Last but not least, I resized it to my needs. (EDIT-->FREE TRANSFORM) {TIP: Hold down the shift key to keep proprtions} And here's the result!

I hope this was helpful. Here are some colour variations.


PS: I'm going out of town and won't be able to answer ?s and comments after Wednesday. Just wanted you to know I'm not ignoring you ^^. Thanks!