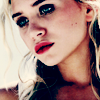
requested tutorial
easy translated. I'm using PSCS2. no curves.
requested by:
audiokill
make this:
1. Duplicate your base, set to screen, if your image is REALLY dark/light, you might wanna check back to
this layer at the end and duplicate/delete(or change the opacity) this
2. darkblue exclusion layer (almost black)
3. light blue colorburn layer
4. light pink soft light layer
5. light yellow colorburn layer (may wanna adjust the opacity if you want the icon more pink-ish)
6. tan multiply layer
7. duplicate base, drag -> top and set it to soft light, change the opacity to your liking.
you're done!
btw. the reason why I don't put (for example) #b77a8f is that I don't want you to copy totally, to make it your own
icon! =) enjoy the tutorial.
if your image is quite green, make a selective colors adjustment layer as step 2 (but still follow everything).
make it quite red-ish. and work with the reds & neutrals :)
other icons used by this or similar tutorial


requested by:

audiokill
make this:

1. Duplicate your base, set to screen, if your image is REALLY dark/light, you might wanna check back to
this layer at the end and duplicate/delete(or change the opacity) this
2. darkblue exclusion layer (almost black)
3. light blue colorburn layer
4. light pink soft light layer
5. light yellow colorburn layer (may wanna adjust the opacity if you want the icon more pink-ish)
6. tan multiply layer
7. duplicate base, drag -> top and set it to soft light, change the opacity to your liking.
you're done!
btw. the reason why I don't put (for example) #b77a8f is that I don't want you to copy totally, to make it your own
icon! =) enjoy the tutorial.
if your image is quite green, make a selective colors adjustment layer as step 2 (but still follow everything).
make it quite red-ish. and work with the reds & neutrals :)
other icons used by this or similar tutorial


