(no subject)
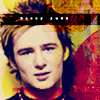
Alrighty, my first tutorial ever. At least, on here. We'll be making the icon show below. Yay.
It won't be exact due to the fact I made the icon quite some time ago and only recently wrote the tutorial. But it'll be similar. Made in PSPX, but most likely can be used in other programs.
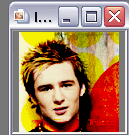
It doesn't matter what picture you use, but I'd suggest one where the person or whatever main object you use is a tad off-centered like in the original. I choose the picture of Harry Judd below.

Crop it down to 100x100.

Duplicate the base twice. Set the first to screen, and the second to soft light.
Make a new raster layer and flood fill with the color #0a1134. Set that layer to exclusion.
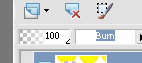
Create a new layer. Fill with #c4e5ec. Set that layer to burn.
Go down to your soft light layer. Duplicate that and drag it on top of your last layer.
Create another new layer. Fill with #c0c0c0. Set to burn and place the opacity around 40.
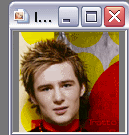
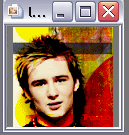
You should have something similar to this: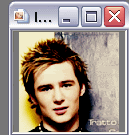
.
Okay, now onto the fun retro layers! Take this

and paste it as a new layer on your image.
Set that layer to burn at 100%.
Now you'll notice that the circles are covering Harry's face! Take the eraser brush and erase them just off of his face, make sure you don't erase anywhere else. You should get something like this: .
Make sure you don't erase his hair like I did in the picture, that was a mistake, heh.
Next you want to take this:
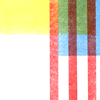
and paste it as a new layer on your image. Set that layer to soft light at 100% and erase just his face again.
that is what it should look like. Or somewhat similiar.
Now take

and paste as a new layer, set it to multiply at 100%. Again, erase parts covering his face.
We're almost done! Take this:

and paste it as a new layer. Set it to multiply at 100%. Now, use the move tool and drag this layer up so the black line is a bit away from the top, like this:
.
Yay! So now, merge all the layers together. It's time to put some writing on it! Make your foreground and background color white. I used Arial at 2pt. with 2.000 Leading and 13 Kerning.


. (I don't know where that is located in anything besides PSP X.)
Alright, so with those settings I wrote Harry Judd and then placed it on the little black line.
Merge all layers, and then you can add brushes are whatever you would like.
My finished product: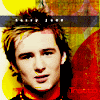
Original:
If you'd like the blue-ish tint on your image, add a new layer, filled it with #0a1134 and put it at exclusion after you do everything else!
If you know who exactly retro layer thingies I used, I'd love to know because I really have no idea! Hope you guys liked it, and I'd love to see what you made.
It won't be exact due to the fact I made the icon quite some time ago and only recently wrote the tutorial. But it'll be similar. Made in PSPX, but most likely can be used in other programs.
It doesn't matter what picture you use, but I'd suggest one where the person or whatever main object you use is a tad off-centered like in the original. I choose the picture of Harry Judd below.
Crop it down to 100x100.
Duplicate the base twice. Set the first to screen, and the second to soft light.
Make a new raster layer and flood fill with the color #0a1134. Set that layer to exclusion.
Create a new layer. Fill with #c4e5ec. Set that layer to burn.
Go down to your soft light layer. Duplicate that and drag it on top of your last layer.
Create another new layer. Fill with #c0c0c0. Set to burn and place the opacity around 40.
You should have something similar to this:
.
Okay, now onto the fun retro layers! Take this
and paste it as a new layer on your image.
Set that layer to burn at 100%.
Now you'll notice that the circles are covering Harry's face! Take the eraser brush and erase them just off of his face, make sure you don't erase anywhere else. You should get something like this: .
Make sure you don't erase his hair like I did in the picture, that was a mistake, heh.
Next you want to take this:
and paste it as a new layer on your image. Set that layer to soft light at 100% and erase just his face again.
that is what it should look like. Or somewhat similiar.
Now take
and paste as a new layer, set it to multiply at 100%. Again, erase parts covering his face.
We're almost done! Take this:
and paste it as a new layer. Set it to multiply at 100%. Now, use the move tool and drag this layer up so the black line is a bit away from the top, like this:
.
Yay! So now, merge all the layers together. It's time to put some writing on it! Make your foreground and background color white. I used Arial at 2pt. with 2.000 Leading and 13 Kerning.
. (I don't know where that is located in anything besides PSP X.)
Alright, so with those settings I wrote Harry Judd and then placed it on the little black line.
Merge all layers, and then you can add brushes are whatever you would like.
My finished product:
Original:
If you'd like the blue-ish tint on your image, add a new layer, filled it with #0a1134 and put it at exclusion after you do everything else!
If you know who exactly retro layer thingies I used, I'd love to know because I really have no idea! Hope you guys liked it, and I'd love to see what you made.