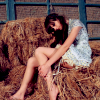
tutorial by runxway #1
this: 
to this:
Made using PSP8, can easily be done with other programs.
take your picture and crop & resize it to 100x100

add a new raster layer & flood fill it with #EEE2F8 set to burn 100% opacity

add another new raster layer & flood fill it with #CED0F6 set to burn 100% opacity

add another new raster layer & flood fill it with #5F8544 set to soft light 24% opacity

add one last new raster layer and flood fill it with #0A0C30 set to burn 10% opacity

& then you are done! Notice how that yucky green tint it started out with is gone!?

As with any tutorial, you will have to play around with the opacity levels to get it just right. It all depends on your starting picture. For example, these two icons below were made using the same steps, however I duplicated my base and set it to screen at about 30% opacity because it was too dark...and for one of them I eliminated the 4th dark blue burn step all together!


tutorial #1 by runxway @ splurged
to this:
Made using PSP8, can easily be done with other programs.
take your picture and crop & resize it to 100x100
add a new raster layer & flood fill it with #EEE2F8 set to burn 100% opacity
add another new raster layer & flood fill it with #CED0F6 set to burn 100% opacity
add another new raster layer & flood fill it with #5F8544 set to soft light 24% opacity
add one last new raster layer and flood fill it with #0A0C30 set to burn 10% opacity
& then you are done! Notice how that yucky green tint it started out with is gone!?
As with any tutorial, you will have to play around with the opacity levels to get it just right. It all depends on your starting picture. For example, these two icons below were made using the same steps, however I duplicated my base and set it to screen at about 30% opacity because it was too dark...and for one of them I eliminated the 4th dark blue burn step all together!
tutorial #1 by runxway @ splurged