Tutorial 008 and 009: The Black Donnellys
go from 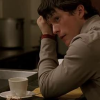
to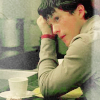
Made on PS CS with selective colouring, colour layers, and hue/ saturation. is not translatable.
1] Crop, sharpen, and do whatever steps you usually take to prep your base icon.
2] Duplicate your base and set to screen at 100%. You may need to play around with this depending on how dark the picture or cap it.
3] Create a new layer and flood fill with #F3E5C7. Set to soft light at 100%.
4] Create a Selective Colouring layer and set to the following:
RED
c: -52
m: 45
y: -66
b: 15
YELLOW
c: 39
m: -43
y: 10
b: -17
NEUTRALS
c: 17
m: -3
y: -3
b: -8
5] Create a new layer and flood fill with #B5CDBD. Set to Colour Burn at 100%.
6] Create another Selective Colouring layer and set to the following:
RED
c: -64
m: -28
y: -30
b: 8
YELLOW
c: 13
m: -24
y: 29
b: 26
GREEN
c: -39
m: -14
y: 25
b: 25
WHITE
c: -4
m: -19
y: 12
b: -26
NEUTRALS
c: -6
m: 9
y: -2
b: -12
BLACK
c: 7
m: 8
y: -16
b: 20
7] Create a Hue/ Saturation layer and set to the following:
MASTER
hue: 11
saturation: 22
lightness: 3
YELLOW
hue: -4
saturation: -12
lightness: 20
GREEN
hue: 0
saturation: 8
lightness: 0
BLUE
hue: 0
saturation: 13
lightness: 0
8] Create a new layer and flood fill with #FACF89. Set to Multiply at 21%.
9] Add your brushes, text, etc., merge and you're done.
go from
to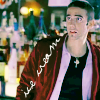
Made on PS CS with selective colouring, colour layers, hue/ saturation, levels, and curves. is not translatable.
1] Crop, sharpen, and do whatever steps you usually take to prep your base icon.
2] Duplicate your base twice. Set the first duplicate to screen at 69% (again this depends on how dark your cap or picture maybe. Set the second duplicate to soft light at 75%.
3] Create a Curves layer and set to the following:
RBG
input: 83
output: 115
4] Create a new layer and flood fill with #CAE0E5. Set to Colour Burn at 100%.
5] Bring the soft light duplicate from step two to the top.
6] Create a new layer and flood fill with #F8EBC0. Set to Soft Light at 100%.
7] Create a Hue/ Saturation layer and set to the following:
MASTER
hue: 0
saturation: 12
lightness: 0
8] Create a Selective Colouring layer and set to the following:
RED
c: -8
m: -28
y: 20
b: 99
YELLOW
c: 39
m: 15
y: -33
b: 47
GREEN
c: 70
m: -20
y: -65
b: 51
WHITE
c: -40
m: 25
y: -24
b: 49
NEUTRALS
c: 62
m: 44
y: 28
b: -16
9] Create a Levels layer and set to the following:
RGB
input levels: 0, 1.10, 255
output:0, 255
RED
input levels: 0, 1.13, 255
output:0, 255
GREEN
input levels: 0, 1.00, 229
output:0, 245
BLUE
input levels: 0, 1.13, 255
output:0, 255
9] Create another Selective Colouring layer and set to the following:
RED
c: -38
m: -46
y: 26
b: 11
GREEN
c: 7
m: 32
y: 20
b: 31
CYAN
c: 35
m: -51
y: -45
b: 19
WHITE
c: -15
m: 13
y: 7
b: -16
NEUTRALS
c: 20
m: 18
y: -1
b: -16
BLACK
c: 18
m: -21
y: 17
b: 19
9] Add your brushes, text, all that good stuff and merge all your layers.

to

Made on PS CS with selective colouring, colour layers, and hue/ saturation. is not translatable.
1] Crop, sharpen, and do whatever steps you usually take to prep your base icon.
2] Duplicate your base and set to screen at 100%. You may need to play around with this depending on how dark the picture or cap it.
3] Create a new layer and flood fill with #F3E5C7. Set to soft light at 100%.
4] Create a Selective Colouring layer and set to the following:
RED
c: -52
m: 45
y: -66
b: 15
YELLOW
c: 39
m: -43
y: 10
b: -17
NEUTRALS
c: 17
m: -3
y: -3
b: -8
5] Create a new layer and flood fill with #B5CDBD. Set to Colour Burn at 100%.
6] Create another Selective Colouring layer and set to the following:
RED
c: -64
m: -28
y: -30
b: 8
YELLOW
c: 13
m: -24
y: 29
b: 26
GREEN
c: -39
m: -14
y: 25
b: 25
WHITE
c: -4
m: -19
y: 12
b: -26
NEUTRALS
c: -6
m: 9
y: -2
b: -12
BLACK
c: 7
m: 8
y: -16
b: 20
7] Create a Hue/ Saturation layer and set to the following:
MASTER
hue: 11
saturation: 22
lightness: 3
YELLOW
hue: -4
saturation: -12
lightness: 20
GREEN
hue: 0
saturation: 8
lightness: 0
BLUE
hue: 0
saturation: 13
lightness: 0
8] Create a new layer and flood fill with #FACF89. Set to Multiply at 21%.
9] Add your brushes, text, etc., merge and you're done.
go from

to

Made on PS CS with selective colouring, colour layers, hue/ saturation, levels, and curves. is not translatable.
1] Crop, sharpen, and do whatever steps you usually take to prep your base icon.
2] Duplicate your base twice. Set the first duplicate to screen at 69% (again this depends on how dark your cap or picture maybe. Set the second duplicate to soft light at 75%.
3] Create a Curves layer and set to the following:
RBG
input: 83
output: 115
4] Create a new layer and flood fill with #CAE0E5. Set to Colour Burn at 100%.
5] Bring the soft light duplicate from step two to the top.
6] Create a new layer and flood fill with #F8EBC0. Set to Soft Light at 100%.
7] Create a Hue/ Saturation layer and set to the following:
MASTER
hue: 0
saturation: 12
lightness: 0
8] Create a Selective Colouring layer and set to the following:
RED
c: -8
m: -28
y: 20
b: 99
YELLOW
c: 39
m: 15
y: -33
b: 47
GREEN
c: 70
m: -20
y: -65
b: 51
WHITE
c: -40
m: 25
y: -24
b: 49
NEUTRALS
c: 62
m: 44
y: 28
b: -16
9] Create a Levels layer and set to the following:
RGB
input levels: 0, 1.10, 255
output:0, 255
RED
input levels: 0, 1.13, 255
output:0, 255
GREEN
input levels: 0, 1.00, 229
output:0, 245
BLUE
input levels: 0, 1.13, 255
output:0, 255
9] Create another Selective Colouring layer and set to the following:
RED
c: -38
m: -46
y: 26
b: 11
GREEN
c: 7
m: 32
y: 20
b: 31
CYAN
c: 35
m: -51
y: -45
b: 19
WHITE
c: -15
m: 13
y: 7
b: -16
NEUTRALS
c: 20
m: 18
y: -1
b: -16
BLACK
c: 18
m: -21
y: 17
b: 19
9] Add your brushes, text, all that good stuff and merge all your layers.