(no subject)
Tutorial for PHOTOSHOP users I hope it will be understandable for you.
We'll be going from
to
1. We start with this base:
2. Duplicate the background layer and set it to screen at 100% opacity
RESULT:
3. Create new adjustment layer->selective color
REDS: -100,+100,+100,+100
YELLOWS: -100,-30,+100,+55
NEUTRALS: +28,+14,-16,-20
BLACKS: 0,0,0,+100
RESULT:
4. New adjustment layer->selective color
REDS: -100,+100,+100,-10
YELLOWS: -100,+25,+100,0
NEUTRALS: +23,-5,+22,-8
RESULT:
5. Paste this texture: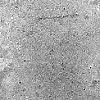
on your icon and set it to multiply opacity 50%
RESULT: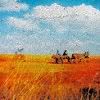
6. Go to Layer->Flatten image
7. Now you have only one layer. Duplicate it. Create new adjustment layer->Gradient Map and choose gradient on black and white. PREVIEW
RESULT: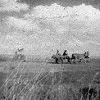
(If you use gradient map like I show you here instead of desaturate picture it will look much better)
8. Click on the Gradient Map Layer with right mouse button and select Merge down from the menu PREVIEW
9. Now using ellipse tool make a circle in important place of your icon. While creating a circle make sure your settings are like THIS
RESULT: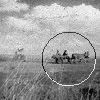
10. Go to Paths and Load path as a selection PREVIEW
11. Get back to your layers and with your circle as a selection click on Add layer mask on your black and white layer.
RESULT:
12. You can finish now or add some text or brushes, I've added just a simple text. I used a font Royfont
RESULT:
OTHER ICONS MADE WITH THIS TUTORIAL:


We'll be going from

to

1. We start with this base:

2. Duplicate the background layer and set it to screen at 100% opacity
RESULT:

3. Create new adjustment layer->selective color
REDS: -100,+100,+100,+100
YELLOWS: -100,-30,+100,+55
NEUTRALS: +28,+14,-16,-20
BLACKS: 0,0,0,+100
RESULT:

4. New adjustment layer->selective color
REDS: -100,+100,+100,-10
YELLOWS: -100,+25,+100,0
NEUTRALS: +23,-5,+22,-8
RESULT:

5. Paste this texture:

on your icon and set it to multiply opacity 50%
RESULT:

6. Go to Layer->Flatten image
7. Now you have only one layer. Duplicate it. Create new adjustment layer->Gradient Map and choose gradient on black and white. PREVIEW
RESULT:

(If you use gradient map like I show you here instead of desaturate picture it will look much better)
8. Click on the Gradient Map Layer with right mouse button and select Merge down from the menu PREVIEW
9. Now using ellipse tool make a circle in important place of your icon. While creating a circle make sure your settings are like THIS
RESULT:

10. Go to Paths and Load path as a selection PREVIEW
11. Get back to your layers and with your circle as a selection click on Add layer mask on your black and white layer.
RESULT:

12. You can finish now or add some text or brushes, I've added just a simple text. I used a font Royfont
RESULT:

OTHER ICONS MADE WITH THIS TUTORIAL:


