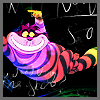
Cheshire Cat Tutorial
Well, when I tried posting this whallago, it messed up, so here I go again.

to
Made in PS CS3, but it should be translatable (no selective coloring)
Level: Intermediate: NOT BEGINNER FRIENDLY.
Works best with dark cartoon pictures
1.) Crop your base. Do any adjustments you need (screen, darken, sharpen, etc.)

2.) Layers // New Adjustment Layer // Brightness/Contrast
Brightness: +8
Contrast: +67

3.) Now for the tricky part. Duplicate your base and bring it to the top.
Image>Adjustments>Photo Filter
From the Drop-Down menu, choose Sepia.
Density: 100%
If this shows up a little bit opaque (see through), duplicate your layer as many times as needed to make it solid.
(sorry, no picture)
4.) NOW! on the sepia layer, take a rather small grungy brush as your eraser. Erase where you don't want the sepia. I didn't want it on the Cat's face, so that's the only place I erased it. MAKE SURE YOU DON'T DRAG THE ERASER AROUND! Just click one time, then another, then do that however much you need to.. Confusing? Sorry..

5.) New Adjustment Layer // Brightness/Contrast
Brightness: +8
Contrast: +100

6.) New Fill Layer: # a0e4f0 on Color Burn, 100%

7.) Make a new layer, and with a soft brush, make random strokes with different colors. Be sure to fill in the entire layer. Set that to Color Dodge, 100% (If it looks weird with Color Dodge, try Soft Light, using the dodge tool to soften the colors a bit) If you wanted, you could blur it a little, but I chose not to. Erase from the face. (hehe, that rhymed!)

8.) Now, add this texture (by ?), set to screen. Move it around until you get what you want.

9.) Add any other text or effects you want. I added a border.


Comments and Criticism are wanted! If you have any questions, just let me know!
I love to see what you make!
to
Made in PS CS3, but it should be translatable (no selective coloring)
Level: Intermediate: NOT BEGINNER FRIENDLY.
Works best with dark cartoon pictures
1.) Crop your base. Do any adjustments you need (screen, darken, sharpen, etc.)
2.) Layers // New Adjustment Layer // Brightness/Contrast
Brightness: +8
Contrast: +67
3.) Now for the tricky part. Duplicate your base and bring it to the top.
Image>Adjustments>Photo Filter
From the Drop-Down menu, choose Sepia.
Density: 100%
If this shows up a little bit opaque (see through), duplicate your layer as many times as needed to make it solid.
(sorry, no picture)
4.) NOW! on the sepia layer, take a rather small grungy brush as your eraser. Erase where you don't want the sepia. I didn't want it on the Cat's face, so that's the only place I erased it. MAKE SURE YOU DON'T DRAG THE ERASER AROUND! Just click one time, then another, then do that however much you need to.. Confusing? Sorry..
5.) New Adjustment Layer // Brightness/Contrast
Brightness: +8
Contrast: +100
6.) New Fill Layer: # a0e4f0 on Color Burn, 100%
7.) Make a new layer, and with a soft brush, make random strokes with different colors. Be sure to fill in the entire layer. Set that to Color Dodge, 100% (If it looks weird with Color Dodge, try Soft Light, using the dodge tool to soften the colors a bit) If you wanted, you could blur it a little, but I chose not to. Erase from the face. (hehe, that rhymed!)
8.) Now, add this texture (by ?), set to screen. Move it around until you get what you want.
9.) Add any other text or effects you want. I added a border.


Comments and Criticism are wanted! If you have any questions, just let me know!
I love to see what you make!