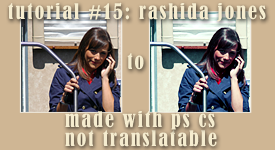
tutorial #15: rashida jones

Five steps total involving selective colouring, levels, and colour balance.
1] Prep your base however you usually would.
2] Create a new layer and flood fill it with #F8F8DE. Set to Soft Light @ 100%.
3] Create a Selective Colouring Layer. Set to the following:
REDS: 17, 40, -29, 42
YELLOWS: 36, 35, -52, 38
NEUTRALS: 3, -9, -6, 16
4] Create a Levels Layer. Set to the following:
RBG
input: 0, 0.75, 255
output: 0, 236
RED
input: 0, 0.88, 230
output: 0, 255
Green
input: 10, 0.87, 255
output: 0, 255
BLUE
input: 0, 0.96, 255
output: 0, 243
5] Create a Color Balance Layer. Set to the following:
SHADOWS: 19, 10, 16
MIDTONES: -28, 6, 31
HIGHLIGHTS: -3, 10, -1
make sure the preserve luminosity is checked.
6] Merge and add any text or brushes you want. Wicked simple right?
::other icons made with this::


and for those who want it here is the psd.
More of my tutorials (along with those by others) can be found here @ stealingsecondx