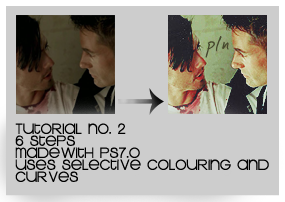
Heroes colouring tutorial
My first tutorial post to this community, I hope you find it useful.
.psd included.

Step 1. Crop, resize and sharpen your base.

Step 2. Duplicate once and set to Screen (Change the amount/opacity of Screen layers depending on your image).

Step 3. Make a new Curves Adjustment Layer with these settings:
RGB:
Point 1 - I-58 O-60
Point 2 - I-105 O-41
Red:
Point 1 - I-44 O-57
Point 2 - I-122 O-138
Green:
Point 1 - I-61 O-75
Point 2 - I-109 O-136
Blue:
Point 1 - I-31 O-44
Point 2 - I-126 O-141
Change the Opacity to 73%.

Step 4. Now make a Selective Colour Layer with these settings:
R: -100, 0, +100, +100
Y: +5, +9, +100, +22

Step 5. Make a new layer and flood fill it with #54BCF7. Set the layer to Soft Light 54%

Step 6. Because I like it I add a little bit of text and this texture (I think it's by gender) on Lighten 100%

Other Examples:


Layers can be found here.
Download .psd here
Show me what you get!
+ Screencaps from stripedwall.com
.psd included.
Step 1. Crop, resize and sharpen your base.
Step 2. Duplicate once and set to Screen (Change the amount/opacity of Screen layers depending on your image).
Step 3. Make a new Curves Adjustment Layer with these settings:
RGB:
Point 1 - I-58 O-60
Point 2 - I-105 O-41
Red:
Point 1 - I-44 O-57
Point 2 - I-122 O-138
Green:
Point 1 - I-61 O-75
Point 2 - I-109 O-136
Blue:
Point 1 - I-31 O-44
Point 2 - I-126 O-141
Change the Opacity to 73%.
Step 4. Now make a Selective Colour Layer with these settings:
R: -100, 0, +100, +100
Y: +5, +9, +100, +22
Step 5. Make a new layer and flood fill it with #54BCF7. Set the layer to Soft Light 54%
Step 6. Because I like it I add a little bit of text and this texture (I think it's by gender) on Lighten 100%
Other Examples:
Layers can be found here.
Download .psd here
Show me what you get!
+ Screencaps from stripedwall.com