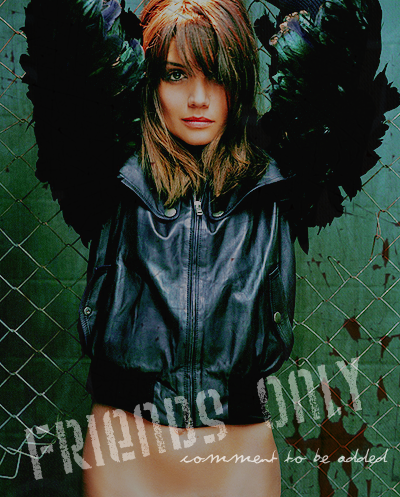
"Friends Only" Banner
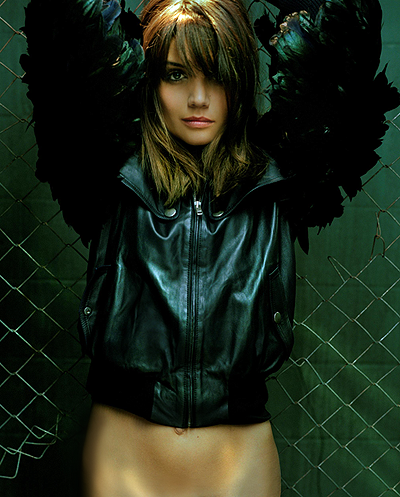
We're going from this to this
Made in Adobe Photoshop 7.0 -- Not translatable, sorry.
Involves: Selective Color, Curves, Hue/Saturation
Use any image you want, and feel free to adjust/add/delete any steps in this tutorial to your liking.
Remember, the goal is to create something similar to mine rather than an exact copy. =)
Ok, I started with this:

Crop your image, sharpen, etc.
Now that your base is ready, onto the tutorial!
First, duplicate your base and set to screen, at 100% opacity.
Second, add a new Selective Color layer.
Reds: -100 +10 +10 +10
Yellows: -20 +10 -20 +10
Greens: +100 +50 +60 -30
Cyans: -40 +20 -40 -20
Whites: -50 -50 -50 -50
Neutrals: +5 +10 -5 -10
Blacks: +20 +5 +5 -10
Then, add a new Curves layer.
Input: 68
Output: 93
Now add a Color Balance layer (make sure "Preserve Luminosity" is checked!)
Midtones: +7 +2 +12
Shadows: +24 +3 -3
Highlights: +4 -7 -6
Then, add a Hue/Saturation layer.
Master: 0 +10 +5
Reds: 0 +10 -5
Yellows: 0 +20 0
Greens: 0 +20 0
Cyans: 0 +40 0
Blues: 0 +40 -40
Add this texture by Mayang's Free Textures; set the layer to soft light at 100% opacity. Erase the portion covering Katie's face and body.
Then add this texture (also by Mayang's Free Textures); set the layer to Multiply at 100% opacity.
(I took the Smudge tool and smudged the area over Katie's face and stomach so that the grainy texture covering her skin smoothed out and disappeared; this step is optional.)
Add a new Text layer ("Friends Only"). I used the Weltron Urban font in 18pt, in white, and set the layer to 45% opacity.
Then add another Text layer ("comment to be added"). I used the Violation font in 4.5pt, in white, and set the layer to 70% opacity.
And voila!

You're finished. =)
Made in Adobe Photoshop 7.0 -- Not translatable, sorry.
Involves: Selective Color, Curves, Hue/Saturation
Use any image you want, and feel free to adjust/add/delete any steps in this tutorial to your liking.
Remember, the goal is to create something similar to mine rather than an exact copy. =)
Ok, I started with this:

Crop your image, sharpen, etc.
Now that your base is ready, onto the tutorial!
First, duplicate your base and set to screen, at 100% opacity.
Second, add a new Selective Color layer.
Reds: -100 +10 +10 +10
Yellows: -20 +10 -20 +10
Greens: +100 +50 +60 -30
Cyans: -40 +20 -40 -20
Whites: -50 -50 -50 -50
Neutrals: +5 +10 -5 -10
Blacks: +20 +5 +5 -10
Then, add a new Curves layer.
Input: 68
Output: 93
Now add a Color Balance layer (make sure "Preserve Luminosity" is checked!)
Midtones: +7 +2 +12
Shadows: +24 +3 -3
Highlights: +4 -7 -6
Then, add a Hue/Saturation layer.
Master: 0 +10 +5
Reds: 0 +10 -5
Yellows: 0 +20 0
Greens: 0 +20 0
Cyans: 0 +40 0
Blues: 0 +40 -40
Add this texture by Mayang's Free Textures; set the layer to soft light at 100% opacity. Erase the portion covering Katie's face and body.
Then add this texture (also by Mayang's Free Textures); set the layer to Multiply at 100% opacity.
(I took the Smudge tool and smudged the area over Katie's face and stomach so that the grainy texture covering her skin smoothed out and disappeared; this step is optional.)
Add a new Text layer ("Friends Only"). I used the Weltron Urban font in 18pt, in white, and set the layer to 45% opacity.
Then add another Text layer ("comment to be added"). I used the Violation font in 4.5pt, in white, and set the layer to 70% opacity.
And voila!

You're finished. =)