Another tutorial.
This is the 2nd last tutorial that is currently requested. This was requested by dreamt_too_late and navi_glow.
Program: Photoshop CS2
Involves: Curves, Selective Color, Color Balance, Levels, Clone Stamping, Channel Mixer, 'Smudging'
Level: Intermediate, depending on the image.
Example-
From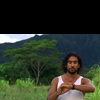
to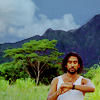
SAYID JARRAH TUTORIAL.
So I started with this picture of Sayid from Lost.
1. I moved my picture down on my canvas to get the cropping I wanted. The black space is actually blank canvas.
2. Duplicate your base layer and set the duplicate to 'Screen'. Set your opacity accordingly, I left mine at 100%.
to
3. Create a new color balance layer (Layer - New adjustment layer - Color balance).
I used the following settings. This layer will increase the blue properties of the image.
Midtones: -45, -39, -23
Shadows: +5, +9, -5
Highlights: -23, -17, -15
to
4. Create a new selective color layer (Layer - New adjustment layer - Selective color). I used the following settings. This will add vibrancy to the colors, adjust accordingly.
Reds: -12, -8, +5, +3
Yellows: -30, -21, +65, +12
Greens: -11, -9, +6, -2
Cyans: +78, +23, +12, 0
Blacks: 0, 0, 0, +8
to
5. Create a new hue/saturation layer (Layer - New adjustment layer - Hue/Saturation).
I set my master saturation to +20, but if that is too much then lower the opacity of the layer.
to
6. Create a new layer and fill it with the color #8c490e change the layer to 'Linear Dodge' and adjust the opacity accordingly. I used 34% but some images may be very orange, if that is the case change the opacity.
to
7. Create a new layer and fill it with the color #362a26 change the layer to 'Exclusion' and adjust the opacity accordingly. I used 95% but if your images loses too much contrast then lower the opacity.
to
8. Duplicate your base image and bring it to the top. Set the layer to 'Soft Light' too add some contrast. I set the layer at 100% opacity but you can lower or increase it according to your picture.
to
9. Create a new levels layer (Layer - New adjustment layer - Levels). I used the following settings. This darkens the blacks in the picture and lightens the grays.
RGB:
Input- 14, 1.09, 255
Output- 0, 255
to
10. Create a new brightness/contrast layer (Layers - New adjustment layer - Brightness/contrast). I used the following settings. I lowered my opacity to 70%, if your image is still to contrasted then lower the opacity accordingly.
Brightness: +3
Contrast: +19
to
11. Create a new color balance layer (Layer - New adjustment layer - Color balance).
I used the following settings. This layer will increase the blue properties of the image.
Midtones: -17, -10, -22
Shadows: +20, -6, +49
Highlights: -5, -3, +23
to
12. This is where it gets difficult. Next hit Ctrl+A to select your entire image, next hit Shift+Ctrl+C to copy your entire image and finally paste it will Ctrl+V. This will be your 'smudging' layer. The technique can be explained here. For the mountains I used the clone stamp tool (soft edged brush) and filled in a basic shape. Next with the smudge tool (also a soft edged brush) I smudged the sky over the mountains to get a basic shape.
to
13. The mountains still do not look 'crisp' enough at the top. I sampled a dark color from the mountain and with a very small brush I drew in an 'outline'. I lowered the opacity so it looked more natural.
to
14. Create a new layer and fill it with a cloud image, for example this one.
Set the cloud layer to 'Darken' and erase all the parts of the image that are not sky. I set the opacity to '80%'. If you find the sky isn't blue enough even at 100% opacity then change the layer to 'Multiply'.
to
15. Create a new selective color layer (Layer - New adjustment layer - Selective color). I used the following settings. This layer will improve the color of the sky and any other cyan aspects of your image. It will also brighten the whites and give them a green hue.
Reds: -5, -3, +6, -3
Cyans: +93, +43, +51, +42
Whites: +13, -5, -12, -13
Neutrals: +2, +1, +3, -5
Blacks: +2, -1, +3, +11
to
16. Create a new layer and fill it with the color #d0cdcd change the layer to 'Color Burn' and adjust the opacity accordingly. I used 26% but if your image is to dark then lower the opacity.
to
17. Last step! Create a new layer and fill it with the color #d0cdcd change the layer to 'Linear Burn' and adjust the opacity accordingly. I used 76% but if your image is to dark then lower the opacity.
to
Any questions/comments? Please post them here.